Mouthpiece Remover
thingiverse
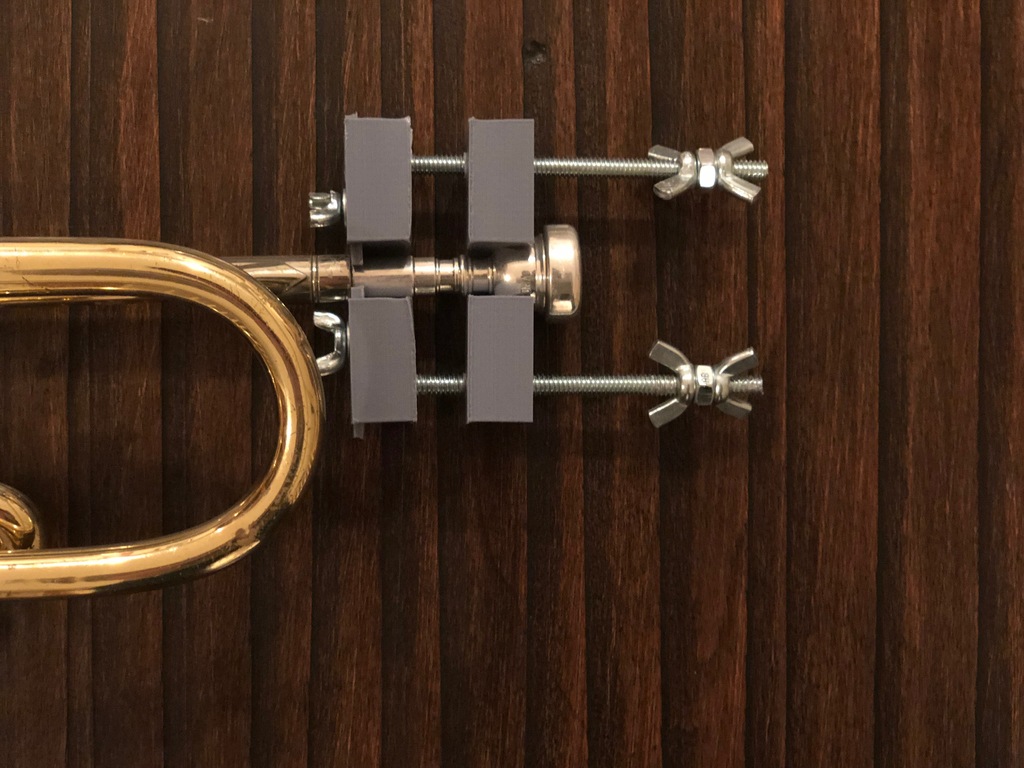
A mouthpiece getting stuck is SOOOO annoying. Unfortunately, they cost $40 on Amazon! In preparation for the marching band season, I decided to make a cheap, 3D printed mouthpiece remover. This was made to work on trumpet mouthpiece, however it should work on most other small mouthpieces like french horn, mellophone, cornet, and fugal. In total this project cost $7 to make and 30 minutes to assemble. Total printing time was 5 hours at .1 mm with the Tevo Tornado. #How to remove a mouthpiece: 1. loosen the crown bolts at the bottom of the mouthpiece remover until the sliders can slide. 2. move the two sliders away from each other to make room form the mouthpiece. 3. turn the bottom wing nut on the threaded rod clockwise (bottom point of view), and alternate this process on both sides until the mouthpiece can be placed in with the sliders above the lip were the mouthpiece connects to the lead pipe. 4. move the sliders inwards to secure the base of the mouthpiece. Tighten the two crown bolts to lock the sliders in places. 5. alternate turning the top two wing nuts clockwise (top point of view) until the mouthpiece pops out. WARNING: They can really pop out quite aggressively, I'm not responsible if any mouthpiece gets dents by falling on the floor. Here's a video of me using it: https://www.youtube.com/watch?v=AeP1htOAiFo #Materials: All the supplies were found at Home Depot. 1/4 in threaded rod 1/4 in - 20 nylon lock nut (2 needed) 1/4 in - 20 nut (2 needed) 1/4 in - 20 wing nuts (4 needed) number 8-32 x 3/8" wing/crown screw (2 needed) number 8 metal washer (2 needed) #Assembly: Print all the parts out (no supports required!) Cut the threaded rod to an appropriate length (mine were 3.75 in long) Insert the threaded rod into both the threaded holes in the top section of the mouthpiece remover to break away any lose plastic/defects in the print. Remove the rod afterwards. At one end of each of the threaded rod, put on a lock nut. They can be twisted on part of the way by hand, but then you need to use a wrench and pliers to twist the nut until the end is flush with the rod. Insert one of the rods with the nut into the bottom of the build. Then, put on that sides slider and hold it in with it's corresponding crown bolt and washer. Insert the rod into the top section of the build. Use the wing nuts and regular nuts to help twist it on (see picture for nut setup) Insert the other rod into the other whole, again put on its wing nuts and nut to twist it in. Put on the other slider and its crown bolt and washer and you're done! I designed this using fusion 360 and by looking at pictures of existing mouthpiece removers. If you enjoyed this project, a tip/like would be very much appreciated!
With this file you will be able to print Mouthpiece Remover with your 3D printer. Click on the button and save the file on your computer to work, edit or customize your design. You can also find more 3D designs for printers on Mouthpiece Remover.