Moving Targets for Airguns
prusaprinters
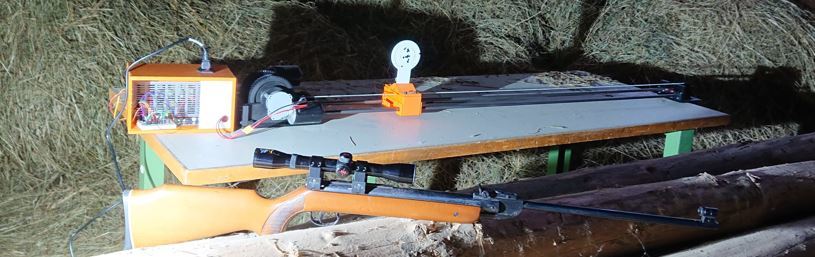
<p>I designed this moving targeds to shoot on with airguns. I use it with 2 targets, moving at the same time. The system can also be reduced to a single target. I programmed it that way, that every time the carriage changes direction it also changes its speed.<br/> All printable parts are available, the rest needs to be bought in a local store. Many screws are directly screwed into the wholes. I used a thread cutter before threading the screws.<br/> The pictures and Stl's from the subassemblies should help with the assembling. If you have question/need something adapted feel free to contact me.</p> <p>There are 3 main assemblies which are connected with 12mm shafts:</p> <ul> <li>Startblock</li> <li>Wagen (carriage)</li> <li><p>Stopblock The Startblock consists of:</p> </li> <li><p>3d printed parts:<br/> 1x ...Boden (floor)<br/> 1x ...Hinten (back)<br/> 1x ...Links (left)<br/> 1x ...Rechts (right)<br/> 1x ...Vorne (front)<br/> 1x StangenhalterVorne (shaft holder front)<br/> 2x Zahnrad1 (big gear)<br/> 2x Zahnrad2 (small gear)<br/> 4x Zahnrad2 Füller (protects the ball bearing, can be left out)<br/> 2x T5 Timing Pulley VLoch (has M3 wholes and slots for M3 nuts)<br/> 4x T5 Timing Pulley Füller (protects the ball bearing, can be left out)<br/> 2x Zahnrad2T5Abstandhalter (spacers between the small gear and the pulley)</p> </li> </ul> <ul> <li>Additionaly you can print my case into which i put all my electronics:<br/> 1x Strombox<br/> 1x StromboxDeckel1<br/> 1x StromboxDeckel2</li> </ul> <ul> <li><p>Mechatronics:<br/> 2x DC motor with drivers (mine are 24V)<br/> 1x Powersupply 24V<br/> 1x Arduino Nano<br/> 1x Powersupply Arduino (I use a voltage reducer from 24V to 9V)<br/> 2x Pushbuttons (mine fit perfecly in the slots of StangenhalterVorne)<br/> 1x 8mm shaft (about 110mm long)<br/> 4x ballbearing (8x22x7)<br/> Many screws and nuts (mostly M5 and M3) The first Wagen consists of:</p> </li> <li><p>3d printed parts:<br/> 1x ...Base<br/> 1x ...T5Klemmer<br/> 2x ...FederHalter with each 1x ...FederDruckplatte (springs are mounted on M3 screws between these two parts)<br/> 1x ...ZielscheibeVerbindung (slidable interface for targets)<br/> 1x Zielscheibe V1 OR V2 (targets, V2 uses a torsion spring)</p> </li> </ul> <ul> <li><p>Mechatronics:<br/> 4x LME12-UU<br/> 4x Spring (I used some out of old pens)<br/> xX Torsion spring (if target V2 is used)<br/> Many screws and nuts (mostly M5 and M3) The second Wagen would consist of:</p> </li> <li><p>3d printed parts:<br/> 1x ...Base<br/> 1x ...T5Klemmer<br/> 1x ...FederHalter with 1x ...FederDruckplatte<br/> 1x ...PushbuttonHalter (same push buttons as the startblock uses)<br/> 1x ...ZielscheibeVerbindung (slidable interface for targets)<br/> 1x Zielscheibe V1 OR V2 (targets, V2 uses a torsion spring)</p> </li> </ul> <ul> <li><p>Mechatronics:<br/> 4x LME12-UU<br/> 2x Spring (I used some out of old pens)<br/> 2x Pushbotton<br/> xX Torsion spring (if target V2 is used)<br/> Many screws and nuts (mostly M5 and M3) The Stopblock consists of:</p> </li> <li><p>3d printed parts:<br/> 1x ...Vorne (base)<br/> 1x ...T5Halter (shaft and pulley holder)<br/> 2x T5 Timing Pulley VOhneLoch<br/> 4x T5 Timing Pulley Füller (protects the ball bearing, can be left out)<br/> 1x StangenhalterHinten (shaft holder back)</p> </li> </ul> <ul> <li><p>Mechatronics:<br/> 1x 8mm shaft (ca 55mm long)<br/> 2x Pushbutton<br/> 2x Ball bearing (8x22x7)<br/> Many screws and nuts (Mostly M3) Additionally you need not to forgett the 12mm shafts and the T5 timing belt (5 or 6mm wide). My shafts are about 1.7m long. It works fine but I would not recommend to go much longer because of the stiffness of the whole system.</p> <p>The T5 timing belt is fixed onto the wagen with the WagenT5Klemmer. Both ends can be placed under this part and be connected with a small reversed T5 timing belt (ca 7cm). With the screws the part can be clamped onto the base and compress the the belts together</p> <p>An .ino file is added to upload onto the arduino. It is programmed for 2 carriages. If you wish a different code, please contact me.</p> <h3>Custom Section</h3> <p class="detail-caption">Moving Target with only one carriage. The velocity is randomized.</p> <p class="detail-video"> <figure class="media"> <oembed url="https://www.youtube.com/embed/GteWEhI2zg0"></oembed> </figure> </p> <p class="detail-caption">Moving Targets with two carriage. The right one is at full speed, the velocity of the left one is randomized.</p></li> </ul> Category: Mechanical Toys
With this file you will be able to print Moving Targets for Airguns with your 3D printer. Click on the button and save the file on your computer to work, edit or customize your design. You can also find more 3D designs for printers on Moving Targets for Airguns.