MPCNC dewalt/laser dual tool mount
thingiverse
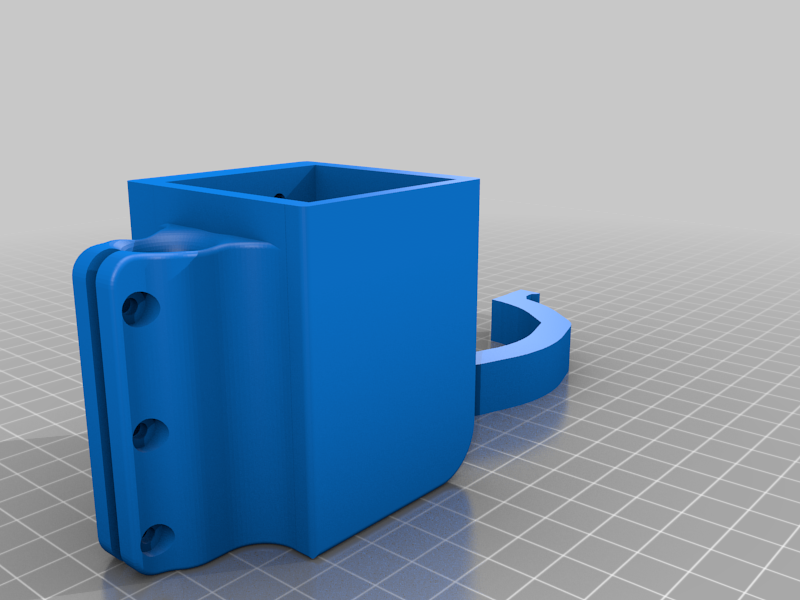
Updates ----------------------- 12/10/2020: the file I added today is a total overhaul of the air assist with a few new features. NOTE: this is not backwards compatable with the other pieces. it no longer has the need for any gaskets, the air is piped in and focused downward into a series of spiraling fins directing it into a swirling vortex! also i left room to adjust the focus manually. more to come soon! stay tuned! 11/30/2020: Apologies if you tried to print either of the last 2 revisions of the main body, this version fixes a number of issues aesthetic and otherwise. The side clamp now allows for a full length barb (don't cut it!), and with the 3 m3 nuts and bolts clamps down tightly on the hose (it actually does i promise, i printed and tested it). I am working on a redesign for the air assist which incorporates a different method of covering/uncovering the lens that should adapt easily to automation down the road. 11/29/2020: Updated the main body with counter-bore styled holes for mounting the laser inside, and widened the clamp on the side as well as updating the way the clamp works. this is to allow some mobility while providing sufficient pressure as to not need a hose clamp. i needed something like [this][1] ..but i have an eleksmaker laser (la03-3500), and i wanted an air-assist and a magnetic lens cover for when the laser isn't in use (sawdust + laser optics = no bueno)... so i designed this! ----------------------- You Will Need ========== * [the orignal burly mount for the dewalt 660][2] and all of it's related hardware * screws for mounting the laser and attaching the air assist > *i believe M3's will work if they are the proper length, I just dug through my screw bin until I had what I needed* * a 1/4" barbed swivel nut: [search amazon][3] > *I added this after several failed attempts to print a barb that wouldn't snap off, I found one kicking around in a junk drawer, i'm sure you could even find a one piece solution* * 2 8x3 neodymium a.k.a. 'rare earth magnets', i got [these][4], > **Note:** > *be aware that the naming convention for these magnets apparently has no bearing on the actual dimensions, as the diameter of these is actually 12mm* * 2 M3x10 or M3x12, with nuts * An air compressor and 1/4" hose. * And [Sugru][5] or any kind of gasket maker really > *JB Weld makes a few, I just used what I hand on hand, but go nuts* Printing =========== All the parts can be printed without supports, as long as they are oriented properly. The main piece needs to be upside-down, the other 2 need to be right-side up. Assembly ================ 1. Super glue the magnets in place > *Make sure to mind the poles! I usually glue the first magnet in while it's still attached to it's mate, then l put glue in the second cavity and press it over the second magnet, once it's dry pull 'em apart et voila!* 2. Cut, or grind down the barb, we need it to be <14mm, make it smooth. 3. The tube on the side of the Air-assist part is meant to have the swivel nut threaded onto it. > *Screw threads bite nicely into 3d-printed holes, so I asked myself: "Why not the other way as well?" After a few prints I had worked out the sizing and bada-bing, the swivel nut threaded over the cylinder.* 4. Slightly overfill the channels on the air-assist and lens cover with the Sugru (or gasket maker) and allow time to set. > **UPDATE:** the gasket should cover everything except the screw holes on the air assist part, as shown in the picture, and for the lens cover, you need to apply the gasket around the magnet as well, or else the magnetic pull will use the gasket like a fulcrum, and your lens cover will not sit flat like it needs to. 5. Slide the laser into the main body, and secure with screws. 6. Cut one end off of the air compressor hose and pass it through the clamps on the side of the main body. 7. Press the cut end of the hose over the barb and maneuver the air-assist into place. 8. Attach the air-assist to the laser using 4 mounting screws 9. Use the M3x10's (or 12's) to tighten the clamps down on the hose 10. Always be sure to remove the lens cover before powering on the laser! [1]: https://www.thingiverse.com/thing:4280980 "Source of initial inspiration" [2]: https://www.thingiverse.com/thing:944952 "The rest of it" [3]: https://www.amazon.com/s?k=1%2F4+barbed+swivel+nut&crid=1PQ1JC9SDMC8W&sprefix=1%2F4+barbed+swive%2Caps%2C167&ref=nb_sb_ss_ts-a-p_1_16 "Search for 1/4 barbed swivel nut on amazon" [4]:https://www.ebay.com/itm/New-8mm-x-3mm-N52-Neodymium-Disc-Strong-Rare-Earth-Small-Fridge-Magnet/323956651449?ssPageName=STRK%3AMEBIDX%3AIT&var=512998171638&_trksid=p2057872.m2749.l2649 [5]: http://www.sugru.com/ "Mouldable glue"
With this file you will be able to print MPCNC dewalt/laser dual tool mount with your 3D printer. Click on the button and save the file on your computer to work, edit or customize your design. You can also find more 3D designs for printers on MPCNC dewalt/laser dual tool mount.