MPMD V1 Bed Probe
thingiverse
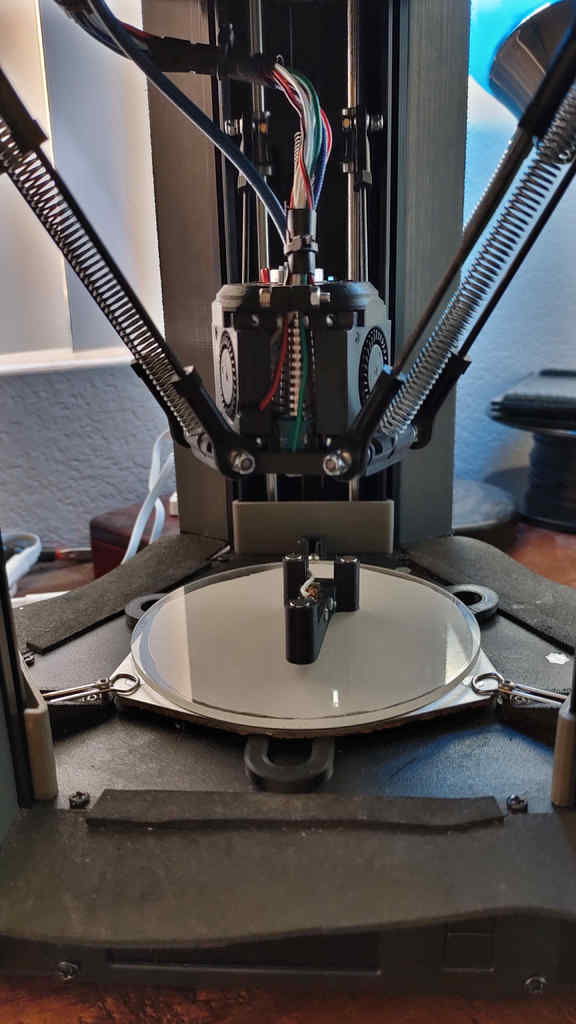
If you have trouble with the installation and would like further explanation or clarification, I can be easily found on the [MP Mini Delta V1 Facebook group](https://www.facebook.com/groups/mpminideltaowners). I check-in there more often. ++++++++++++++++++++++++++++++++++++++++++++++++++++++++++++++++++++ This machine has been my tinker toy for perfection, and this mod got me a little bit closer to that goal. I'll try my best to explain the process to install the necessary components specific to this mod, but I'll be assuming you'll know how to do the rest. If not, I'll try to provide resources for you to read up on. The main resource I will be referencing is the ["Monprice Mini Delta Calibration Roadmap and FAQ"](https://drive.google.com/file/d/1RYnJSEOnuf3h62FwhQ2lCmzbucvMLhy7/view). If you are linked to that document, do a search(Ctrl - F) for the hyperlink's text to find the mentioned section. Page numbers are likely to change as the document is updated and thus are not reliable here. **Warning** === I consider this to be an unnecessary and advanced mod. If you're happy with the results you're getting from your MPMD v1 printer and don't want to possibly break anything without being able to fix it easily: **do NOT install this.** You can get good enough results without having to go through the lengths I went through just to have the flattest bed mesh around. **As it stands, I have printed with this mod on the MPMD v1 printer with modded and stock firmware, specifically [marlin 1.1.x 119r16](https://github.com/aegean-odyssey/mpmd_marlin_1.1.x) by aegean-odyssey and [v44](https://www.mpminidelta.com/firmware/motion_controller) from Monoprice.** Usage on the stock v1 firmware seem to have some quirks that I will try to outline later. I have not tested this on the MPMD v2. _The purpose of this mod is to reduce the amount of deviation generated during calibration and G29 auto-leveling for more precise and accurate results. This is done by placing a micro-switch directly under the nozzle and placing chocks underneath the bed. By using the same switch to probe the surface of a stationary bed, more consistent results should be obtained than if you were to use three different switches through a tilting bed._ - I feel like I should mention that I attempted to make an effector mounted probe before for the stock metal effector, but that required taking the hotend assembly off and installing the button. I figured it'd be a one time calibration which would then go back to using the bed switches with the nozzle to start printing. It wasn't until about a year later did I have my own _Jimmy Neutron Brain Blast™_ after looking at the [Klicky Probe](https://github.com/jlas1/Klicky-Probe) for the Voron CoreXY printers. Now here we are. Images ==== Since Thingiverse does not like any images over 500kBs in size, [here is a google drive link to a folder containing various images and videos of this mod.](https://drive.google.com/drive/folders/1Je_iZMMcCLrp9d4EY8-FLlbKSzjQpXCF?usp=sharing) I'll try to reference back to these photos when it seems applicable. To show that I've some idea on what I'm talking about and have an idea on what I'm doing: [here is a time lapse](https://drive.google.com/file/d/1oh-Rvw-df6cuvquNtbE4lLHHh5VDQt7w/view?usp=sharing) of the printer printing with the mod installed and [here is a short video](https://drive.google.com/file/d/1okmLG6P1uodpbwDl2H8R8ANyxQ6mWf2U/view?usp=sharing) showing the probe doing what it is designed to do.
With this file you will be able to print MPMD V1 Bed Probe with your 3D printer. Click on the button and save the file on your computer to work, edit or customize your design. You can also find more 3D designs for printers on MPMD V1 Bed Probe.