MSB 3D Printer Variant Mark II
thingiverse
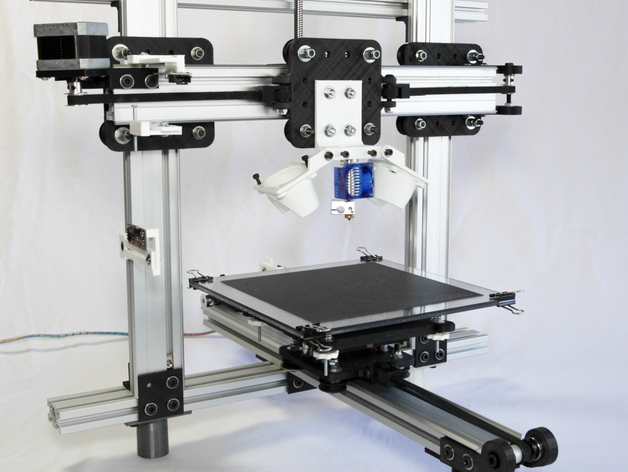
Similar to http://www.thingiverse.com/thing:20249 but improved upon. Update 9/7/14 -- Printer is in operational state after running into issues with CFR PLA on my .4mm E3DV6. Previously parts were printed using a J-Head. Currently resolved by switching to Green PLA and have on order a .6mm nozzle which I hope will help (Mentioned on the CFR PLA page that .5mm worked fine and being there was no .5mm, .6mm was my next best option. Endstops parts are working and files will be posted later. Featured photo shows how they are at the moment. Improvements The use of CFR PLA (Carbon Fiber Reinforced PLA) for rigidity of parts. New motor mounting orientation. Timing pulley used as idler in new idler orientation. Simpler method of installing the belt to the carriage plate. Only the Z-Axis motor needs to be adjusted forward or backwards instead of previously sliding the Z-Axis extrusion bar I've posted pictures and most if not all the STL files used to create this. One of the original issues I had was the carriage plates flexing. The current version uses CFR PLA from Proto-Pasta. Almost all the 3D printed parts were printed with it. You may notice that I have two "Back Feet" parts in Clear and Grey PLA which were from the previous printer. CFR PLA is not cheap filament so the idea is to use it for only parts that require to be rigid like the motor mounts. It's worth pointing out that RIGID does NOT necessarily mean stronger. Parts will snap off much easier when the right amount of force is used with this filament. Pending Items -- Endstops on the XYZ Axis with the Z-Axis having the ability to fine-tune height. Some sort of BOM list (A lot of parts were from previous projects). Thanks for reading. More information/details to come... Credit Where Credit is Due -- New motor orientation inspired by http://cinemaker.us/2013/01/toward-cinemaker-2-0-not-on-but-through/ Quantum ORD Bot by bdring (http://www.thingiverse.com/thing:16216) For making it easier to use this 3D printer setup, Azteeg X5 Mini (http://www.panucatt.com) CFR PLA Filament (http://www.proto-pasta.com) Carriage Plate origins: http://www.thingiverse.com/thing:12504 also referenced http://www.openbuilds.com/resources/sketchup-openrail-model.59/ MakerSlide purchased from http://www.inventables.com Instructions Carriage Plate Standard -- Carriage Plate Standard SKP file uploaded . Lots of SketchUp guidelines floating around in this file. Uses two M7 washer each (OD 14mm ID 7mm) for Eccentric Spacers installation. This is so the wheels can lightly grip the MakerSlide when the spacer is rotated. Use for Z-Axis MakerSlide. Carriage Plate with Belt -- Carriage Plate with Belt SKP file uploaded. Same as Carriage Plate Standard but for X & Y-Axis. Belt Connector is included in the SKP. X-AXIS Motor Mount -- X-AXIS Motor Mount SKP file uploaded. When facing 3D printer, goes to the left of the X-Axis and matches holes from Carriage Plate Standard. Works best with low-profile M5 10mm screws and 1mm thick washers. Y-AXIS Motor Mount Y-AXIS Motor Mount SKP file uploaded. Installs on the right of the MakerSlide. Same as X-Axis Motor Mount except no Carriage Plate to match up with. Axis Motor End Axis Motor End SKP file uploaded. File contains both Left and Right models along with initial design layout. Uses 625 Bearings and are the same bearings used in the V-Wheels. Bearings are meant to fit snugly inside so they can move left or right for belt placement fine-tuning. Should not be hard pressed into opening. Uses M5 screw with length 45mm or longer. Use of spacers or washers may be needed depending on the timing pulley design. Variable Z Axis Slide -- Variable Z Axis Slide SKP file uploaded. Once again, lots of SketchUp guidelines. Uses four low profile M3 12mm screws. Uses four M5 10mm screws and four washers. Drilling the size of a M3 screw is required for the four holes used to hold the motor in place. Z Nut Holder -- Z Nut Holder SKP uploaded. Uses six low profile M5 10mm screws + washers. Mainly for those that have T-o-M Z-Axis motor. Z Front Plates -- Z Front Plates SKP file uploaded. Uses three low profile M5 10mm screws + washers each. Used to support the right angle prints on the Z-Axis extrusions. Right angle -- Right angle SKP file uploaded. Uses four low profile M5 10mm screws + washers. Currently eight of them are used. Front and Back Feet -- Feet SKP file uploaded. Uses two back feet and one front one to elevate printer. Uses four low profile M5 10mm screws + washers each. Bowden E3DV6 HotEnd Mount -- Mount located at http://www.thingiverse.com/thing:450172 Magnetic Bed -- Printer Bed for PLA printing located at http://www.thingiverse.com/thing:454565
With this file you will be able to print MSB 3D Printer Variant Mark II with your 3D printer. Click on the button and save the file on your computer to work, edit or customize your design. You can also find more 3D designs for printers on MSB 3D Printer Variant Mark II.