Multi-color Cable Tags
thingiverse
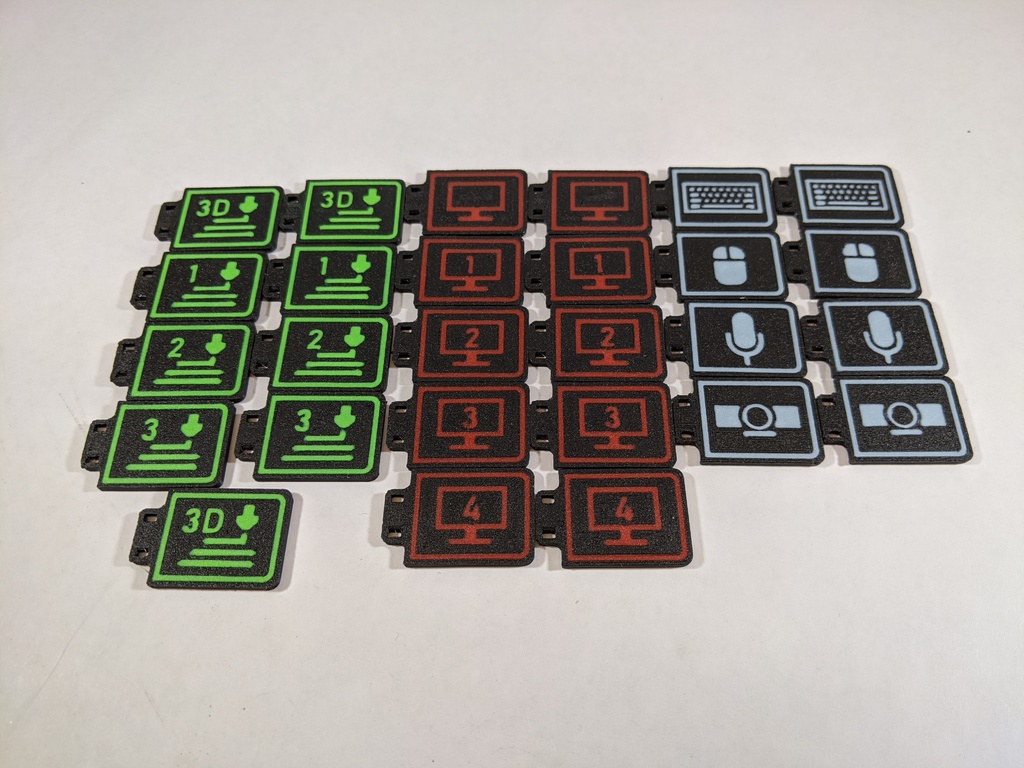
A better way to manage your computer cables than tugging on them and seeing what moves across your desk. --- Included are also "blank" models where you would be able to make your own label with a sticker or something if you'd like. If you don't have multiple filaments, you could also just print the tags face-up; you just won't have the nice contrast for the graphics, but you'll still have the symbol on the face of the tag. Note: The zipties that these models were designed to work with have a width of 2.50mm and a thickness of 1.20mm. The tolerances are very tight for these, so make sure your printer is tuned well (The zipties should easily slide in and out of the tag's holes. Note: these prints were designed with a 0.3mm nozzle in mind. A standard 0.4mm nozzle should work with some slicer adjustments for thin walls. Note: Make sure you are careful when removing skirts or any other non-model parts that are printed with the inlay model. <b>Multi-color Printing Basics:</b> 1. Set up and print the "inlay" model first with the text is facing downwards. 2. Completely purge the filament color you used when switching to another color. 3. Set up and print the "tag" model second so the inlay holes are facing downwards. (The cavities should line up perfectly with the inlay model.) <b>Helpful tips:</b> - The inlay models have an "alignment assistant" that makes the bounding box of the inlay the same size as the bounding box of the tag model; you should be able to set the XY position to be the same location to get things to line up perfectly, or drop both models into your slicer individually to line them up. This alignment assistant is very thin and should not slice with your slicer so you shouldn't need to worry about it. - If your slicer changes the z-height when flipping your models over, adjust the vertical offset by 2mm; that is the thickness of the finished print. - Make sure your z-hop is set to more than 0.4mm (for example, 0.5mm) when printing the tag; this will prevent the hotend from dragging across the inlay and messing up the inlay. - Make sure your colors are completely changed and the real color is coming out of your hotend by comparing the ooze to the filament on the spool; if the colors don't perfectly match, your finished print will look smudgy and be difficult to read; continue purging the filament until the colors match perfectly. - Choose colors with a high contrast value for best results.I chose a black tag color so the tags wouldn't stand out too much when attached to the cables of my computer. Most bight colors should work well with a black background. - Make sure you retract as much as possible during the inlay printing; this will keep all of the graphical elements clean and separated. This is especially important for the keyboard inlay; this is a hard print. --- To Do: - Virtual Reality HMD Tag - Digital Art Tablet Tag - Generic Power / Charging Tag - Eye Tracking Peripheral Tag - RGB Mouse Mat Tag - USB Hub Tag - External HDD / SSD Tags
With this file you will be able to print Multi-color Cable Tags with your 3D printer. Click on the button and save the file on your computer to work, edit or customize your design. You can also find more 3D designs for printers on Multi-color Cable Tags.