MultiClip Object Mounting System
prusaprinters
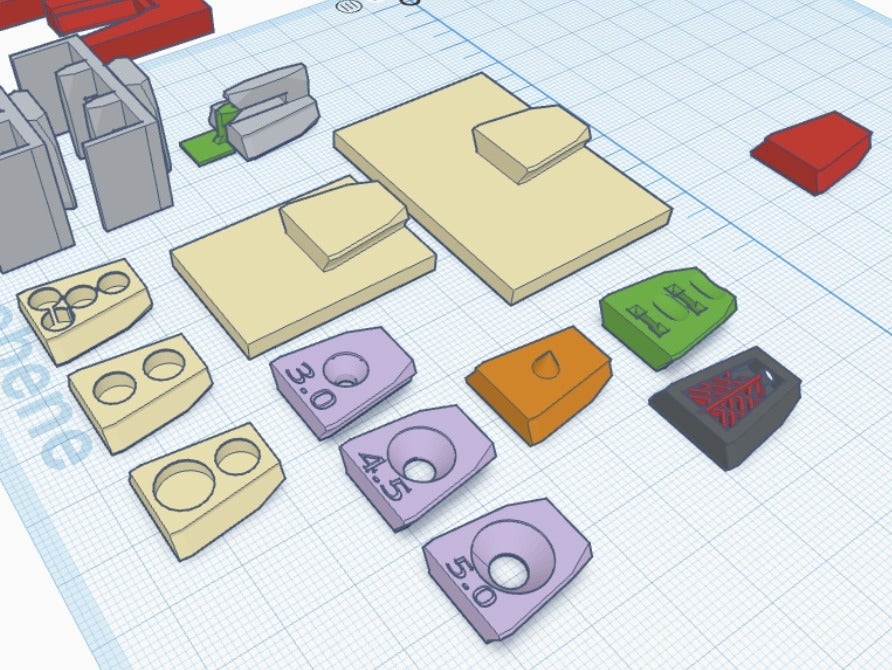
<p>I was fairly new to 3D printing. Like many others I soon began to browse objects online and modify them to suit my needs. One thing that struck me after a relatively short time was, that most of the time I was modifying other peoples objects because I liked them but they could not be mounted In the way I needed them.</p> <p>Maybe I overlooked something - leave a comment, if you know better - but I also could not find any outstanding efforts to abstract mount points from objects so that remixes which basically consist of reengineering the fixtures of an object would become less frequent.</p> <p>This is why I decided to begin designing my own system. It basically consists of a sliding clip (or cleat) design, that has already seen quite a few generations of development. At the current stage I won't make major changes to the design of the clips any more, since they have proven many times to be very usable and sturdy during the last year.</p> <p>It tries to combine the following primary goals:</p> <ul> <li>easy printing (esp. FDM)</li> <li>minimal size (big enough for a medium-sized screw)</li> <li>painless application (using carefully crafted guide planes and printable alignment helpers)</li> <li><p>sturdiness (one PLA clip at 30% infill is good for at least 10kg of continuous weight and 3kg of drag)<br/> If you intend to create objects using the MultiClip design, please try your best to adhere to the following guidelines. They are meant to retain maximum interchangeability between clip- and object-designs.</p> </li> <li><p>Do not resize the clip design; try to use multiple clips instead wherever needed.</p> </li> <li>try to space multiple clips vertically by 35mm (from top to top) or any multiple thereof.</li> <li><p>try to space them horizontally by 25mm (from lhs to lhs) or any multiple thereof.<br/> You can find the MultiClip object ready for your tinkering on <a href="https://www.tinkercad.com/things/dA6fr6jke4Q-multiclip">TinkerCad</a>!</p> <p>I also designed two mount shapes for the clip; one that is designed to need some effort to click into place and will not come off easily and one that is designed to just slide in and out without major effort, for objects that need a fixed mount point as well as easy removal. Please see the <a href="/prints/44004-multiclip-object-mount-templates">page for the mount templates</a> for further information.</p> <p>I am now regularly releasing new <a href="/social/95833-layershifter/collections/33827">things using the MultiClip system</a>, both for public use and as examples.</p> <p>Also, I strongly encourage you to create remixes of the clip to create new object mounting capabilities I have not yet realized. Comments and suggestions are also very welcome.</p> <p>### Update 2020-10-19</p> </li> <li><p><a href="https://www.thingiverse.com/thing:4627695">Kermi radiator mount clips</a> now available</p> </li> <li><p>Quite a few new MultiClip Objects in the collection (link above).<br/> ### Update 2018-09-21</p> </li> <li><p>Updated the alignment helper</p> </li> <li><p>New: MultiClip Glue!<br/> ### Update 2018-08-26</p> </li> <li><p>improved and corrected models for the 3mm and 4,5mm screw MultiClip and the screw hole marker clip.</p> </li> <li><p>new MultiClip for 5mm screws with 10mm head diameter. For a screw this strong, using ABS to print the clip is recommended.<br/> ### Update 2018-04-04</p> </li> <li><p>improved alignment helper tool<br/> ### Update 2018-02-23:</p> </li> <li><p>Optimized Stapler Clip</p> </li> <li><p>Varied Screw Clips. Now 2 sizes and they bear marks which screw size they are for.<br/> ### Update 2018-01-27</p> </li> <li><p>Added stapler clips.</p> </li> <li>Added clip alignment helper tools</li> </ul> <h3>Print instructions</h3><p><strong>Resolution:</strong> 0,15<br/> <strong>Infill:</strong> 50%</p> <h4>Notes:</h4><p>All objects here are either designed to print without support or there is an STL provided for FDM printing with extra support structures (look out for files with "FDM" in their name).</p> <p>I recommend not to use more coarse resolutions than 0.15mm for printing, otherwise you might experience negative impacts on the fitting of the clip.</p> <p>The clips print best with filaments that have no big tendency for warping. I have had very good results with ABS+ from ICE filaments (very durable clips) and Patona white PLA (good enough for most occasions), both of which can be found on Amazon.</p> <p>All clips should be printed with <em>at least</em> 3x3x3 shell/upper/lower layers; stapled clips at least 4x4x4</p> <p><br/>--------------------------------------------------------------------------<br/></p> <h3>Licensing</h3><p>Please note that the clip design itself is licensed non-commercial, but <a href="/prints/44004-multiclip-object-mount-templates">the matching mount</a> is not, so to allow you to incorporate it even in objects you intend to sell.</p> <p><br/>--------------------------------------------------------------------------<br/></p> <h3>Clip Variants</h3><p><strong>Screw clips</strong></p> <p>These are the standard variant with a screw mounting hole.</p> <p>There is also an STL for a clip with a marker tip. Just clip the marker clip into your object and press the tip against the wall to create a mark where you need to drill holes for your screws. Then remove the marker clip, fix the screw clip to the wall and be good :-)</p> <p>The Clips come in the following sizes:</p> <ul> <li>for 5mm screws (with 10mm max. head diameter). Use ABS to get a clip as strong as that big screw you are using.</li> <li>for 4.5mm screws (typical drywall screw)</li> <li><p>for 3mm screws (useful on OSB-plates or wood in general)<br/> <strong>Magnet clips</strong></p> <p>There are five designs:</p> </li> <li><p>one clip for up to four 5mm magnets with a thickness of either 2 oder 3mm. You can use fewer magnets for lightweight objects, of course.</p> </li> <li>one clip for up to two 6mm magnets with a thickness of either 2 oder 3mm.</li> <li>one clip for one 6mm magnet (up to 3mm thick) and one 8mm magnet (up to 2.5mm deep)</li> <li>one clip for 20mm by 2mm magnet (1,5 and 1,75 fit as well).</li> <li><p>one clip for 2x20mm magnets.<br/> The holes for the magnets have a 0.1mm brim at the top that is meant to prevent the magnets from falling out again, once they have been pressend in.</p> <p>To prevent the magnetic clips from slipping, I recommend using small pieces of <a href="https://www.inventables.com/technologies/suction-cup-tape">Suction Cup Tape</a> which increase stickiness by a factor of 5-10 at least.</p> </li> </ul> <p><strong>Shelf rail clips</strong></p> <p>I have created clips equipped with shelf rail hooks sized for standard hardware-store book-shelf rails</p> <ul> <li>One clip for single slot rails</li> <li><p>Two clips for dual-slot rails. These clips are sized in a way that it is possible to put them on an object with two vertically aligned clips (at 35mm spacing) and then clip them to the rail. The slightly taller clip has to go at the bottom for that.<br/> <strong>Stapler Clips</strong></p> <p>Currently, there is one design available for pneumatic staplers with the EU standard shoulder width of 5,7mm (example product link). These clips include dents that help to align the stapler properly for application.<br/> Using a MultiClip alignment helper tool (see "Files" tab for an STL) is strongly recommended for these clips (see the <a href="https://cdn.thingiverse.com/renders/d1/da/49/3b/a4/1ad7cbd7eecc12207afdf8345d152da7_preview_featured.jpg">example picture</a>).<br/> I also recommend to print 1-2 spare clips. Take care that your clips print well and fit snugly into<em>the very mount</em> you plan to attach<em>before you staple</em>! If you have never printed staple clips with a new material, I strongly recommend you staple two or three test clips to a piece of spare wood<em>before</em> you try an actual wall. If you do not align your stapler properly with the holes, the staples easily destroy the clips. And they can be tough to remove if stapling goes wrong.</p> <p>Once you get the hang of it, though, putting stuff to the wall becomes a matter of mere seconds!</p> <p>While PLA does usually work well if you staple properly, I still recommend using ABS for stapler clips.</p> </li> </ul> <p><strong>Glue Clips</strong></p> <p>The MultiClip Glue Clip is designed to stick and stay. It features an open structure that attaches perfectly to thick blobs of hot glue.<br/> Moreover, the glue clips have a hole on their upper side. You may loosely attach a clip by using a minimal amount of superglue, for example, and then fill the clip through the hole with whatever adhesive you see fit to finalize.</p> <p><strong>MultiClip alignment helper tools</strong></p> <p>You can put mounting or marking clips into the alignment helper tool objects while fixing them to the wall. There are two versions available for left- and right-handed operation.<br/> You can also use them to properly align your clips with a levelling tool or to protect your fingers, e.g. when using a stapler.<br/> Bar width of the helpers is exactly 1cm.<br/> Lower edge of top bar aligns with top of clip.</p> <ul> <li><em>Single clip helpers:</em><br/> The far edge of the perpendicular bar is 25mm away from the center of the clip.</li> <li><em>Multiple clip helper:</em><br/> Clip holders are spaced exactly according to the MultiClip design recommendations above.</li> </ul>
With this file you will be able to print MultiClip Object Mounting System with your 3D printer. Click on the button and save the file on your computer to work, edit or customize your design. You can also find more 3D designs for printers on MultiClip Object Mounting System.