Multifunction radio
thingiverse
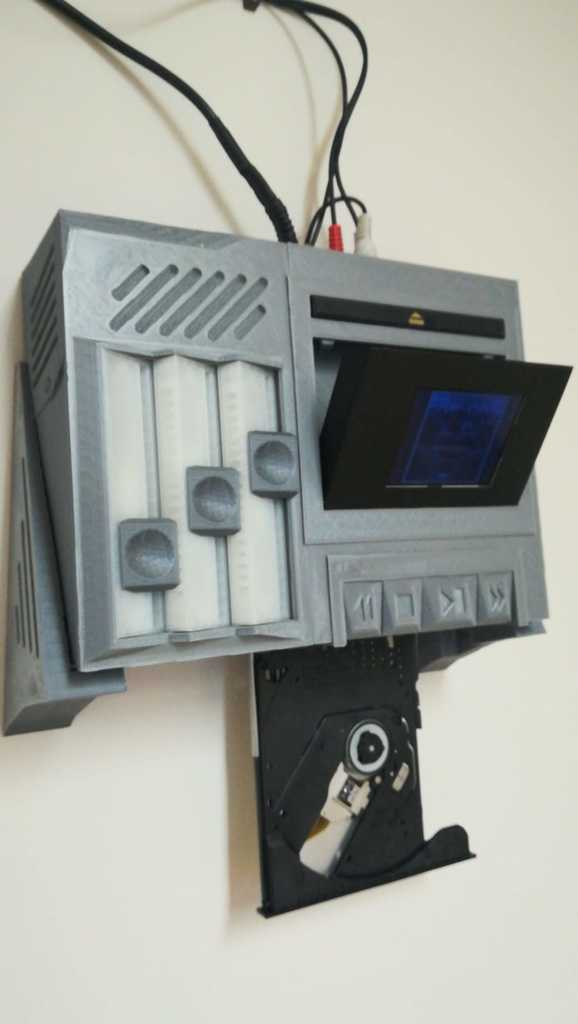
# Multifinctional radio - current design is adapted to OrangePi Zero but can be migrated to use RaspberryPi ZeroW - design for inner usb-hub is for non hub that I had laying around so provided link to usb-hub is just for reference - based on the version of pc used for build wifi/bluetooth/dac dongles are not needed - design for CD/DVD drive is for slim version of notebook drives - for playback is used [Volumio](https://volumio.org/) and Opi Zero uses img from [Volumio Forum](https://volumio.org/forum/volumio-orange-boards-t9692.html) - script for updating playback cover to display [volumio-album-art.sh](https://gist.githubusercontent.com/aenniw/c74958f8e9ed7f8642c15de98bf57881/raw/af12328ba6fb72c83a895d1201522e03ceb5c825/volumio-album-art.sh) - Opi Zero armbian config [armbianEnv.txt](https://gist.githubusercontent.com/aenniw/c74958f8e9ed7f8642c15de98bf57881/raw/af12328ba6fb72c83a895d1201522e03ceb5c825/armbianEnv.txt) - buttons control clone/build [WiringOP](https://github.com/zhaolei/WiringOP) and afterwards compile [gpio-buttons.c](https://gist.githubusercontent.com/aenniw/c74958f8e9ed7f8642c15de98bf57881/raw/8b646e106947f3189746af3e57867f088dc7e15b/gpio-buttons.c) ## How-To - needed parts: [PSU 12V2A](https://www.ebay.com/itm/AC110-220V-To-DC-5V-12V-24V-Switch-Power-Supply-Adapter-LED-Strip-Light-Driver-/132755132786?var=&hash=item1ee8d29172), [Amplifier](https://www.ebay.com/itm/TPA3116D2-2x-50W-100W-2-1-Channel-Digital-Subwoofer-Power-Amplifier-Board/311616288645?hash=item488dc73785:g:pbQAAOSwGeBXPvyH), [OrangePi Zero](https://www.ebay.com/itm/Orange-Pi-Zero-Zero-NAS-H2-512MB-WiFi-SBC-Expansion-Board-USB-Black-ABS-Case/253537674557?var=552728767655&hash=item3b0805e53d:m:makS52PxbcN1Vf6Mp292d1Q) or [RaspberryPi Zero](https://www.ebay.com/itm/Raspberry-pi-Zero-V1-3-Pi0-Version-Camera-Connector-1-3-board-1GHz-Original-K/282998390906?hash=item41e404c07a:g:OacAAOSwdrlbGOqG), [Flat USB-hub - optional](https://www.ebay.com/itm/Pro-4-Ports-USB-3-0-Hub-5Gbps-Speed-Compact-Adapter-Converter-for-PC-Laptop/113165411988?hash=item1a592f2694%3Am%3AmUtfc1L4RcKnctN35ahmd9Q&var=413468591133), [Wifi dongle - optional](https://www.ebay.com/itm/Mini-USB-150-300Mbps-WiFi-Wireless-Adapter-Dongle-Network-LAN-Card-802-11n-g-b/192155796375?hash=item2cbd60c397%3Am%3AmaFYj_ciel7BP3n4jlcYlFQ&var=492069745876), [USB audio card](https://www.aliexpress.com/item/5V-USB-Powered-PCM2704-MINI-USB-Sound-Card-DAC-decoder-board-for-PC-Computer/32224589429.html?spm=a2g0s.9042311.0.0.22e04c4djihQg7) or [DAC hat](https://shop.pimoroni.com/products/phat-dac), [TFT display](https://www.aliexpress.com/item/2-8-240x320-SPI-TFT-LCD-Serial-Port-Module-PCB-Adapter-Micro-SD-ILI9341-5V-3/32573316100.html?spm=a2g0s.9042311.0.0.22e04c4djihQg7), [Bluetooth A2DP receiver - optional](https://www.ebay.com/itm/Bluetooth-Music-Receiver-A2DP-Wireless-3-5mm-Stereo-Audio-Dongle-Adapter-Black-x/141899514325?epid=1574849845&hash=item2109dec1d5:g:JcgAAOSwm8VUwLR7), [StepDown module](https://www.ebay.com/itm/1PCS-DC-DC-LM2596-power-Supply-Buck-Converter-step-down-module-NEW-CA/142147326064?hash=item2118a41070:g:L1kAAOSwvzRXzOBg), [RCA connectors](https://www.ebay.com/itm/20Pcs-Jack-Panel-Mount-RCA-Female-Socket-Connectors-Adapter-Metal-Connector/272785802932?epid=2113736078&hash=item3f834d06b4:g:GikAAOSwutFZgAg5), [Power button](https://www.ebay.com/itm/10Pcs-Pro-SPST-ON-OFF-Switch-Mini-Black-2-Pin-Rocker-Switch-DC-12V-16A-Tool-Pack/253102070951?hash=item3aee0f1ca7:g:ztUAAOSw2n5ZiGet), [CD/DVD notebook drive - optional](https://www.ebay.com/itm/Internal-DVD-CD-RW-Burner-9-5mm-SATA-Laptop-PC-Media-Optical-Drive-Slim-Writer/223088662548?epid=2201734612&hash=item33f11ed814:g:4qQAAOSw9iNbZc1v), [IDE/SATA to USB - optional](https://www.ebay.com/itm/External-USB2-0-Slim-Case-Enclosure-9-5mm-SATA-Laptop-Tray-CD-DVD-Drive-Bur-M3F4/282420773038?epid=725236490&hash=item41c19700ae:g:IVoAAOSw03lY42qv), [Opi/Rpi fan](https://www.aliexpress.com/item/Raspberry-PI-2-Fan-high-quality-Cooling-Fan-for-Customized-Acrylic-Case-Support-raspberry-pi-model/32556412337.html?spm=2114.search0104.3.83.772273e03RGsZR&ws_ab_test=searchweb0_0,searchweb201602_5_10065_10068_5014915_10059_10696_100031_10084_10083_10103_451_5014815_452_10618_10304_10307_10820_10821_10302,searchweb201603_2,ppcSwitch_7&algo_expid=5afb3a7d-121a-4270-b4d6-10dc0aad66d7-12&algo_pvid=5afb3a7d-121a-4270-b4d6-10dc0aad66d7&transAbTest=ae803_2&priceBeautifyAB=0), [6 pen springs](https://www.ebay.com/itm/New-style-50pcs-spring-spare-ball-pen-part-424/142761746310?hash=item213d435f86:g:~qgAAOSwP~FbXTaa), [4 Tactile Buttons](https://www.ebay.com/itm/Momentary-Tactile-Push-Button-Switch-Vertical-SMD-Horizontal-Mini-Micro-PCB/263284557976?hash=item3d4cfb8898%3Am%3AmKye4z5VT-e_vs8wA2tZYcw&var=562290928528), [M2 screws](https://www.ebay.com/itm/Hex-Socket-Bolts-Countersunk-Flat-Head-Screws-M2-M3-M4-M5-M6-Black-Alloy-Steel/183214890165?hash=item2aa8755cb5%3Am%3AmRNLwqyXcB6KXHipo6jIAWA&var=690492992291) - print case as whole or as 2 separate parts based on your printer volume - print all slider/pot parts 3 times, extends pots from amplifier with wires and mount them on sliders optionally add some grease - print all buttons related parts - and add tactile switches to buttons-case and secure them with hot/super glue - add pen spring to buttons-case and slowly insert button, adjust the spring with pliers - repeat for remaining buttons... - print all tape related parts - glue together tape-bottom and tape-top part add display to tape-tray add hot/super glue and cover with tape-tray-lid do not forget to pass display cables through tray hole - cut 2 short pieces of wire bend then around tape-tray-joint but let be loose they will be used as spring that opens tape tray - insert tape-tray with bended wires optional glue them to tray for ease of assembling lock wires to slots on tape-bottom and insert tape-tray-joints - sand down tape-lock-pin insert it to slot on tape-top part, cut in half pen spring and insert each half on pins on tape-lock-pin secure with tape until inserted into main body - add tape-eject buttons with spring and lock it with 2 pins from side - insert pot sliders, amplifier PSU and buck converter into left part of case and wire it up together - print remaining parts - add usb-hub usb-bottom part - add CD/DVD drive to case-right-bottom part and secure it with small screw from side - add Opi Zero to right part of case - add assembled buttons and tape parts and connect them to Opi Zero, optionally secure them with super/hot glue - join usb-bottom, case-right-bottom and usb-top parts add all electronics to them like usb-hub, wifi-dongle, usb-dac and bluetooth receiver connect it to Opi Zero and insert int from bottom to right part of case and slowly slide it backwards... secure with screws from bottom - add case-left-bottom part and secure it with 4 screws - add back panel with AC socket, DC power switch and RCA connector that are connected to amplifier PSU and Opi Zero - optionally print wall mount parts to hang radio on the wall ## Wiring ### PINOUT: Display -> Raspberry Pi Zero - BL -> pin 12 (GPIO 18) - SCK -> pin 23 (GPIO 11) - MISO -> pin 21 (GPIO 9) - MOSI -> pin 19 (GPIO 10) - CS -> pin 24 (GPIO 8) - RST -> pin 22 (GPIO 25) - D/C -> pin 18 (GPIO 24) - VIN -> pin 17 (3.3v) - GND -> pin 20 (GND) #### PINOUT: Display -> Orange Pi Zero - BL -> pin 15 (GPIO 3) - SCK -> pin 23 (GPIO 14) - MOSI -> pin 19 (GPIO 15) - CS -> pin 24 (GPIO 13) - RST -> pin 11 (GPIO 1) - D/C -> pin 13 (GPIO 0) - VIN -> pin 2 (3.3v) - GND -> pin 20 (GND)
With this file you will be able to print Multifunction radio with your 3D printer. Click on the button and save the file on your computer to work, edit or customize your design. You can also find more 3D designs for printers on Multifunction radio.