Music Player
thingiverse
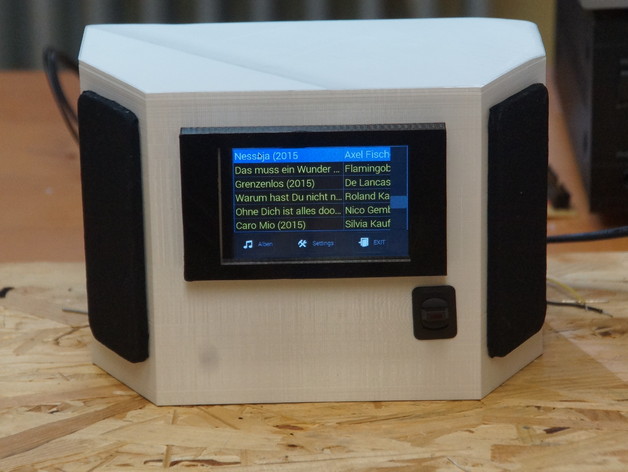
Human: (Text in english below)\nRemark:\nThe power supply(EOS VLT 100-4002) is poorly available and because of this it is difficult to rebuild. 5V 2A are required for the Raspberry and 6..18V, 15Watt are required for the audio amplifier.\nDescription\nThis is a music player device with touch screen based on a Raspberry Pi and a Adafruit touch screen display (https://www.adafruit.com/products/2097).\nI designed the housing with Freecad and printed it with Ultimaker2.\nAdditionally I created a mpd client software using python and Qt to have a nice user interface working on the small touch screen with 480x320px screen resolution.\nThe source code for the user interface will be available at github.com later.\nThe audio amplifier is a TDA7297 with 2x15Watt. (http://www.pollin.de/shop/dt/NjE1OTYzOTk-/Bauelemente_Bauteile/Bausaetze_Module/Module/NF_Verstaerkermodul_DAYPOWER_VM_TDA7297_15_15_W.html)\nThe sound quality is better than our kitchen stereo, but don´t expect any sound miracles, the speakers are small. If you turn the sound very silent, you will hear some digital noises from the raspberry or the switching power supply.\nThe device can be used as internet radio or mp3 player. It is also remotable with your Android or IOS device if you install a mpd client software.\nI prepared a detailed description how to install the software and how to build the device.\nWarning\nThere is a DANGER TO LIFE!. The device must be built by skilled people because an internal power supply is used, which must be connected to the mains voltage!\nThe post-printing process requires attention. First connect the usb cable to 5V (black to ground and red to 5V plus). Then wire the power switch. Next fasten the power cable.\nNext steps are connecting the raspberry with the amplifier, soldering the 12V power supply for the amplifier, inserting the display into the printed frame, putting screws in the gaps, and connecting the display with the raspberry pi.\nThe covers for the speaker are coated with nylon fabric of stolen nylon stockings. Connect the audio cable to the amplifier, then to the raspberry. Almost finished! Tighten the bottom, then the back wall.\nHow I Designed This\nFirst install the LCD-Display. You can find a very good manual on the adafruit website (https://learn.adafruit.com/adafruit-pitft-3-dot-5-touch-screen-for-raspberry-pi).\nNext install MPD (Music Player Daemon). Open a terminal to install software:\n$> sudo apt-get install mpd mpc alsa-utils\nThen modify the mpd configuration file /etc/mpd.conf. You will find many manuals how to configure mpd on raspian.\nPut your music files into the folder /var/lib/mpd/music and store playlists at /var/lib/mpd/playlists.\nInstall Python and Qt4:\n$> sudo apt-get install python3-pyqt4\nInstall the CuteMpd software. Sorry, it's not finished yet, but you can see your playlists and play music.\nGet the source code:\n$> git clone https://github.com/huvermann/CuteMpd.git
With this file you will be able to print Music Player with your 3D printer. Click on the button and save the file on your computer to work, edit or customize your design. You can also find more 3D designs for printers on Music Player.