My 3D (Dream Drum Design)
thingiverse
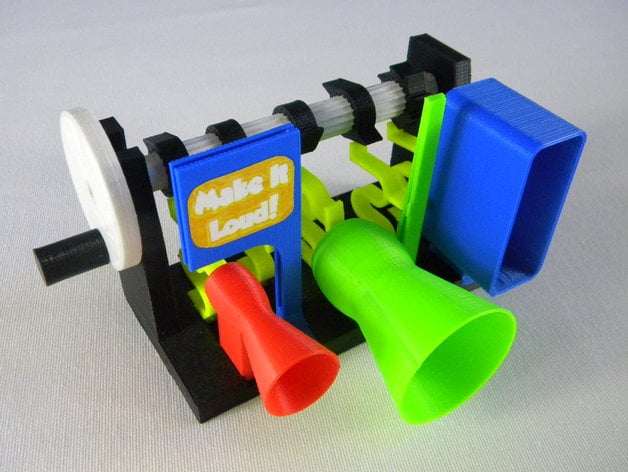
I am still a kind of novice in CAD and 3D printing, but I am learning everyday (or at least, I try!) and this challenge was a good opportunity for me to work on a funny project. While speaking with my children about what we could propose, one spoke about a piano, the second about drum, the last one about trumpet… Well, after few hours thinking about a potential result, we converged toward a drum, with hammers as drum sticks, and horn-shaped toms to amplify the sound (noise?). I really had fun to develop it, and to work on some evolution (not part of the challenge !) by motorizing the drum and also adapting a piezo-sensor to link with a midi system (see the "evolution" section) The following is an updated version (first one was presented few days ago..). Main changes are: More toms and variations in the shapes to modify the sounds Rounding of the cam bolt's edges to facilitate insertion on the camshaft added videos and pictures some fun with evolution of the drum (see the last section !) 2 versions (for base and camshaft): the normal version to comply with the challenge's rules (max. dimensions 10x10x12.5) and a XL version with 5 tom housings. Update (2016.02.01): Evolutions section: Added link to a piezo/Midi converter. Pictures will follow. Video presentation: https://youtu.be/mHfu1JUAYuEf Print Settings Printer Brand: RepRap Printer: 3C (Cheap Chinese Crap..) Rafts: No Supports: No Resolution: Good... Infill: Depends.. Notes: For parts that are bended (e.g. the hammer that will hit the tom), it is important to choose a quite elastic material, like ABS. More rigid material like PLA is not flexible enough and will break quite quickly (and anyhow, they will produce a quite limited noise). For the different toms, I stuck to ABS, although PLA would fit as well. As my printer is a quite cheap version (but I will build a better one soon!), I choose standard printing parameters: Temperature for filament (I use 1.75 mm filament and 0.3 mm extrusion head) and heated bed according to filament specification: 225°C and 95° for the bed Layers 0,25 mm Speed 30 mm/s Some specifics for the different parts: Drum base: When printing the base, which is quite large, you can add a 5mm brim to avoid peeling of the first layers. You can print the base with 15% infill (large volume, let save some material!), but then take care with the sides that may delaminate when playing too "strong" (e.g. my youngest daughter...). Compared to the initial version, I rounded the junction between the sides and the base mat to avoid such problem. Camshaft and cam bolts The camshaft should be printed with an infill of 25/30%, because of the constraints when bending the hammers. The mechanical clearance between camshaft and cam bolt is 0.2 mm. It is normally OK, although some resistance might occur the first time the cam bolt is put in place. Evolution from initial design was to round the shapes to facilitate insertion. Toms and other “noise making parts” They can be printed with either PLA or ABS, with standard parameters. Post-Printing Noise level measurment For noise level testing, I have to say; OK… compare to whistles, my drum machine has no chance to be the loudest one… So let’s be positive and present it differently, valuing other aspects related to sound measurement! Maximum instantaneous sound: For this test, I prepared only 3 toms generating the loudest sound. All 3 (only 3 because of space limitations, I could have used several joint drums!) will be hit simultaneously… Then, the noise level is 84 dB. It is not comparable to whistle, but I was expecting much worse results! Maximum continuous sound: In sport, comparing sprint-runners like Usain Bolt or marathon-runners like Ghirmay Ghebreslassie is hardly possible: They are both exceptional athletes, and both deserve congratulations and respect. Let’s have the same approach with noise measurement by measuring the average sound level instead of the instantaneous one; then hand-actuated noise machines will probably have an advantage on the ones actuated by blowing air (unless you can blow unlimited air, which is not my case!!!). Then the average noise of my drum machine, on a long period of time is 80dB. Frequency spectrum: Let’s continue our comparison with sports! I have a lot of respect for Ashton Eaton. He’s not a champion in sprint-running, neither in endurance-running… What he achieves is much harder in my opinion: he’s a decathlon-runner, and therefore he has to be good in several disciplines at the same time. For my drum machine, a comparable aspect would be the range of frequencies covered by the drum machine, from bass to treble. Frequency spectrum goes from 700 to 7000Hz. Quite large ! Instantaneous Noise measurement Average noise measurement Frequency spectrum measurement (red is the peak value, green the current one. The green peak is the sound made by my camera when I took the picture) How I Designed This Design basis During the design and test phase, I had several requirements: It shall be easy to modify it, to enable different sounds and future evolutions, it is why the different parts (hammers, toms and potential other components) are fixed to the base with dovetail joints: you can change the drum configuration within seconds. It shall be possible to actuate the hammers directly with the fingers (e.g. to find new rhythms or sonorities) as well as with a camshaft to have a more regular and constant tempo. It shall be easy to modify the pattern: the camshaft shall be removable and replaceable promptly The design shall be fun and coloured: it is always nice to clearly differentiate the moving parts. Although the driving force is normally provided with a hand wheel, an autonomous driving of the camshaft should be possible. The different iterations I had during the design are as following: Base I designed it to enable quick changes for both hammer and toms. I tried initially by plugging the different parts in dedicated holes; but then it was impossible to adjust e.g. the hammer toward the camshaft, or the strength of the beat… Dovetail joints was the most practical design. The shape for inserting the camshaft allow a quick change, just by moving horizontally the shaft, and then aligning the narrow part of the camshaft with the dedicated path on the side of the base (see photo/video). Base Camshaft and Cam bolts The objective was to easily change and to adapt it for new rhythms and patterns. I designed it with 16 gear teeth to create very precise rock and jazz rhythms. There is another variation with 12 gear teeth for 3 sound-rhythms. On the camshaft are fixed the cam bolts. There are different sorts, depending on the number of beats you want to produce with the same tom during a pattern. Toms and hammers Yeah, this is the interesting part! I tried several designs to recreate “a kind of” sound, similar to a drum. What a tough job! For the toms, I tried different diameters (small, medium, large), different shapes for the amplifying part (cone, rectangular…), different shapes for inner part of the tom (closed, semi-closed, open…). I was expecting a bit more differences in the sonorities (more bass/treble…). For the cymbal, I thought about 2 parts clapping each other. I am quite satisfied with the result although it is still far from a metallic part!!! I tried different spacing between the 2 surfaces of the cymbal, and 1.5 mm was a kind of best result.. I really saw (heard!) huge differences depending on the hammer shape (especially the part in contact with the tom). The clearest sound came with a “hitting surface” of about 7mm x 5mm. For the cymbal, a long hitting surface gave the base “splashing sound”. The S-shape for the hammer gives the best elasticity and adaptability. I tried different other shapes (I, T, horizontal S…), but that one is the best and does not delaminate, even after hours of use! Toms Hammers Different shapes for the toms Evolutions (not part of the challenge !) Evolutions The rules for this challenge are to build a noise-machine only with parts being 3D-printed. However, it would be a pity to design something only for the challenge. It is why I propose in this section some evolutions for my drum machine to have a longer life! Motor-driven camshaft: a socket in the camshaft allows the use of a stepper motor to drive the drum machine. You can play rhythms very regularly, or modify the tempo very easily. As I had no autonomous device to drive the stepper motor, I put it on the output of my Reprap's extruder... Look at the video, I am definitly happy about it !!! Electronic music: Thanks to dovetail joints, it is also easy to evolve toward electronic music: Microphones behind the toms (with a special shape) enable the possibility to input directly in a mixing device and/or sound effect, and then sample and modify the sounds Contacts (I try with piezo-electric sensors, although normal push-buttons should work too) connected to the appropriate device can be converted into midi-signal, and then process midi-signals directly on a computer or a keyboard. I still struggle a little to do so (problem of time to develop the electronics, not from 3D printing!), but it is on a good way. An interface to convert pulses on a piezo electric sensor to Midi signals can be found here (in French, but the diagram is quite simple, and the Hex file can be directly flashed to the microcontroler): One way, with a Microchip PIC 12F675http://sonelec-musique.com/electronique_realisations_gene_percus_003b.html Diagram: http://sonelec-musique.com/images2/electronique_percus_003c.gif Hex file: http://sonelec-musique.com/logiciels/pics/electronique_gene_percus_003bc_12f675.zip 4 Ways, with a Microchip PIC 16F88http://sonelec-musique.com/electronique_realisations_gene_percus_003.html Diagram: http://sonelec-musique.com/images2/electronique_percus_003.gif Hex File: http://sonelec-musique.com/logiciels/pics/electronique_gene_percus_003_16f88.zip
With this file you will be able to print My 3D (Dream Drum Design) with your 3D printer. Click on the button and save the file on your computer to work, edit or customize your design. You can also find more 3D designs for printers on My 3D (Dream Drum Design).