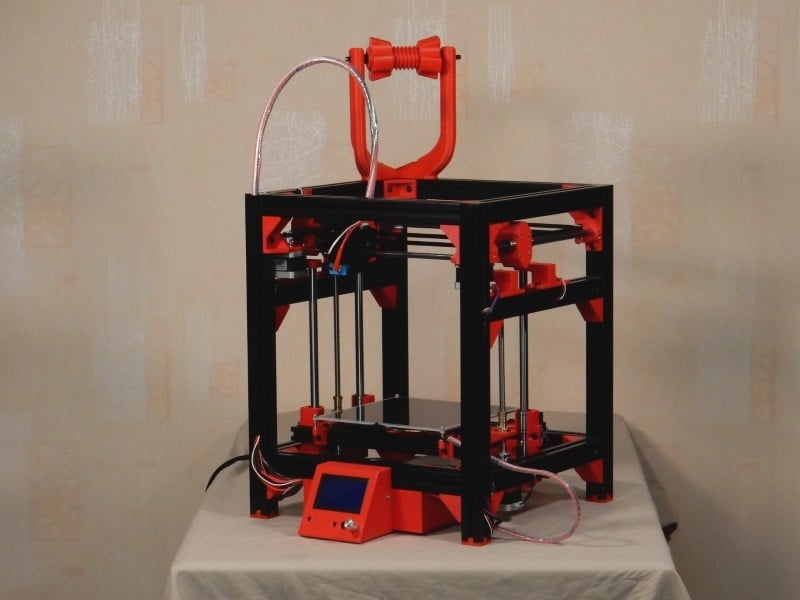
My HyperCube Evolution
thingiverse
It appears to be the final document in a series of instructions for assembling and customizing a 3D printer. The document lists various items that have been purchased or printed, along with YouTube links for videos related to each part. Here's a summary of the content: **Part 6: It Prints!** * A video is provided showing the printer printing successfully. * Various parts are listed as being printed, including an LCD case and power supply cover. **Purchased Items:** * E3D Aero Titan Extruder 24v (clone) * PrintBite Print Bed Surface * Raspberry Pi 3B/3B+ * USB cable * Thermistors * Optical endstops * Screws and nuts **Printed Items:** * Extruder mount * Z optical endstop flag * Y optical endstop mount **Part 7: Great Prints!** * A video is provided showing the printer printing successfully. * Various parts are listed as being printed, including a fan duct to extruder mount and spool holder. **Purchased Items:** * Fan motor mount * Spool holder screws and T-nuts **Printed Items:** * Part cooling fan duct * Extruder mount and cable constraint * Spool holder v2 * Hemera adapter (clone) **Part 8: Hemera Extruder!** * A video is provided showing the printer printing successfully with a Hemera extruder. * Various parts are listed as being printed, including a Hemera part cooling duct. **Purchased Items:** * Hemera adapter to Hemera extruder * Hemera part cooling duct to Hemera adapter * Fan to Hemera part cooling duct **Printed Items:** * Hemera adapter * Hemera part cooling duct **Part 8a: MKS & SKR Controller Board Case v2** * A new version of the controller board case is designed to support various mainboards, including the MKS Gen L and SKR 1.3/1.4. * The document notes that the dimensions are accurate, but it has not been printed yet. * A left elbow USB Type A cable will be required for connection. **Purchased Items:** * Brass threaded inserts **Printed Items:** * Controller board case v2
With this file you will be able to print My HyperCube Evolution with your 3D printer. Click on the button and save the file on your computer to work, edit or customize your design. You can also find more 3D designs for printers on My HyperCube Evolution.