MyRCCar 1/10 Typical Pickup Body for RC car (Old)
thingiverse
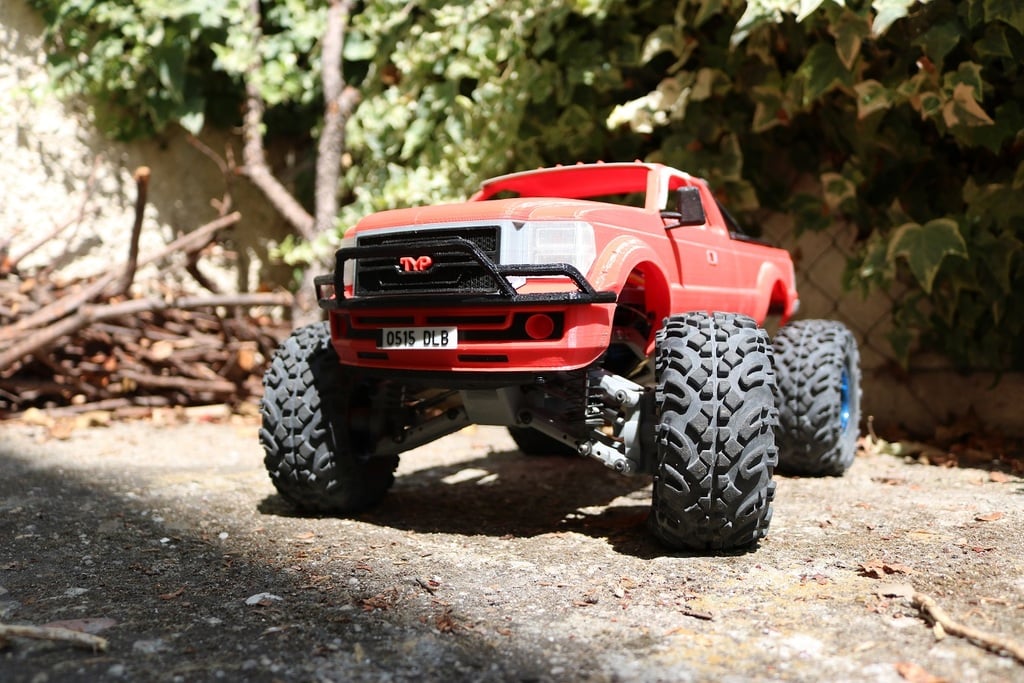
###Here it is, the Typical Pickup Body for MyRCCar 1/10 MTC Chassis### ####NEW: Now you can find all the parts without more complications [here](https://www.myminifactory.com/object/3d-print-120034) My Old publication (this is a replica) had: 22056 views 6707 downloads 713 likes 867 collects 17 watches 371 comments 71 makes But for some reason, it disappeared. I can see it in my designs but anyone else gets a 404 OLD TEXT FROM ORIGINAL PUBLICATION: At last! An alternative to the 1.3KG FJ Cruiser Body, this one weights less than 500g with the things you can see in the photos and can be printed mostly in PLA, but the links to the chassis or rearviews. A new video of a [Speed Build Test Drive of the MTC Chassis](https://youtu.be/EprtyTaEj4c) without using gearbox. Calculated top speed 52Km/h... read description of the video for more info. You will see how the Typical Pickup Body resists a rolling... Some scratches in the roof as spected, any other damage. I just used my foot when i reached the car to turn it downside-up! See it also in this other [video of MTC+TPB highlift](https://youtu.be/tlIHbWKtQcE) Take a look to the [Typical Pickup body with the MTC Chassis in action!](https://youtu.be/BoferANebmE) You need a 200x200x200 printer, i think most of "not the cheapest" printers like Prusas or Anetes can manage this build size good. All parts you see of the body has been 3d printed. I could divide the body into more parts but this time i tryed to keep the build easier. Anyway more parts will come probably in an update! ###Part List### - MRCC_TPB_Body_Front - MRCC_TPB_Body_Cab - MRCC_TPB_Body_Rear_290 - MRCC_TPB_Body_Bumper_Front - MRCC_TPB_Body_Bumper_Rear - MRCC_TPB_Details_Lights_Front - MRCC_TPB_Details_Lights_RearLeft - MRCC_TPB_Details_Lights_RearRight - MRCC_TPB_Details_LightCover_FrontLeft - MRCC_TPB_Details_LightCover_FrontRight - MRCC_TPB_Details_LightCover_RearLeft - MRCC_TPB_Details_LightCover_RearRight - MRCC_TPB_Details_Mirror_Left - MRCC_TPB_Details_Mirror_Right - MRCC_TPB_Details_Radiator_Bulk - MRCC_TPB_Details_Radiator_Model1 - MRCC_TPB_Details_Stickers_Front - MRCC_TPB_Details_Stickers_RearBump - MRCC_TPB_Details_Suncover_Front - MRCC_TPB_Details_Suncover_Left - MRCC_TPB_Details_Suncover_Right - MRCC_TPB_Details_TiraDoor - MRCC_TPB_Links_Chassis_FrontLeft - MRCC_TPB_Links_Chassis_FrontRight - MRCC_TPB_Links_Chassis_FrontBumper - MRCC_TPB_Links_Chassis_Rear - MRCC_TPB_Links_Body_Front - MRCC_TPB_Links_Body_FrontBumper - MRCC_TPB_Links_Body_Rear As you can see, there are three main groups, BODY, DETAILS and LINKS parts. **I'm just sharing through the download buttons BODY and LINKS**. Can you imagine why i'm doing this?¿? I just want you to join thingiverse as a way to interact with MyRCCar things and with me and others in the MyRCCar Group. If you look to number of makes of MTC Chassis or OBTS chassis it is extra low. The number of likes or collects is not bad for me, but is bad compared to many other "insignificant" things shared in thingiverse. Of course thingiverse lets you download a thing without login. That's good and bad the same time. I recently discovered reading comments in my things that some people download it annonimously (without having a thingiverse account), and a few have printed it and I will never know about them. I know of those who decide to join thingiverse after doing a chassis to ask for some missing part or a new one, and some also to thank me for my work... **So this time, if you want the DETAILS parts, you will have to join Thingiverse and interact with MyRCCar Group, things and users**. It would be nice if this include joining MyRCCar Group, introducing yourself in the propper post, but **uploading a make of the 3 main parts of the pickup with more than 2 photos is a must to get the rest of the parts** **Those missing DETAILS and parts are waiting for you! Now you know how to get them? **They are made and they are printable, as you can see in the photos. Most of them go glued and can be printed without supports. ###Printing the big main body parts### Body_Front, Body_Cab and Body_Rear are these three big parts. Take a look to the Cab part finishing printing in this [video](https://youtu.be/7IlksQU3hSI). I recommend you to rotate them 90º exactly to print them as i did. not other better angle if you want the layers to be in the same direction in all the body. For that, you will need to create well build supports for the Front part and also for the rear window part of the cab as you can see in the photos i uploaded. **NOTE:** I had to add a piece in the rear thing to allow doing the rear bumper zone without supports. So the rear part is really 2 meshes, the main rear part and this part i tell you. It intersects a little with the main part so if you slice it with Simplify3D use "separate connected surfaces" so it will print the "intersection zone" correctly, otherwise it will leave a little gap between both parts. ####Times#### This 3 prints will take loooooong. I printed this 3 in about 29h. 7h30m for the front, 12h for the cab and about 9h for the bed part. To get those times with my Anet A8 i used standard speed (70mm/s /50%outer /80%infill /80%supports) and 0.2mm layer height. I can try to give you some extra advices for long prints if you want them, ask in the comments! The most important would be that you need a perfect and strong first layer and to be near the printer all those hours. ####Weights#### There is a big difference between front and cab parts against the rear one in terms of design. The bed is designed in a 1mm shell mode trying to reduce the weight as much as possible, but will probably be less strong than front and cab. So the bed for a 290mm wheelbase, the one i share this time weights about 100g only. The front part is about other 100g and the cab weights about 170g. Maybe i will need to add some oil containers and oversized anti-roll bars or a kayak to the rear part to balance my build ;) ###Printing the Links### It is mandatory you print the links in TPU so they have the necessary flexibility to help the whole body survive some hits. This parts are a little big to allow you to do them more or less rigid. I printed most of them with 0.2 layer height, 2 perimeters, 20% infill and about pure 40mm/s (for all printing feature types). I use a 3d printed extruder adaptor for Anet A8 to help guiding the TPU filament but its not perfect. If you dont use the adecuated speed or temp... I'm already learning about printing flex well. ###Printing other parts and details### As you can see i employ a simple color palette, main color (painfull red), gray, black and transparent. All of them in PLA but the rearviews (left and right mirrors) wich surive perfectly to any lateral roll and come back to its place after the hit. ###Will You?¿?### If you upload some makes and "make some noise" with your Typical Pickups and MTC Chassis i'll create new parts as front defenses, anti-roll defenses, rear door with hinges and lockers, maybe some more "stickers", side bars or interior parts. ***I hope you like it, collect it, print it, upload your make, enjoy it, improve it, share your improvements and new parts with us!***
With this file you will be able to print MyRCCar 1/10 Typical Pickup Body for RC car (Old) with your 3D printer. Click on the button and save the file on your computer to work, edit or customize your design. You can also find more 3D designs for printers on MyRCCar 1/10 Typical Pickup Body for RC car (Old).