NA/NB Miata Telescoping A/C Vent
thingiverse
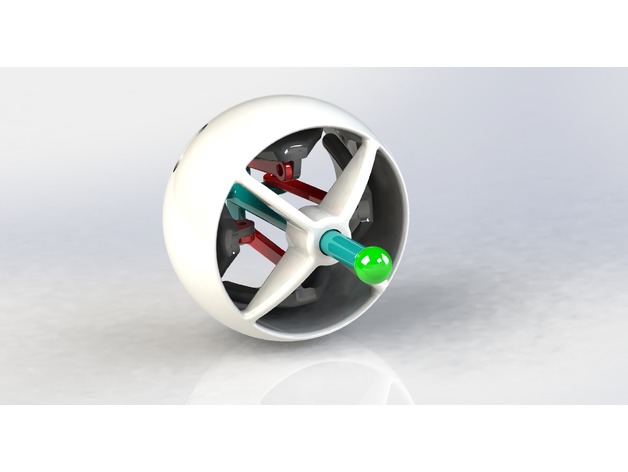
This is a telescopic A/C vent for NA or NB Mazda Miatas it will replace the eyeball in the stock A/C vents. All parts were modelled in Solidworks. I was tired of having vents that couldn't be closed when they weren't in use, so I decided to make new ones. If you have an NA, I recommend that you do NOT reinstall the two top screws of the tombstone - because these are printed, they are not strong enough for you to remove the entire assembly from the tombstone. I tried this and ended up breaking the shell piece. Now, I just leave the top two screws out of the tombstone so it can be removed if need be. Print this with ABS. I tested the parts with PLA, and they warped when I put the car's heat on. They would get even hotter if you left the car out in the sun. To make one vent, you will need to print: 1 x Shell 1 x Pushrod (I recommend 100% infill for this part - poor layer adhesion makes it very fragile) 1 x Nub 8 x Linkage (or two sets of 4) 4 x Flap (or one set of 4) To assemble each vent, you will need: 8 x M2x6 (or longer)screws 8 x M2 nuts 4 x toothpicks (or any other straight rod that will fit in the ~2.4mm holes in the shell) Superglue (or acetone for acetone welding the nub to the pushrod if you are using ABS). Use the M2 screws and nuts to connect the flaps to the linkages, and then the linkages to the pushrod. Use two linkages per flap - the bolt and nut will be touching different linkages each. This will ensure that the bolt and nut do not become looser with time as you continue to use the vent. Ensure that the connection is centered (the surfaces you are connecting are offset so that the connection itself may be centered. Then, I used toothpicks to hold the flaps along the holes in the shell, and cut them so that they would not protrude. Then, I used superglue to keep them locked onto the shell. After this, I generally sand the surface to make it smooth, and then repaint that portion with the inside taped off. I printed the parts with rigid.ink ABS. To give the vent a tighter fit, I added a small piece of Velcro (the soft, fuzzy portion) to stop the vent from drooping, since I was also having that problem with my vents as it was. I recommend printing the flaps and shell with support on. I printed the flaps upright so that the curved surfaces had a nicer-looking finish. Also, ignore the fact that the fins on the pushrod and flaps are not symmetrical - the previous iteration of the design used that, and I forgot to fix it before my Solidworks license expired.
With this file you will be able to print NA/NB Miata Telescoping A/C Vent with your 3D printer. Click on the button and save the file on your computer to work, edit or customize your design. You can also find more 3D designs for printers on NA/NB Miata Telescoping A/C Vent.