NanoLongRange Evo
thingiverse
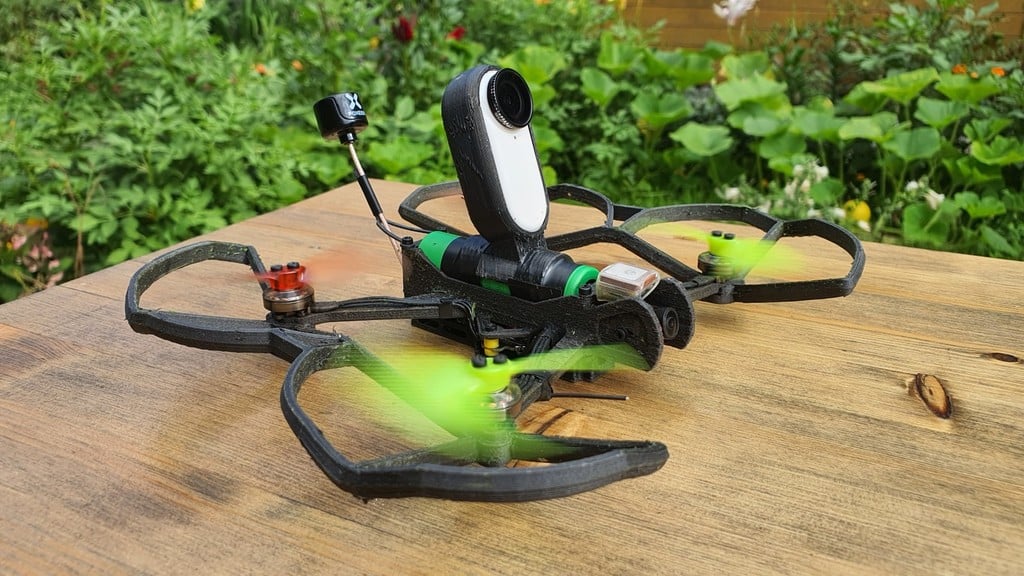
This is my improvements (so far) to the great NanoLongRange concept by Dave_C_FPV. This thing is about 80% of my flying time this season. The most notable changes are: * **Integrated battery tray** to make frame tougher and stiffer (and save a few grams). * **Balanced pitch** to give more power to the motors and reduce propwash. The original NanoLongRange is 65:35 nose heavy which means front motors work almost twice as hard as rear ones during the flight. This is usually not such big of an issue for a more powerful quads, but this quad is very limited on power so balancing it improves the flight experience noticeably. This frame is perfectly 50:50 balanced and front props and propguards are still ~5mm out of sight of 4:3 ant camera. * **Stronger arms** with angled top surface have a stiffer and stronger joint with the body. I've never broken an arm with this frame although I've crashed it badly a few times ([most](https://www.youtube.com/watch?v=0PPLKe0Yw7w) notable crash, [autopsy](https://imgur.com/a/5rBhoY1), most damage is done by me removing battery terminals, the only damage to the frame from the hit is chipped off top part of camera "cheek"). * **Prop guards** to fly thru bushes and trees. These guards are really heavy duty when printed in non-planar way (see below), I've only managed to break one early version. * **GO2 HD camera mount** for slow cinematic flights. * **More open bottom part** for better cooling. * **Antenna positioning clip** for bigger antennas like Foxeer Lollipop (and TBS Minion Pro/Triumph Pro maybe?). Moving VTX antenna up and away from the frame greatly improves video quality. * **Mounting bracket for the NamelessRC TinyGPS** for telemetry, speed measuring and GPS rescue failsafe (I haven't tried to configure the failsafe part yet). 12 Sep 2021, top part v4.1 changes: * **A little more room for the battery** to fit cells easier. * **Ejector tool** to remove batteries easier by sticking it to the foremost slot of the bottom part. * **Positive power wire hole tilted** to make room for the ejector tool. * **A few fixes to the thin walls** to make their thickness a multiple of 0.4. * **Updated reinforcement scheme** for high-carbon nylon prints. ### Printing: * Top part: 2 walls, 2 top, 2 bottom, concentric pattern for the first layer and top skin. 25% octet infill with [local reinforcement](https://imgur.com/a/gJ91Wqu) for high-carbon nylon, 50% infill for low-carbon nylon like ePA-CF or PETG or PLA. Don't anneal ePA-CF. Don't bother trying ePC. Supports may be left disabled. I use high-carbon BFCarbon nylon for my prints. * GO2 mount: TPU, print laying on the back. Attach to the battery [like this](https://imgur.com/a/QDmiEqw) to keep the quad balanced. * Prop guards: CF Nylon or PETG, 2 walls, 50% octet infill. STL is for the right prop guard, just mirror it before printing to make the left guard. I use ePA-CF for my prints. * The rest (bottom part, GPS bracket, antenna clip): nylon or PETG. ### Non-planar printing: Prop guards may be printed [non-planar](https://www.youtube.com/watch?v=knbYKlcQNQQ) to make them really strong. I managed to print it with regular CR10 on my slightly modded Ender 3 V2, but I had to temporarily remove part cooling fan, bed leveling sensor and even silicone sock, clearances are that tight for CR10. It's not possible to slice a print like this with a conventional slicer, so here're gcode files for [left](http://cpp.in/dev/nanolr/nlr-evo-guards-v4.2-l-out.gcode) and [right](http://cpp.in/dev/nanolr/nlr-evo-guards-v4.2-r-out.gcode) prop guards. These files assume that by the time the file is launched your hotend and printbed are heated up to the desired print temperatures and all axes are homed, so you have to do it all manually prior to starting the print. **Don't try to print these files unless you're sure you 100% understand this paragraph.** **This is pure experimental stuff. Don't leave your printer unattended.** ### Misc notes on parts and assembling: * Front compartment is very small in this frame, but the rear compartment is larger, so it's possible to fit everything inside, including capacitor. [Here's](https://imgur.com/a/7HDU24p) the picture how my quads look on the inside. * I always used Crossfire everywhere including my first NanoLongRange build, but stock antennas are too large for this frame and Minimortal T has abysmal range (like tenth of the stock), so now I use ExpressLRS with Happymodel EP1 receivers for this frame. Shortly, it's great. * While Minimortal T is marketed as 900MHz antenna it actually works way better at 2.4G having VSWR~=1.2. It's superior in build quality compared to stock Happymodel antenna and is on par with it performance-wise. It may be further improved a bit by removing capacitor and inductor from the matching board on the antenna and placing a short where the capacitor used to be. * Fitting the step up booster to power the VTX is somewhat tricky, but it's really beneficial as it gives you a couple of extra minutes of flight time. VTX will still brown out before FC, the particular voltage depends on the booster used and VTX power draw (about 2.4-2.6V for 25 and 100mW, up to 3V for the MAX of TBS nano32). It may be useful to have VTX power [on a switch](https://www.youtube.com/watch?v=a1_U2v0kAjg) to gradually lower it when returning from afar on low battery for example. Adding LC filter before or after the step up booster may reduce the motor noise if you have it (usually on lower VTX power levels), but it's not necessarily useful for the every setup. * Foxeer Lollipop 3 or TBS Triumph Pro antennas on the VTX are really night and day compared to stock whips or tiny CP antennas like TBS Switchblade or Lumenier AXII nano. * It's relatively hard to fix a ripped uFL as it often rips the HF pad/trace as well, so use the antenna glue to glue the antenna connector AND as much cable as possible to the VTX board. It's better to install VTX with uFL connector facing front for this purpose. * Configure as "props out", it turns noticeably better this way, especially in heavy configs. * If you have "flashing failed" status when reflashing your ESCs, you should just retry until it succeeds (up to a few dozens of times). Using fully charged battery usually helps, temporarily connecting 2S battery usually helps a lot (but disconnect VTX voltage booster first if you use one). * Gemfan 65mmS props may be used with this quad (ones with 1.5mm shaft hole). They are 2 times lighter and disk loading is closer to optimal with them. Hover RPM is about 18k and max RPM is about 28k (vs 14k and 21k of 3' hurricanes). I've only done a couple of flights with them and now the season is over where I live, so no pros and cons, just an option if you want to try. ### Components shootout: * FC AIO * **HGLRC Zeus5** **+** The most "brand" one. **+** WiFi configuration, if you need it. **+** Well thought pads layout, receiver stacking for CRSF-like receivers. **~** Two extra pads (S5, LED_STRIP) are available. **-** Only one hardware serial available (other one may be recovered, see below). **-** Some units overheat out of the box, see below. * **JHEMCU Play F4** **+** The cheapest one, performance-wise on par with Zeus5. **+** Both UARTs available. **~** One of the HW UARTs is configured weirdly in the default config, see below. **~** One extra pad (LED_STRIP) is available. **-** No mounting bobbins included. **-** A lot of DOA reports. I've got 3, all working fine however. * **DarwinFPV 1-3S AIO** **+** 15A ESC, sharper punch on the fresh battery. **+** 3 extra pads (S5, RSSI, LED_STRIP). **-** Lands at 2.8V compared to others flying down to 2.5V (about 1min extra flight time). May be solved by changing FETs, see below. **-** A couple of grams heavier than the others. * Motors. They all basically perform the same, get the ones that are in stock. * **Flywoo Robo RB 11500KV** **+** No play between shaft and bearings at all. **-** Harder to buy. * **RcInPower GTS V2 11500KV** **+** Easy to buy **-** Small play between shaft and bearings. * **HGLRC AEOLUS 11600KV** **+** Slightly higher KV actually does result in a slightly lower hover throttle, I haven't expected to be able to see it. No noticeable difference in flight time or performance though. **-** Noticeable play between shaft and bearings. **-** One of my motors was delivered unbalanced because of balancing epoxy chipped off from the bell. * VTX * **TBS Unify nano32** **+** Smallest, thinnest, easiest to fit. **+** The most powerful of three. **~** Needs LC to get rid of the motor noise at 25 and 100mW. **-** No microphone. * **Eachine Nano V3 VTX** **+** Cleanest video, usable without LC. **-** Largest one, hardest to fit. **-** There are DOA reports. I've got 5, all working fine. * **HGLRC Zeus Nano VTX** **+** Cheapest one. **-** Thickest one, a bit challenging to fit with LC. **-** Noticeable motor noise on lower power levels persists even with LC **-** Least powerful of three. ### Extra 1: Recovering/reusing UART1 on Zeus5 Zeus5 has only one hardware UART exposed and it is commonly used by the receiver. There's second hardware UART that is used internally for WiFi configuration, I don't really need this feature and prefer to use second UART for GPS or OpenLager, so [here](https://imgur.com/a/DoErukI)'s how I rewired it (this is updated diagram, original one had undesired connection between uarts because of hidden via). Some (better than mine) microsoldering skills are required, if you're using an SBUS receiver you need to run the RC jumper accordingly. WiFi network may be disabled permanently with following CLI commands: set pinio_config=1,1,1,1 set pinio_box=29,255,255,255 save To re-enable WiFi: set pinio_config=129,1,1,1 set pinio_box=0,255,255,255 save ### Extra 2: ESC and Core overheating on Zeus5 See my [first remix](https://www.thingiverse.com/thing:4841862). ### Extra 3: Configuring UARTs properly on JHEMCU TX part of UART2 is split and used for a Softserial, this limits usage of UART2 to a single wire fport-style serial receivers or simplex peripherals. To make it two-wire full duplex again, type: resource SERIAL_RX 11 NONE resource SERIAL_TX 2 A02 save To use LED_STRIP as a Softserial for Smartaudio etc, type: resource LED_STRIP 1 NONE resource SERIAL_TX 11 A00 save ### Extra 4: Changing FETs on DarwinFPV AIO### There are very few p+n FETs with a compatible solder pattern out there, I've bought a few and after some [testing](https://imgur.com/a/Zl11TT2) I've ended up with two good upgrade options: **DMC3016LDV** same package as stock ones, better in any aspect, quad flies down to 2.4V. **Si5517DU** half size of stock ones, lower amps(about 7A per motor), quad flies down to 1.8V (it's the MCU that shuts down and VTX is long gone at that moment). These FETs still allow to draw close to maximum current from the VTC6 and they perform better than the first option with U<2.8V. Both options perform noticeably better than the stock ones, both options perform better than FETs on Zeus5 and Play F4 FCs (both stock SiA517DJ and "best upgrade option" SiA527DJ).
With this file you will be able to print NanoLongRange Evo with your 3D printer. Click on the button and save the file on your computer to work, edit or customize your design. You can also find more 3D designs for printers on NanoLongRange Evo.