NCC-1701-D Enterprise Warp Core Reactor
thingiverse
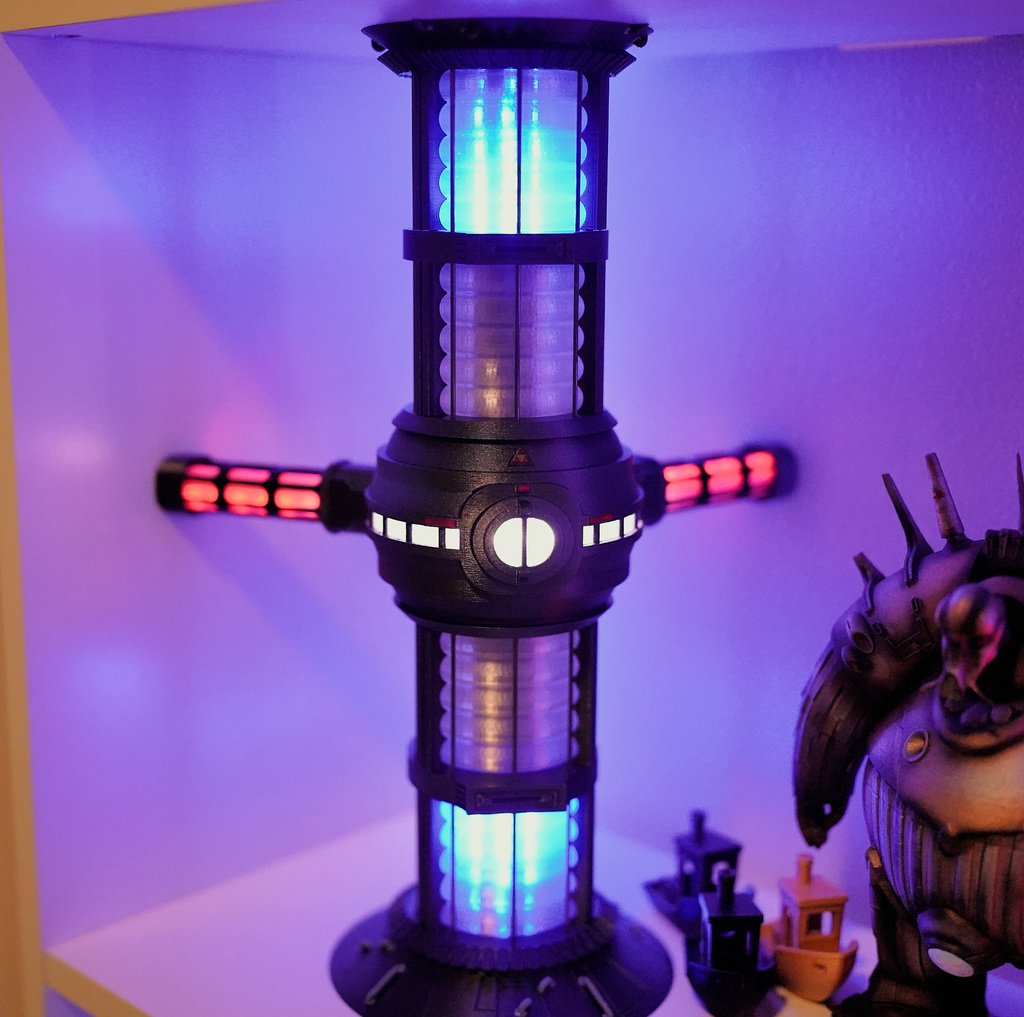
<h3> [New and improved version](https://www.thingiverse.com/thing:6272909) </h3> <br> <br> <h1>The USS Enterprise NCC-1701-D warp core</h1> <br> This is my own design of the TNG warp core that I've spent dozens of hours creating and trying to make as screen accurate as possible. I hope you enjoy and give credit where credit is due. <h1>What to print</h1> Print qty 1 of: * chamber glass * chamber glass front * warp core chamber * chamber LED support * Base and a top of your choice (there's a few options I've provided) Print qty 2 of: * power conduit endcap * power conduit inner * power conduit outer * mag coil support * mag coil support detailed Print qty 4: * mag coil * led support segment long * mag coil support rear beam print qty 20 of: * led support segment small <h1>Printing tips</h1> * print the coils with 0% infill and 1 shell * print the chamber upright with supports (see example slicer image attached) * print the LED support pieces with a .2 mm layer height (or single first layer) * print the mag support back beam on it's side with support (see example image) * print the windows, coils and inner power conduit with a transparent filament for the LEDs to shine through * For the LED chamber support, I split the model in half and glued together after printing due to its shape being not ideal for printing * You can print more of the magnetic constrictor segment pieces and LED supports if you want to make the model taller by adding more segments <h1>Additional items to finish</h1> * 3x 36" long .062" music wire or something similiar * WS2812B LED strips (100 LEDs / meter) 10mm wide strip * LED control board * 5v power source * soldering equipment * various wires and connectors, etc * paint <h1>Notes</h1> * Music wire: cut to smaller lengths and glue around the coils (see example image) this gives the warp core a more screen accurate appearance * I purchased the music wire from a local hobby shop. K&S is the brand I believe Amazon sells it as well * LED strips: LEDs must be 5mmx5mm (5050 chips) and 5mm apart from each other on the strip. The strip must be 10mm wide MAX.I use the BTF Ws2812B LEDs purchased from Amazon: https://www.amazon.com/dp/B07BTTY4FL?ref=ppx_yo2ov_dt_b_product_details&th=1 * WLED Installer website here: https://install.wled.me/ * Youtube video on how to flash WLED and setup/control LEDs vis WLED: https://www.youtube.com/watch?v=GYxctjukehY <h1>Assembly Tips</h1> * Cut 20 strips of 5 LEDs per strip, and gently bend and stick the LEDs to each segment * Each LED chip should be centered on the flat surface of the LED spacer * Bending the LED strips at their "cut" area is usually OK * Super glue the LED spacers together with the LED strips attached * Remember to solder the LEDs in the proper order! * The transparent coils are a tight fit into the coil supports and the supports should fit into each other and the chamber. A little filing or sanding will help if you have any fitment issues. Glue everything together when you're confident it's good and in working order, like LEDs, etc. <h1>Shopping List</h1> * 5v power supply >> https://www.amazon.com/gp/product/B07Q26YG61 * D1 Mini ESP board >> https://www.amazon.com/gp/product/B07RBNJLK4 * LED strips (qty 2) >> https://www.amazon.com/gp/product/B07BTTY4FL <h1>Updates</h1> <b>4/12/2023</b> * Added holes in the bases/tops for the music wire to be used as alignment pins * Modified the chamber to be thicker where the side glass sits * Made the chamber side glass ring thicker and notched for wire access * Added the matter injector (top) * Added a diffused version of the inner power conduit (better for LED light effect) <b>4/14/2023</b> * I'm calling this project complete. Please reach out if you have any questions! <b>4/15/2023</b> * Added wled_presets.txt file which is my preset which controls the LEDs via WLED software (rename extension to .json and import to your WLED setup) <b>4/23/2023</b> * Added a new "matter injector" top piece that might look more "canon" <b>5/2/2023</b> * Added wiring diagram image <b>5/5/2023</b> * Added screen captures of WLED setup <b>7/33/2023</b> * Added a new base with a cover and a switch. The switch is a ST logo. The base is designed to fit this SPST switch: https://www.amazon.com/dp/B07DWS195R?psc=1&ref=ppx_yo2ov_dt_b_product_details https://youtu.be/plmuxBghTPg
With this file you will be able to print NCC-1701-D Enterprise Warp Core Reactor with your 3D printer. Click on the button and save the file on your computer to work, edit or customize your design. You can also find more 3D designs for printers on NCC-1701-D Enterprise Warp Core Reactor.