Needle Gauge
thingiverse
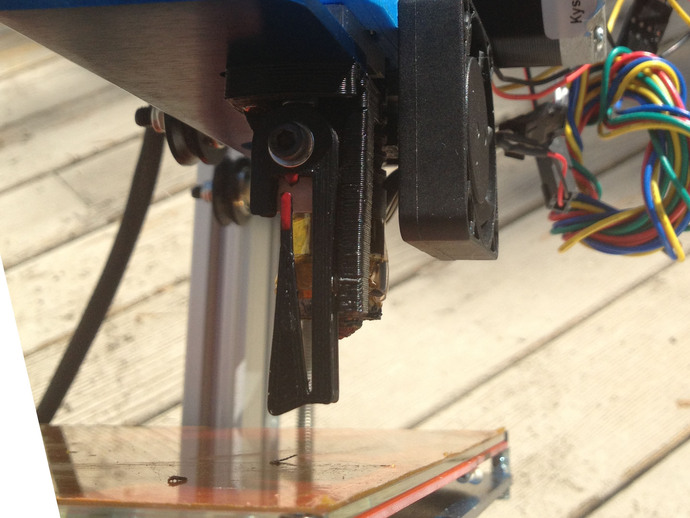
A device for measuring the level and flatness of your print-bed. The gauge is mounted on a hinge, so that it can swing up and out of the way of your nozzle when not in use. The bracket mounts are on 50mm spacing, so that it can be used with a "Greg's Wade" style extruder. It fits (as shown) on an ordbot, and should fit a prusa i3. Instructions Vitamins: 1x M3x12 Allen head bolt. 1x M3 nylock nut. 2x M3 washers. 4x 1/8" x 1/16" (3mm x 1.5mm) neodymium disc magnets. Some epoxy. Optional: Model paint or nail polish (for indicator highlights). A small piece of white cardstock (for indicator background). Some adhesive for the cardstock (I used E-6000, but any compatible glue would work). Tools: A drill, with 1/8" (3mm) drillbit. A 2.5mm allen wrench. A 5.5mm box end wrench, or pliers. Directions: Print one. You may need some aggressive cooling to stop the gauge support from sagging. Touch up all of the holes with the 1/8" (3mm) drillbit. Epoxy the magnets into their traps. Make sure that you face the magnets correctly, so that when the device is assembled they attract rather than repel each other. Install the nylock nut into its nut trap. Epoxying it into place is a plus, as long as you keep the threads clean. Optionally, paint the end of the indicator and the alignment peg in a contrasting color. Optionally, glue and trim a small piece of cardstock to the back side of the needle frame, to improve the needle's visibility. Install the needle gauge mount on your printer, under the extruder. Install the needle gauge on the mount, using the M3x12 and the M3 washers. Using it: 1) Zero your Z axis 2) Raise the Z axis high enough to allow you rotate the probe to the extended position. 3) Rotate the probe to the extended position. 4) Move X and Y to the point you wish to measure. 5) Lower Z slowly until the probe just touches the printbed 6) Continue to lower Z in tiny amounts, until the needle and center mark are aligned. 7) Enter M114 in Gcode, and take note of the Z value. 8) Raise Z by 5mm, and repeat from step 2 for as many points on the bed as you wish to measure. 9) Rotate the probe to the retracted position.
With this file you will be able to print Needle Gauge with your 3D printer. Click on the button and save the file on your computer to work, edit or customize your design. You can also find more 3D designs for printers on Needle Gauge.