NEMA 11 motor mount for Microcube Z Axis
thingiverse
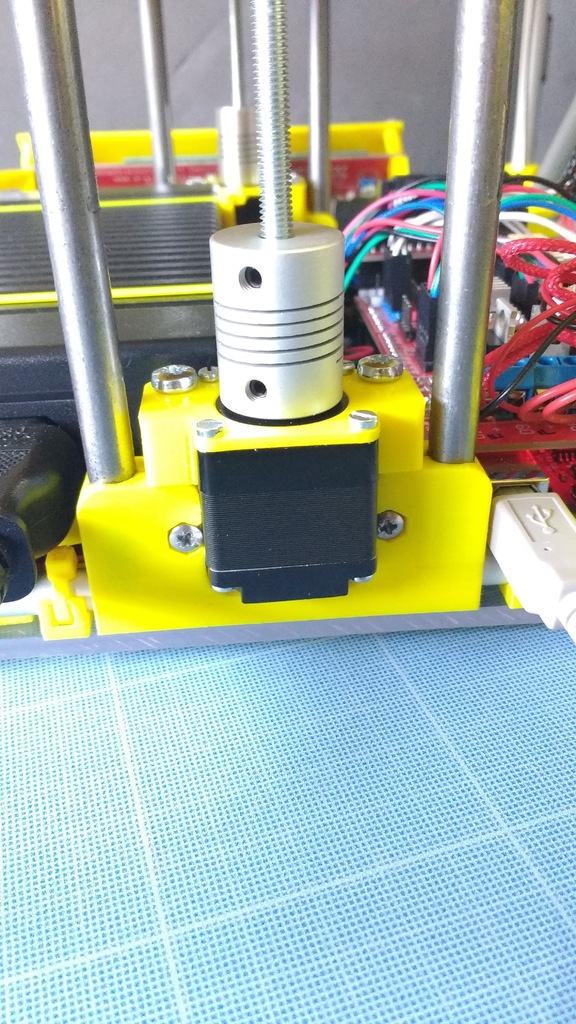
I had a lot of problems with the 28BJY-48 motors for the Z axis used on my original microcube (unreliable, often got stuck, pretty sensitive to any hard points in threaded rods, slow, ...), that were amplified when adding a second Z axis (needed perfect synchronization between Z motors, which seems hard to achieve with 28BJY as there is always a huge difference between coil resistance of two different motors), and a hotbed (a bit more weight to support). And the 28BJY was no way to try adding a z probe for autoleveling on Microcube: autoleveling needs many up and down moves of Z axis to measure enough points on the bed plate. 28BJY always got stuck after a few points (really few, 2 or 3), and they are too slow to measure at least 9 points for good mesh leveling correction. After searching for alternative motors, I chose to try NEMA 11 motors. I selected them because: - Their size is 28mm, which fits perfectly in the original z_axis_motor_mount of the Microcube, so it's easy to adapt some mount for them. - They have a lot more torque than 28BJY (I estimate about x8 for the ones I'm using). - As NEMA motors are a standard with high quality manufacturing constraint, I expect them to all have resistance, inductance and current consumption like their big brothers 14, 17 and 23). - I never used NEMA 11 motors before; this only reason is a go. I bought two (http://www.ebay.fr/itm/311777193131) and mounted them. The perfectly meet my expectation. These little guys are incredible: 8x more power and torque, accurate, never get stuck. I was able to multiply Z speed and acceleration by x10 without any problems. Since I'm using them, I never had any issue with z axis on my Microcube. I can have a lot of full Z up and down in a raw, in only a few minutes. **You'll need:** - 1 x z_nema11_adapter (provided in the thing) - 4 x M2.5x5 or M2.5x4 screws - 2 x M4x16 (or longer) screws - M5 threaded rod about 145mm long (depends on your motor; you can shorten the existing one; see below in instructions) **Note:** using these motors will reduce the Z max of your Microcube by about 20mm. Which means you will only have 70/75mm of height print volume for the original structure size. **Instructions:** To use NEMA11 in your Microcube it's easy: - Buy one or two of them (depending if you have a second z axis or not) - Print z_nema11_adapter (provided in this thing) for each motor. - Remove the actual 28BYJ - Remove the M5 threaded rod, you need to shorten or replace it. It depends on the shaft length of your NEMA11 motor (I used 145mm length M5 threaded rod for mines). - Put the new M5 threaded rod - Screw the adapter to the motor with M2.5x5 or M2.5x4 screws - Put the motor in place and fix it to the original mount with M4x16 screws These motors can take a lot more current than 28BYJ, so you need to adjust your motor stepper driver using VRef! The motor I used are rated to 0.8A. If you have a 2 z axis Microcube, you can connect the two motors on the same Z driver (the motor coil resistance are perfectly matched, and their higher current consumption made them less sensitive to current variations). **Firmware:** You have to adjust your firmware settings for Z axis: - Z step per mm: 4015 (for 1.8°/step motors, like the ones I used) - Z max feedrate: 2 mm/s - Z home feedrate: 2 mm/s - Z max acceleration: 5 mm/s² - Z max jerk: 0.2 mm/s
With this file you will be able to print NEMA 11 motor mount for Microcube Z Axis with your 3D printer. Click on the button and save the file on your computer to work, edit or customize your design. You can also find more 3D designs for printers on NEMA 11 motor mount for Microcube Z Axis.