NEO THANG
thingiverse
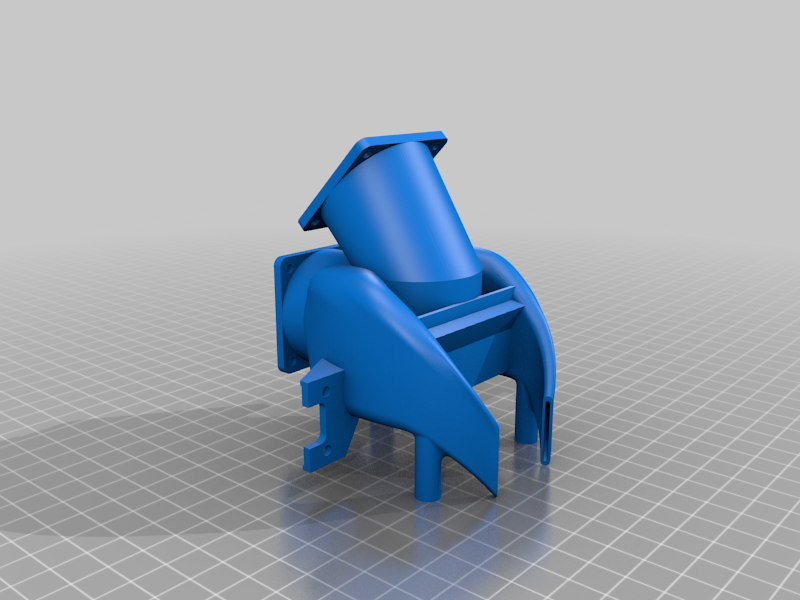
I was so excited to put a Briss Fang on my printer. Then I learned that one didn't exist and I read a forum post where he said he wasn't going to make one for the NEO's because it was a whole redesign. So I exited my comfort zone and decided to make one. I have been through several versions and iterations of this thing. I have included a Binary and ASCII STL file as well as the step files so there is plenty of options for slicers and modification in cad software. Obviously its heavily inspired by the Briss Fang because I thought it was an elegant design and most importantly had excellent viewing of the nozzle. This is not a remake, its completely ground up scribbles based off of measurements of my Ender 3 MAX NEO. This wont fit any other printers outside of the NEO family and I can't even verify that (some kind folks have shared that it will fit any NEO Ender). Included in the pictures is the version before these models that I actually printed and have been using. It's been ok but is made of PLA and it got a bit gooey close to the hot end. It was a very tight fit because I wanted to keep the CR Touch in the exact same spot. The model uploaded pushed the CR Touch away from the nozzle centerline somewhere around 10mm but gave much needed clearance. Print settings and stuff: I printed with PLA, generic slicer settings and supports on but set to build plate only. I will probably make this out of ABS once I get some and am brave enough to try. The first one I printed I set it upside down and that worked fine. The mounting points had the layer lines running lengthwise down them and I was nervous they would split. It did work fine in the end and I believe this is the best way to print it (tried another way and it wasn’t good) Minimum required purchased parts: -One 40xx axial fan. Stock 4010 axial fan to be reused. -Six m3 X 8mm bolts. -Two m3 Nuts. -Three #8 X 5/8" screws. Optional stuff: -Two 40xx axial fans of your choosing. I got a two pack of 4020 so I went with that. -LED strip light. I put one section of under the hot end cooling plenum and its amazing. (If using the Brass Heated Nut Insert version you will need three 3mm thread X 6mm long nut inserts with a major diameter of 5mm. Mine came from Amazon) There is no way around it if you want to make this cooler, soldering is required. Once you start everything is reversible but will also require soldering to reconnect the stock fans. To start the print head must be completely disassembled. I just cut both fans off leaving plenty of wire on them to reverse if so desired. Once the carriage is bare the top factory shroud mount hole must be enlarged a bit for #8 screw to fit through (not required on the heat insert version). Once that’s done the THANG Mount is secured to the carriage with 4 m3 bolts through the factory CR Touch Mount holes and the 4010 Blower fan holes. Once that is complete the hot end goes back on. ** The hot end heater wires need to be run behind the heat brake cooler fins and inside of the CR touch mount bolt heads (seen in picture). The following can basically be done in any order, dealers choice. -Do the wiring for part cooling and heat brake cooling fans. I went with taking power from the brake cooling fan for my LED light strip as well and haven't had any issues. -run the #8 screws into the three mount pegs gingerly to cut threads but not crack anything (not required on Heated Nut Insert Version). The duct can be mounted at any time to the carriage using the #8 screws (or 3mm bolts) and the three standoffs on the THANG. -Mount the cooling fans ensuring to put the part cooling fan on top and heat brake cooler on the “front”. -Mount the CR Tough using m3 bolts and nuts. -Attach the LED to the angled section under cooler to aim the light at the nozzle (if you're adding a light). From there its basically done, just cosmetics as required. IMPORTANT NOTES -I can only for certain say this fits an Ender 3 MAX NEO. I believe it fits all the NEO printers though. -If you still have the stock glass bed, the rear clips may collide with the cooling ducts during printing and bed levelling. I pulled them off the back and moved them to the side. I have a magnetic build plate on the way so it wont be an issue anymore but the retention clips can crash on the back side. -The blue cooling duct in the pictures is the version before this model. I had to make a lot of modifications to get it to work and updated the 3D model accordingly. That's why it looks different. -I am not and will never pretend to be an engineer. I have no idea about the cooling efficiency of this design. Just a dude tinkering on my PC saying “that looks pretty good” over and over. I haven't even done any torture tests with it. I really just wanted to see the nozzle for first layer observation and get a light aimed at it so I can see better. If its technically junk I'll accept the criticism gracefully, and be so very happy if someone improved it. -The ASCII file went into my slicer better. There was an error and repair model option with both Binary and ASCII but the later repaired clean while former still had a few “illegal edges”. I don't know what this means but I did get it to work just fine. -I have never used heated inserts before and modified the model based on what I read and learned about them. So they should work. Theoretically. -I had no idea Neo Thang was a song when I named this thing. Was just what my brain came up with mixing thing and Fang and the Neo was for printer type. -I have been using Printables mostly but decided I should put this on here as well. several people have downloaded it and had positive feedback about it. Happy Printing!
With this file you will be able to print NEO THANG with your 3D printer. Click on the button and save the file on your computer to work, edit or customize your design. You can also find more 3D designs for printers on NEO THANG.