NeoPixel Seven Segment Clock Display
thingiverse
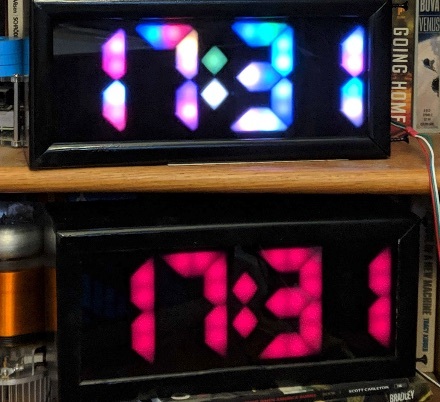
__Update__ 7/11/19: Blog post explains some of the software details. OpenSource code published at github. https://blog.moddable.com/blog/clock-project/ https://github.com/Moddable-OpenSource/moddable/tree/public/contributed/modClock https://youtu.be/_-xJ_BOcGHk __Update__ 7/3/19: Assembly instructions are available at: http://robotranch.org/blog/archives/1235 Two panels of light reflectors and limiters for WS2811 neopixel strands - ie. Christmas Lights. (search your favorite online retailer for _WS2811 12mm Digital RGB LED Pixel_ ) Takes a string of 58 - so you'll have to use a string of 50 and attach another 8. Clip off the rest and save them to make another. Print in whatever color. I then use a plastic spray primer while holding the form with my gloved hand, turning it to get complete coverage and getting in and under the reflector overhangs. Let it dry up for 15 minutes or so, then use a Chrome spray paint and do the same thing. Those two coats should be enough. Let it dry. For a day or preferably more. If you print in white, the whole painting thing may not be necessary. For transparent PLA, it is a must to prevent light leakage between the segments. Use the [PixelTool](https://www.thingiverse.com/thing:3428847) to save your thumbs trying to press the pixels into place. The thin retaining holes can break pretty easily, but it takes some force to get the pixels into place. Use an awl to properly size the holes. The .stl gets close, but the awl will help you get closer. I do it a little at a time until the pixel goes in, then use blue tape around the awl at the proper depth so I can reproduce for all holes. (Something like - _search for_ 5mm - 16mm Hand Held Reamer) You want the leds to be held in firmly. Get some magic [led light transmissive black acrylic](https://www.tapplastics.com/product/plastics/cut_to_size_plastic/black_led_sheet/668) from Tap Plastics, and make sure to mount as close to the reflector as possible. This will prevent light leakage and make nice crisp segments. Use the amazing [Moddable JavaScript SDK](https://github.com/Moddable-OpenSource/moddable) to build and install the clock project to an ESP32. Connect pin 22, power and ground to the LED string and 5v power. Power up and connect to the __clock__ WiFi access point that appears. With a modern browser that supports MDNS, go to **`http://clock.local`** and enter your SSID and password. The clock will use NTP to automatically set itself. Reconnect your computer to your access point and go to **`http://clock.local`** to configure your clock's timezone, daylight savings time, style, colors, etc. Frame building instructions and software will eventually be posted to [http://robotranch.org](http://robotranch.org)
With this file you will be able to print NeoPixel Seven Segment Clock Display with your 3D printer. Click on the button and save the file on your computer to work, edit or customize your design. You can also find more 3D designs for printers on NeoPixel Seven Segment Clock Display.