Neopixel Strip Matrix Crystal Lamp
thingiverse
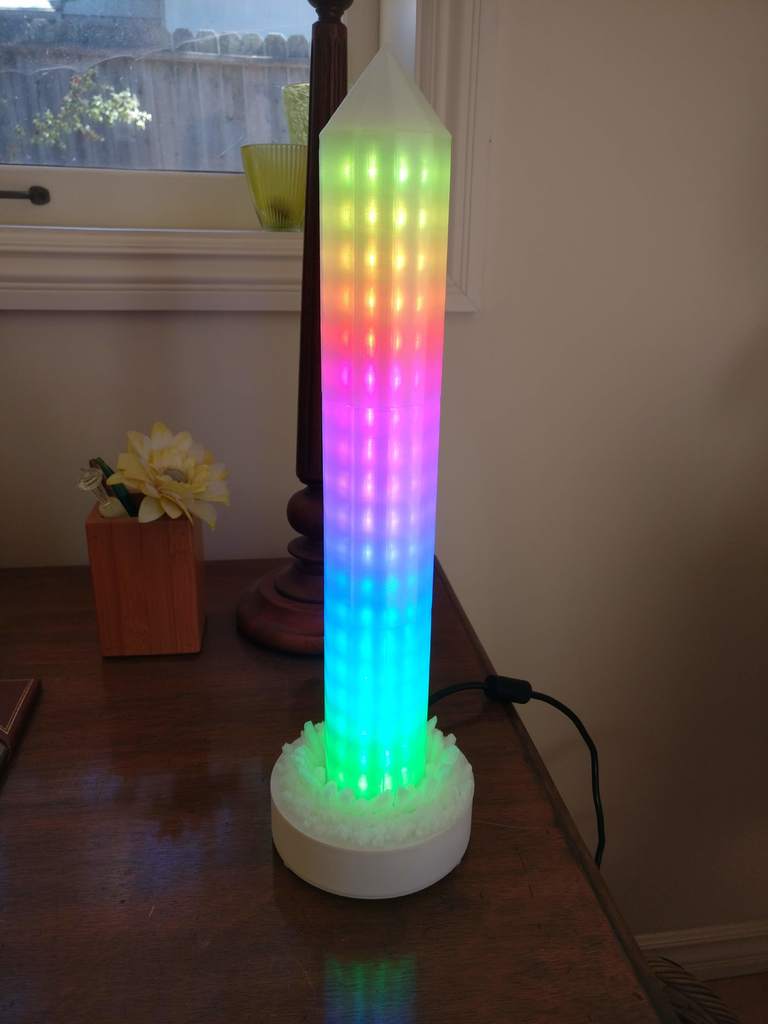
<h3><strong>Overview</strong></h3> This lamp utilizes Neopixel strips in a matrix layout, identical to my other <a href="https://www.thingiverse.com/thing:2966996">Neopixel lamp</a>. The same base components are used, but the strips are arranged into a 19 x 10 matrix that wraps around the lamp. I recommend building this lamp only if you're comfortable with soldering and Neopixels. You can swap out the cover for the matrix; currently, I have two covers: a crystalline one and a simple tube. <h3><strong>Printing / Assembly</strong></h3> Print the shaft cover parts in clear PLA or ABS. White may also work, but it's untested. If you're printing the crystal cover, choose either V1 or V2 of the crystal base to print (see pics). Mechanical assembly should be straightforward; everything stacks together easily. Follow the drawing PDF, which shows both covers but only one is needed. Note that the cover sections need to be glued together. Don't glue the LED strip shaft sections together, but it's recommended. Avoid gluing the cover to the strip shaft; it should fit snugly. <h3><strong>Electronics</strong></h3> For detailed information about the base electronics, see my <a href="https://www.thingiverse.com/thing:2966996">other lamp</a>. The Neopixel strips used in this lamp are available at https://tinyurl.com/yazsvwk8; any ws2812b strip will work as long as it's about 10mm wide. Approximately 3.1m of strip is required. To mount the strips, cut the main strip into sections and attach them to each side of the lamp shaft. Decide how to arrange the strips: either zig-zag (alternating data lines for each side) or straight (sections facing the same direction). I chose a straight configuration with data wires inside the shaft between each section. The strips should have adhesive backing, but mine were not very sticky; hot glue was necessary. If you're unfamiliar with wiring Neopixels, start by reading this: https://learn.adafruit.com/adafruit-neopixel-uberguide/the-magic-of-neopixels. The shafts include wire holes for 22Ga stranded wire, allowing live, ground, and data wires to be connected to each strip section. I chose to inject power at every section and combine the wires onto a central power board (see pics). To reduce clutter, you could inject power every other section. <h3><strong>Code</strong></h3> My code is still a work in progress; it will be posted when more complete. For now, you may need to write your own code, but searching online can yield useful information. Check out the Adafruit guide mentioned above or the fast_LED library for driving pixels. Another resource is https://www.tweaking4all.com/hardware/arduino/adruino-led-strip-effects/.
With this file you will be able to print Neopixel Strip Matrix Crystal Lamp with your 3D printer. Click on the button and save the file on your computer to work, edit or customize your design. You can also find more 3D designs for printers on Neopixel Strip Matrix Crystal Lamp.