Nerf compatible gun powered by rubber bands
thingiverse
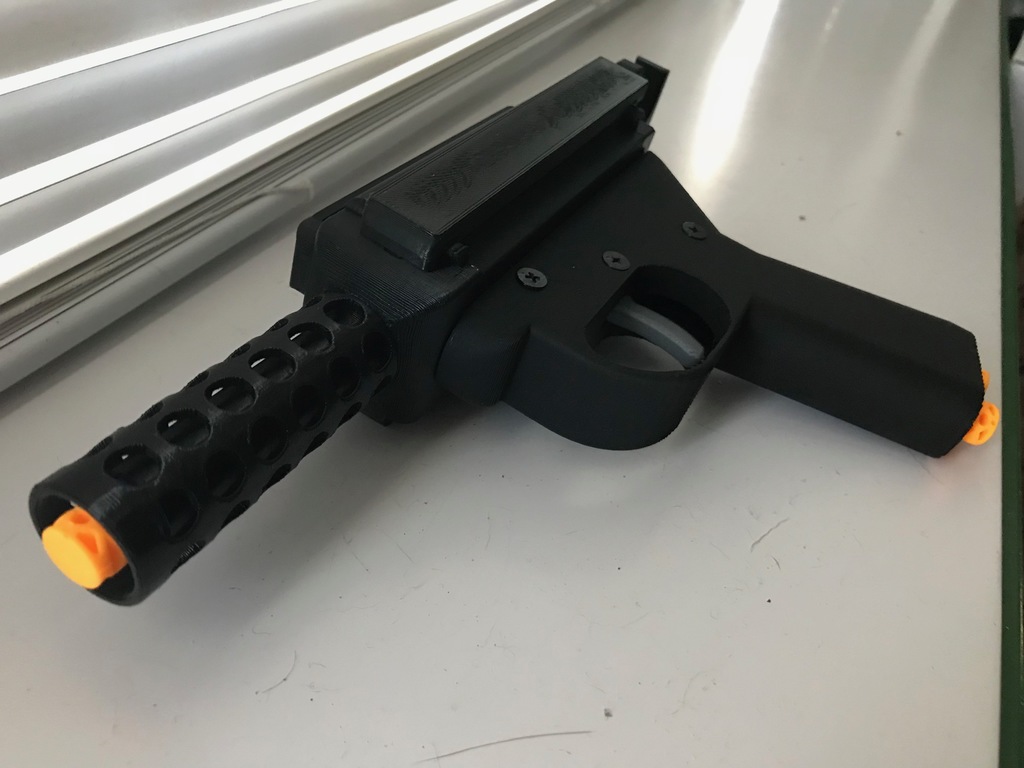
# Description This is a Nerf compatible air gun fully 3D printed, powered by rubber bands. The strength of the gun is controlled by the number of rubber bands installed. I'm using white lithium grease to lubrify the inside of the chamber, and the gasket is printed in flexible filament (TPE 80A). You need two small rubber bands (~7/8 inch) for the trigger action and pull back effect, and two (or more) longer ones for the piston. It works surprisingly well, I'm quite happy of my design! I must admit I spent a ridiculous amount of time working on this :P Its made with FreeCAD. As you can see tho, its far from an "esthetical perfection"... I'm not very talented on the artistic side, feel free to remake it so it looks better! :-) The rail should be compatible with Nerf accessories, but as I didn't had any on hand, I designed it against a scope I took on thingiverse so it may not be perfect... # Printing All the STLs are positioned the way I print them. The `explodedView.stl` and ` fullView.stl` are not meant to be printed. The cylinder and the piston should be printed horizontally to give them strength and so they slide with the layers, not against them. I print the cylinder without any supports. A few layers on the top of the inside don't stick perfectly, I just clean them up before greasing, it doesn't affect the result. I use supports with the piston, the canonBack, the pullerTab, the rail and the handle. I remove the supports inside the handle (I use Simplify3D) to just keep the minimum required, but if you leave them, they are still not very hard to remove. The retainerTab must slide smoothly without effort in the canonBack. If it needs any force to slide, either sand it or scale it down at little on the Z axis. If the pullerTab has issues screwing on the piston, scale it up 2-3%. There is no thead in the screw holes, the screws are pushed-in. The gasket is printed in flexible filament (TPE 80A). I usually print the screws in 0.1, but 0.2 can do. Use 100% infill for the screws (and PETG make them stronger). Using 0.1 for the retainerTab helps avoiding the need to sand it. Use 100% infill. The piston and pullerTab are screwing together correctly at 0.2. 20% + infill for the piston, 3 outlines makes it stronger. Any infill for the pullerTab (use 3 outlines if 0 infill) All the other parts works correctly even at 0.3. Use 100% infill for the trigger. All the other parts can be printed with the infill of your choice. I even printed all of them with 0 infill and 3 outlines in transparent, which worked very well and gave a really cool effect! The hideRubberBand parts are optional. The rail is optional. The tentioners can be replaced by rubber bands. ### Parts you need to print - 2x tentionerA - 2x tentionerB - 2x hideRubberBand - 6x M3-5x8 screw - 3x M3-5x25 screw - 1x of all the other parts # Assembly ### Parts preparation / cleanup - Insert the piston in the cylinder (the retainer slot on the piston must be facing upwards) and play with it to smooth / clean both parts. - Make sure the retainer tab moves freely in its slot in the canonBack part. - Make sure the piston arm slides freely in the canonBack and in the retainerTab. - Properly clean the screw / thread of the piston arm / pullerTab ### Piston / Gasket assembly - Insert the gasket in its slot on the piston and place it so it sits correctly without being twisted. The thinnest part of the gasket should be facing back (piston screw side). - Grease the gasket. - Grease the inside of the cylinder. How the piston slides in the cylinder directly affects the strength of the gun. ### Trigger mechanism assembly - Insert two small rubber bands in the handle, kept them place by inserting the back screw through them. - Insert the trigger and put a screw to keep it in place. - Use a hook-like tool (dentist tool) to bring the two rubber bands over the trigger arm in the slot. - Use your tool again to pull one of the rubber bands, and put it over the retainer tab hook. - Slide the retainerTab inside the canonBack in its slot. - Insert the piston arm in the hole of the canonBack, going through it and the retainerTab. - Insert the piston in the cylinder. - Slide the back of the cylinder in place then push the front in the slot of the handle. You'll probably need some force, its tight. - Insert the screw to hold the cylinder on the handle. ### Putting it all together - Screw the pullerTab on the piston arm. - Insert the rail in the canonBack. - Insert the canonFront on the rail. - Insert the tentioners in place, put their screws in the canonBack. (If you want to be able to disassemble, make sure you can still put your nail between the screw and its socket to pull it or you won't be able to remove it later-on, it won't "unscrew") You should now do a few tests to choose your main rubber bands. The number / strength of them will be directly affecting the power of the gun, but will also affect how hard it it to pull the trigger. When you're happy with your rubber bands setup, you can install the hideRubberBand parts, screw them in the canonBack and enjoy your new toy :-) Very quick video of it shooting : https://www.youtube.com/watch?v=n1S_KdSi4o4
With this file you will be able to print Nerf compatible gun powered by rubber bands with your 3D printer. Click on the button and save the file on your computer to work, edit or customize your design. You can also find more 3D designs for printers on Nerf compatible gun powered by rubber bands.