Nerf Elite Trip Mine Booby Trap
thingiverse
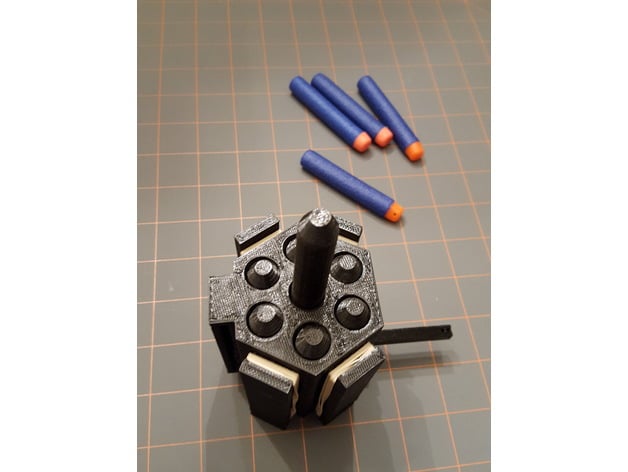
This project is my take on a Nerf Elite foam-dart launching trip mine/booby trap based on a similar design by @IanGrayden whose design was inspired by @AnthongRedbeard. This trap uses rubber bands to store energy that propel Nerf Elite darts several yards when the device is triggered by the target-person walks through a trip wire or string. The device can be mounted to furniture, cubicles, or other supports using Velcro wrap, rubber bands, 550 cord, or other methods. A trip wire string is secured to the opposite wall with a pushpin or other method. WARNING: This project is a toy, but the rubber band design is capable of generating strong snapping forces at pinch points that could injure a finger or otherwise injure small children or other vulnerable or unsuspecting users. Use good sense and risk management principles when placing this device. Remain in the area where the device was placed to ensure it is not mistaken for a hazardous device. Use this design at your own risk. I accept no responsibility for injuries, damages, liability or any other negative outcome of your use of this design. If you wouldn't be comfortable setting a standard springing rat trap, this project probably isn't right for you. Print Settings Printer: XYZPrinting Da Vinci Jr 1.0 Rafts: No Supports: No Resolution: .2 mm Infill: 15-30% Rectolinear Notes: IMPORTANT: If your XYZWare, or other brand, 3D Printer software tells your it found problems with this design and it would like to auto-repair them...DON'T DO IT! It will mess up the geometry and try to fill in holes that need to be there for the project to work. Just hit CANCEL for a DaVinci Jr 1.0. Any other brand or model...CANCEL, NO, or DISABLE auto-repair. If you are going for maximum power/velocity or think you will want to exceed the recommended two 0.25-inch by 1.5-inch bands on each lug, print the pusher mechanism with HIGH infill, much higher than the 15% I have recommended here...maybe 90%. I managed to break one pusher mechanism center guide cylinder when testing how many rubber bands I could install and still physical pull apart and arm the mine by hand (see video). In this video I fired parallel to ground to get a standardized estimation of dart distance at max power, but you will get better range by aiming at an upward angle. The pusher broke with four (4) bands on each lug. OTHER: Supports and raft are unnecessary, use them if you like but be prepared for extra sanding/drilling. I printed in black, but I think clear colors might look pretty cool. Use higher-resolution settings on your printer, if available, the smoother the exterior finish (thinner layers or more sanding) the smoother the action when it goes off. Post-Printing MATERIALS REQUIRED MATERIALS: --3D Printed Parts (Body, Pusher Mechanism, Trigger Mechanism); --One nail (I used a zinc 1.5 inch Everbilt #801304 from Home Depot, a 35 count package was $1.30, any similar sized nail will do); --Approximately 3-inches of straight metal coat hanger wire or other sturdy metal rod of similar diameter; --String or trip wire of suitable length for your planned use --Four (4) to eight (8) rubber bands, 0.25-inch, 1.5 to 3-inch length (double wrap the longer bands to find a suitable power level OPTIONAL MATERIALS: --Sand paper, 120-220 grit (optional) --One eye hook (I used a stainless 0.5 inch screw eye Everbilt #817141 from Home Depot, a 4 count package was $0.99, any similar screw eye will do); --Approximately 1-foot of Velcro one-wrap/two-sided hook and loop strap for mounting, you may substitute 550 cord, rubber bands, or any other suitable material --Approximately 1-foot of 0.5-inch wood dowel POST-PRINTING/HAND-FINISHING INSTRUCTIONS Print the mine body. Remove the mine body from printer and start printing the pusher mechanism. While the pusher mechanism is printing, you can work on finishing the body by: 03a. Sanding inside the cylinders. Use fine 220 or medium 120 grit sandpaper wrapped one time around a 0.5-inch dowel to evenly sand inside the dart cylinders in the mine body. Don't wrap the sandpaper more than one to 1.5 times or it may be too wide to fit in the holes. Use a piece of painter's tape to secure the inner edge of the sandpaper to the dowel, if needed. 03b. Use a drill bit of the same diameter or a slightly smaller diameter as your selected nail to clean up the small holes in the tabs on the bottom of the body that the nail will go through. 03c. Sand exterior of body and/or paint, if desired. When the pusher mechanism finishes printing, start printing the trigger mechanism. While the trigger mechanism is printing, touch sand the pusher mechanism, if desired, to improve the smoothness of the action. I do not recommend printing the pusher mechanism of the inside of the bore of the dart cylinders. When the trigger mechanism finishes printing, attach it to the body with the long arm facing out and the short arm facing down. Do this by cutting your 1.5 inch nail's point end off using a pair of side cutters to about 0.75-inch length. This is better than using a 0.75-inch nail because you get a square edge. You probably will not need to glue it, you may even need to use a drill bit to ream out the hole in the trigger mechanism to the diameter of your nail if your printer filament drooped a little during printing or your nail is a different diameter. The nail should fit snugly in the hole in the trigger mechanism, and rotate easily in the holes in the body tabs. Insert the pusher mechanism into the body. Ensure the four tabs with rubber band retaining slots line up with the matching slots on the top of the body and the tab for the rod lines up with the trigger mechanism tabs. Attach one to two rubber bands to each of the four sides of the body and pusher mechanism that have retaining slots. Done! Optionally, predrill a 1/16-inch hole near the top of the body on the side of the body with the trigger mechanism on in. Screw a small eye-hook or "screw eye" into that hole so the eyelet holes face the top and bottom of the body. Feeding the trip wire or string through such an eye keeps the trigger pull force going in the right direction on the trigger mechanism even if you install the mine at an angle other than directly parallel to your trip wire direction. DEPLOYMENT/OPERATION Stretch the rubber bands by pulling the pusher mechanism apart from the body. Rotate the trigger mechanism so that the small arm points down and the long arm points outward, away from the body. Install a metal rod, like a 3-inch straight section of metal coat hanger, by placing one end in one of the detents on the top of the pusher mechanism and the other end in the single detent hole on the end of the short arm of the trigger mechanism. Install six (6) Nerf Elite darts in the dart cylinders. Hold the body in your hand, point the device in a safe direction, use care to keep your fingers away from pinch points including the pusher. Test fire the device by pushing the long arm of the trigger forward toward the top of the body. If the test was successful, attach a string to the trigger by tying it through the two very small holes in the long arm, pass the other end through the optional screw eye in the mine body, if used, and rearm and deploy the mine How I Designed This CHANGE LOG 2/11/2017 - I have substantially revised the trigger mechanism @IanGrayden used to include a lever that trips the mine with a variable and consistently repeatable trigger pull weight. The trigger mechanism revision also eliminates the need to use a strip of pop can or a safety pin, both of which may have sharp or dangerous edges I found unsuitable for kids. I changed the body shape to a hexagonal design rather than a cylinder. I beefed up the rubber band retaining slots to facilitate use of multiple 1/4-inch rubber bands capable of insane power. I modified the pusher cylinder tolerances and changed the shape of the pusher cylinders to make the mine action smoother with my printer with less finish work/sanding.
With this file you will be able to print Nerf Elite Trip Mine Booby Trap with your 3D printer. Click on the button and save the file on your computer to work, edit or customize your design. You can also find more 3D designs for printers on Nerf Elite Trip Mine Booby Trap.