Nerf Nemesis High-Powered Brushless Mod
thingiverse
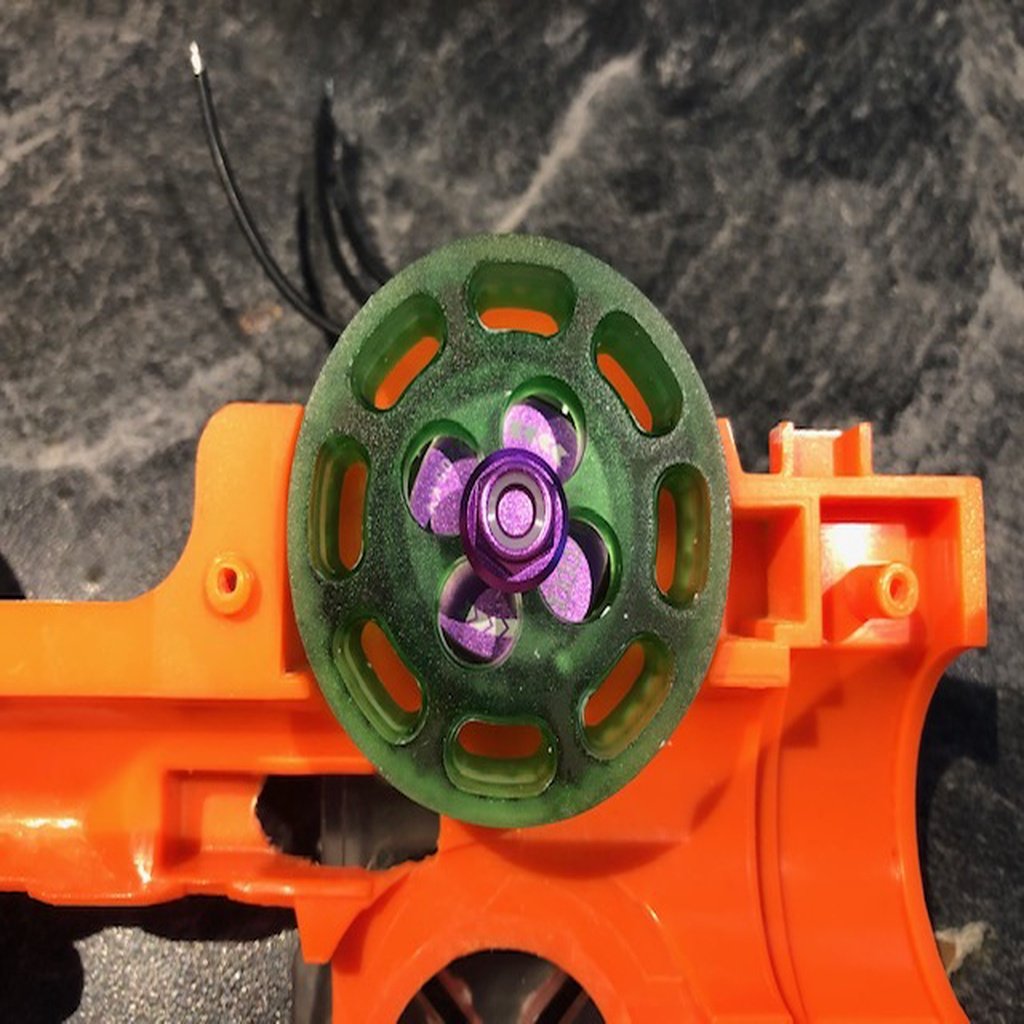
DOWNLOAD FUSION360 SOURCE FILES:\r\n- https://a360.co/2OqjkYe\r\n- https://a360.co/2Ir5jFV\r\n\r\nTurn Your Nerf Nemesis into a High-Powered 480W Monster with This Flywheel Cage and Flywheels Mod.\r\n\r\n## WARNING: THE CONVERTED NERF RIVAL IS NOT SAFE FOR CHILDREN! THE PROJECTILES CAN CAUSE SERIOUS INJURY TO SENSITIVE AREAS. USE RESPONSIBLY AND AT OWN RISK!\r\n\r\nThis design is optimized for printing with an SLA or SLS printer, and I used the Anycubic Photon with various resins to create it. However, I attempted to print this with PLA on my Creality Ender 3, but it was not ideal due to PLA's brittleness and the resulting dimensions and physical strength.\r\n\r\nThe flywheels are designed to fit 2204 and 2205 brushless motors with a bell diameter of 28mm perfectly. When installing flywheels, be extremely cautious as any off-angle installation can cause jamming and vibrations later on.\r\n\r\nWhen selecting brushless ESCs, avoid super-fast drone or copter ESCs as they run different control protocols and are difficult to control with an Arduino. Choose standard ESCs with a decent amperage between 20A and 40A.\r\n\r\n# Parts List\r\n\r\nTo complete this mod, you'll need the following electronic components:\r\n\r\n- A pair of 2204 or 2205 2300KV brushless motors (CW & CCW)\r\n- A pair of 20A or up to 40A brushless ESCs (Make sure they're regular ones, not designed for copters or drones.)\r\n- An Arduino Uno, Nano, Due, Duemilanove, or any other small board that can take 5.5V input and has at least one digital in and two analog out.\r\n- A step-down voltage regulator to convert 12V to 9V.\r\n- A lithium polymer battery (12.4V 3S) with a capacity of around 1300-2600mAh, along with a compatible battery charger.\r\n- A battery plug that fits your lithium polymer battery\r\n- Two pieces of 200cm 16AWG wire in red and black\r\n- Thin insulated electrical wire for additional connections\r\n- Shrink tubing\r\n- A soldering iron and solder\r\n- A dremel or plastic cutting pliers, sandpaper, and files.\r\n\r\n# Modifications to Nerf Rival Parts\r\n\r\n- Disassemble your Nerf Nemesis. Access the orange flywheel cage by opening it up and removing the part that holds both motors and flywheels.\r\n- Carefully remove stock flywheels and motors from this part.\r\n- Use a dremel or cutting tool to carefully remove the motor domes, then file down the walls of these domes flat.\r\n\r\n# Wiring\r\n\r\nGet the source code: https://github.com/m-hallmann/nemesis-arduino\r\n\r\nHere's a brief explanation:\r\n\r\n- Include Servo.h and connect two appropriate outs to servo.h. Attach the data cable of your brushless ESCs to one out each.\r\n- Run a loop that reads one digital in. If it's high, send a maximum value to the two servo outs; if it's low, send a minimum value to the servo outs.\r\n\r\nYou can get fancy and add a delay timer to the startup routine to avoid accidentally changing the configuration of your ESCs during boot sequence.
With this file you will be able to print Nerf Nemesis High-Powered Brushless Mod with your 3D printer. Click on the button and save the file on your computer to work, edit or customize your design. You can also find more 3D designs for printers on Nerf Nemesis High-Powered Brushless Mod.