Nespresso Coffee Capsule Sleeves Case (Original Line capsules)
thingiverse
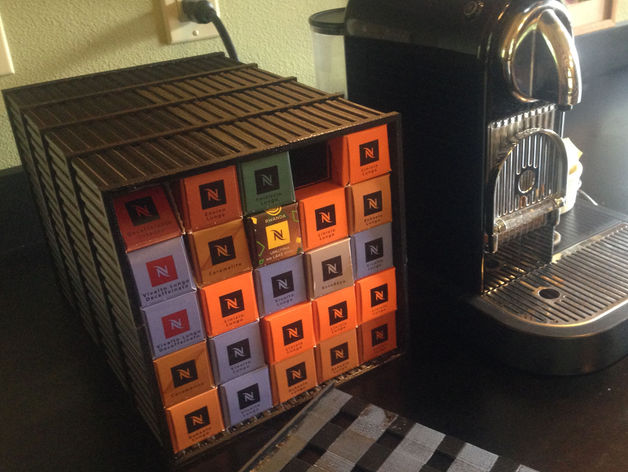
When my wife and I first ordered 250 Nespresso coffee capsules, the 25 sleeves came in a very cool cardstock container that we kept using. Over the months, it got worn and shabby, but we still liked the concept. So my wife (who bought me my Davinci years ago) asked me to print a replacement. It works great. This build has 48 pieces and a difficult assembly. Its a big project. Print Settings Printer: DaVinci 1.0, flashed to Repetier Rafts: No Supports: No Resolution: I used .4mm layers Infill: 10% Notes: Keeping the parts adhered to the glass while printing is absolutely necessary! Any edge-lifting will throw off the assembly. For me, using skirts (6 loops) on the panel and lid-parts worked great. The ribs and back-panels were more of a problem. I eventually resorted to a thin-layer of acetone-ABS slurry painted on the platen glass AT ROOM TEMPERATURE and allowed to dry. Never ever apply slurry to a heated glass platen - that will cause pot-holes to chip out! Post-Printing Assembly After printing out all of the pieces (36 for the Case, 12 for the lid) some assembly will be required. I used ABS filament dissolved in acetone as glue - a slurry. (I tried model cement but it was too messy.) I also tried just acetone, but it evaporated too quickly. Using a slurry seemed to slow down the evaporation, giving it time to soften the contact points on the pieces. Note, The slurry gets thicker as you go from evaporation so you must constantly add acetone to keep the desired consistency (buttermilk). In gluing two pieces together, I used a fine brush to apply the slurry to both pieces' contact points. Only a little is required - don't get sloppy. The brush cleans up well in acetone with a paper towel. Be sure that you stagger each panel to rib layer - each panel must attach to two ribs; each rib must attach to two panels. Each pair of adjacent panels has a point of contact. I recommend not gluing these together. The joint is hidden and there is too much of chance of the slurry slopping out to the exterior. Notice the hammer in the picture. That's to tap each layer to make sure that each joint is all-the-way-tight. How I Designed This All done in SketchUp. The panels are corrugated for two reasons. Greater strength for its 1mm width. Also, the corrugations provide stress relief as the top layer cool and contract making it easier to avoid "lifting".
With this file you will be able to print Nespresso Coffee Capsule Sleeves Case (Original Line capsules) with your 3D printer. Click on the button and save the file on your computer to work, edit or customize your design. You can also find more 3D designs for printers on Nespresso Coffee Capsule Sleeves Case (Original Line capsules).