Nespresso Vertuoline Pod / Capsule Recycler
thingiverse
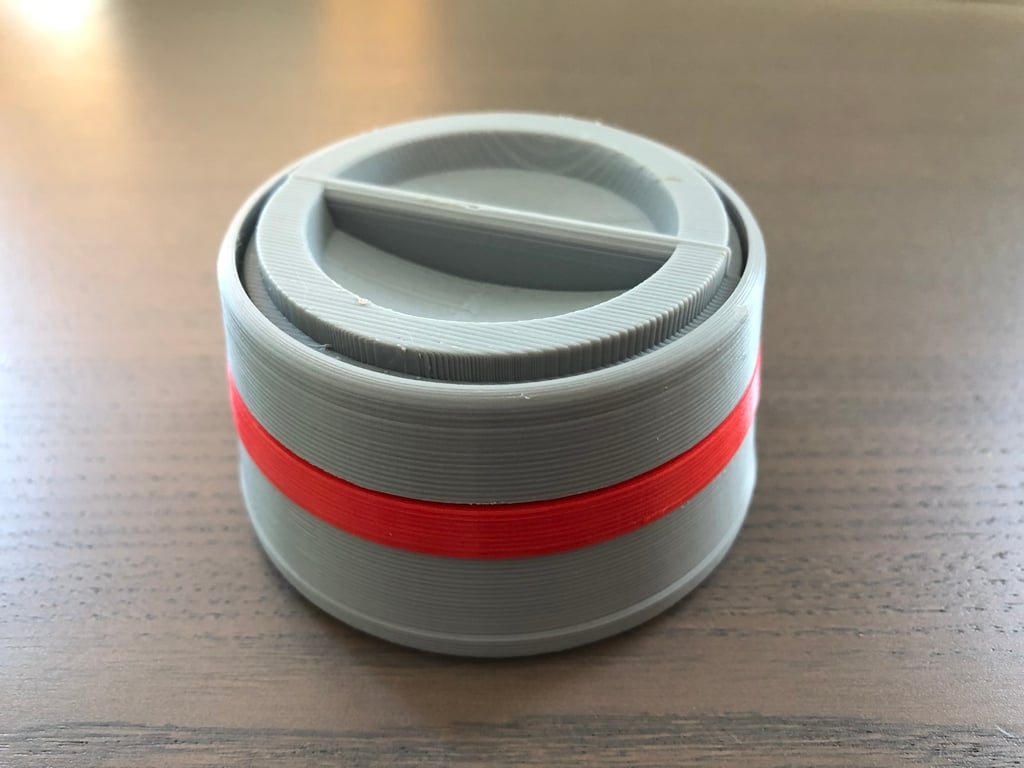
I love the convenience the Nespresso pods, and my wife bought be a Vertuoline series a year ago for Christmas. I knew that the older generation of pods / capsules had endless third party options to refill / recycle the capsules; however, the Vertuoline series had little to no options available so I printed my own. This design is printed in multiple parts, this allows you to customize the item to your color preference. In order to avoid any structural support, given that the bottom "guard" and top "tamper" thread into the main body the structural support ruined the threads, I eliminated any need for them. You simply glue the pieces together to create the finished item. There are 5 parts to the design... 1. The bottom "Guard", this is used to protect your hands from the embedded razor blades, and threads onto the base of the main body. It also has a dual purpose when used for refilling pods, you can place the guard overtop of the pod to avoid coffee grounds collecting around the edge and preventing the recapping sticker from adhering to the pod. 2. The main body come in 2 parts, the bottom part holds the razor blades firmly into the base. 3. The "ring" in between the two halves of the main body is simply the result of splitting the main body into two parts in order to print threads on both the top and bottom without requiring structural support. The ring provides a decorative way to hide the glue joint. 4. The upper part of the main body is designed to hold the capsule / pod with very little room for the pod to move. This is used if you "refill / recap" your pods. 5. The "tamper" is printed in two halves, again to avoid structural support and had two functions. When refilling a pod you can use this to "tamp" the coffee grounds firmer and also, depending on your recapping method, the tamper can be turned upside down to press the recapping sticker onto the edge of the pod. Recycling your pods: The bottom unit holds three (9mm / 60 degree) razor blades, I chose this size as they are very very common to find at the hardware store. The design permits you to install the blades with a small pair of needle nose pliers to press fit them into the hole. The depth is preset so as to only cut the foil and not the pod itself. Just lightly press the pod into the base and turn to remove the foil covering and remove the coffee grounds for recycling. If blades are loose, just add a drop of superglue and they will hold tight. https://youtu.be/-BqGiynrnRk Be very cautious of replacing the guard back onto the base, when not in use, or before refilling your pods. Recapping / refilling your pods: I have found that two primary methods are available... The first is what I call the "sticker option" where you can purchase foil stickers with an adhesive edge that you press around the edge of the pod and then wrap the foil around the pods edges. This method is a little finicky in that you need to carefully align the sticker so as not to cover the bar code on the underside of the pod. Also, if you tamp the coffee grounds tightly where the pod is off balance, your neighbors will know when your making coffee as it make a heck of a noise when spinning inside the machine! The second is what I call the "disk option" where, once your pod is filled with coffee, you place a circular paper filter on top followed by a plastic disk and you insert all of that into the Nespresso machine. I found the "disk" option easier than the first, both have their pros and cons - the "sticker" lets you make large batches that are at the ready, the "disk" is much less tedious than the first and quicker but you can not create a large batch of pods for grab and go convenience. In order to make the sticker option a little easier when refilling your pods, the design allows for the bottom guard to be placed over the top of the pod in order to prevent coffee ground from collecting on the rim of the pod. This helps to ensure that the sticker adheres to the pods edge. You might print two guards, one to be used as a bottom guard and another for this purpose, otherwise you'll forget and poke yourself on the razor blades on the bottom (I did - ouch!) I printed this using PLA and I superglued the parts together and it's held up fine for over a year. I did test this by running a prototype through the "top shelf" of the dishwasher. Don't try it, warped the pieces like crazy! Wipe clean with a paper towel, again being cautious of the razor blades. I used this project over a year ago to teach both myself and my kids how to use our new 3d printer, as well as, teaching myself how to use Fusion 360. I've downloaded a number of items from Thingverse and wanted to contribute something back in return. Hope you find this useful for your purposes.
With this file you will be able to print Nespresso Vertuoline Pod / Capsule Recycler with your 3D printer. Click on the button and save the file on your computer to work, edit or customize your design. You can also find more 3D designs for printers on Nespresso Vertuoline Pod / Capsule Recycler.