Nintendo Switch Game Cartridge Case
thingiverse
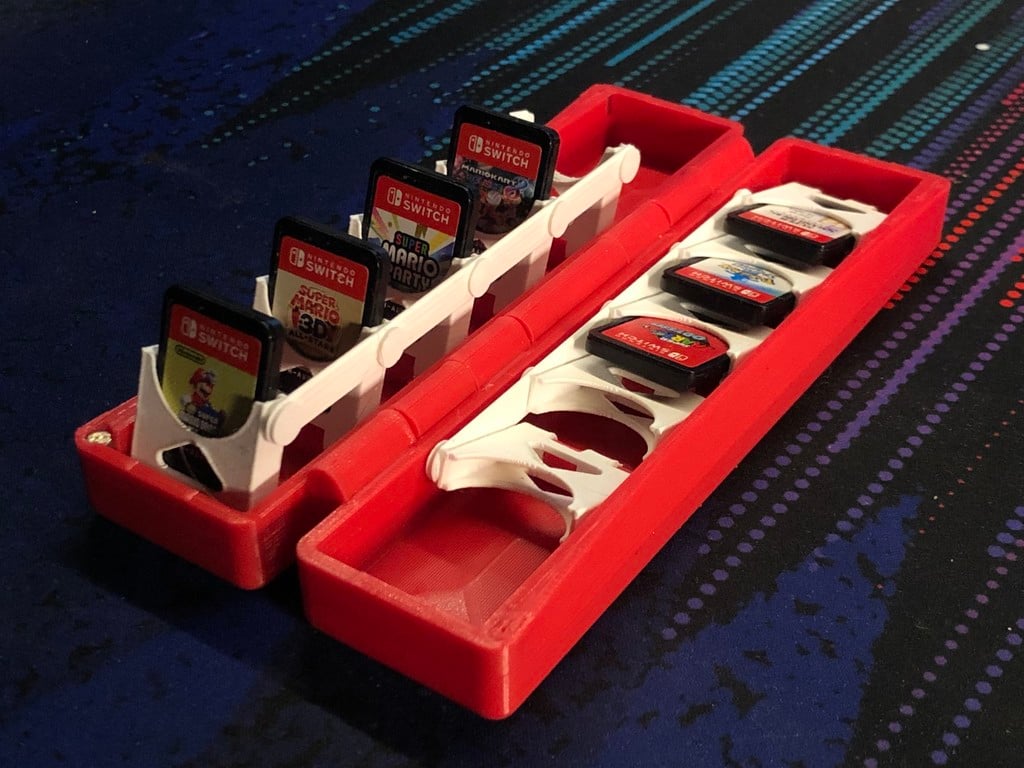
This is a slightly overcomplicated, but really cool, way of storing your Nintendo Switch Game Cartridges. This Design has the Advantage of clearly displaying the games while making it very easy to get them out of the holders through the use of a parallel linkage. The entire case can be assembled with just press fits but I recommend using superglue or similar anyway. In addition to the 3D printed parts you will need: - 10x 25-30 mm nails, diameter roughly 2 mm (a bit less is better; I used 1.8) - 2x 60 mm Nail with the nail head cut off, diameter roughly 3 mm or alternatively a 3 mm steel rod or M3 (or similar) threaded rod cut to about 120mm length (There's 125 mm of space) - 4x Cylinder Magnet 4x4 mm - 1-, 1.5- and 2-mm drill bits - Adjustable water Pump Pliers or something similar, or alternatively just a Hammer - Superglue (optional but recommended) or similar Quantities of the 3D printed Parts: - 2x Link Arm - 10x Pin - 10x Plug - 10x Cartridge Holder OR Cartridge Holder with supports * - Case ** *I recommend printing with the custom supports, but the Bare part is also included if you want to make your own supports/are using an SLA printer or similar. I also recommend printing just one of the first to check the fit of the game cartridge in the holder. **There are versions of the case with and without the Logo and Writing, if you want the Logo, you should do as follows: First print the Logo and Writing, when those are finished keep the print bed hot and immediately Print the rest of the case over it in a different color. This process was nicely described by Devin Montes of Make anything in this Video: https://www.youtube.com/watch?v=KV2AjyowXX4&ab_channel=MakeAnything Additionally, the six Case files are named so that: - Back is always the back half - Front is always the Front half - Full is always both parts with the spacing I used*** - With Logo/Writing includes the Logo/Writing, while files not mentioning it do not include them This is so you can mix and match any front with any back, depending on your preferences. ***The spacing I used is 0.55 mm apart from the holes for the main hinge being perfectly aligned, this should work fine for inserting the 60 mm Nails during the Print. If it does not fit the files are included separately so you can adjust it yourself. Specific Distances (all in mm): assuming the combined Case and Logo/Writing pieces are used: - For the Writing and Logo: 0.4/-0.45/0 assuming the front is at 0/0/0 and aligned length wise with the Y axis, are: - For the back part: 36.75/0/0 (0 mm distance, NOT Recommended), 37.3/0/0 (0.55 mm distance) - For the Writing: -3.3/-0.45/0 - For the Logo: 40.5/-12.75/0 (0 mm distance, NOT Recommended), 41.05/-12.75/0 (0.55 mm distance) Finally: the case pieces need to be paused**** twice during printing: - at 15.11 mm height, or layer 76 (0.2 mm layer height) to insert the Magnets in the four holes in the Corners, making sure to have opposing Poles facing upwards on the front versus back part (so that the magnets hold the case shut rather than preventing it from closing fully) - at about 16.8 mm height of layer 84 (0.2 mm layer height), to insert the headless 60 mm Nails or Similar, at this height they snap in satisfyingly and they are in deep enough to not interfere with the printhead. ****In Cura you can add a Pause by adding a Post Processing Step (Extensions -> Post Processing -> Modify G-Code, then Add a script, choose "Pause at height" and change settings accordingly*****) Please note that the Printer will pause after the given layer is finished and not before. *****I used: Pause at: Layer Number Pause Layer: 76 and 84 (in separate scripts) Park Print Head X: 10 mm Park Print Head Y: 290 mm Retraction: 5 mm Standby Temperature: 200 °C and the rest left to defaults, please note that these settings may not work for your printer, especially the "Park Print Head Y" and "Method" which I left at "Marlin (M0)" which might not work with you printer. Color Info: If you want to make a Dual/Multi color design such as the one in the picture, I recommend printing the case and the plugs in the same color since the Plugs plug up holes in the case. I printed the Case and Plugs in Red and everything else in White (including the Writing as can be seen in the images) Assembly Instructions (Should be fairly obvious once you have the parts): - Print the Case as described above - Print all other parts - Redrill holes as described in the Post Printing Steps - Inserting 5 of the Holders into one Case Half, fixing their joints in place with the 25-30 mm Nails. Make sure the place them so that the small Cylinder with the 1 mm hole is facing the main Hinge in the center of the Case - Hang the Link Arm on the 5 Cylinders with the 1mm hole and fix it in place with 5 Pins which can be glued in, should however fit well enough without (I recommend gluing) - Plug up the 5 Holes with 30 mm Nails in the with the Plugs. These should also just Press into place (I also recommend gluing anyway). Additionally: if there is a slight elephant's foot on the Plugs I recommend pitting them in so that the side that was on the Print bed faces outwards so that the elephant's foot makes them hold in like a cone in a cylindrical hole. I used adjustable water pump pliers to press the Plugs in, but a hammer should do just as well. - repeat for the second half with the remaining 5 holders, 5 Pins, 5 Plugs and Link Arm - enjoy :) If you need further info feel free to write a Comment. I will maybe soon-ish make a slightly more compact version; I will add a Link here if and when I do.
With this file you will be able to print Nintendo Switch Game Cartridge Case with your 3D printer. Click on the button and save the file on your computer to work, edit or customize your design. You can also find more 3D designs for printers on Nintendo Switch Game Cartridge Case.