No-Solder RetroPie Box
thingiverse
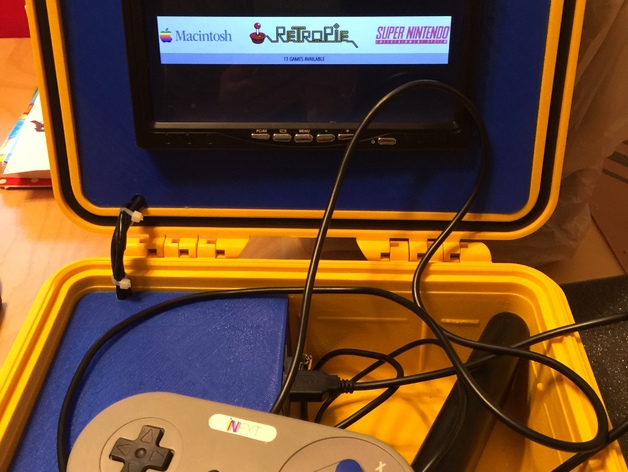
I was inspired by NickRBrewer's Retro Pie Boxes and I wanted to create one that is easier to assemble since I have not learned how to solder yet. Retro Pie Box (original) - http://www.thingiverse.com/thing:118976 Retro Pie Box Version 2 - http://www.thingiverse.com/thing:688566 --FULL BUILD INSTRUCTIONS ARE LOCATED IN THE THING FILES-- MY PARTS LIST: Raspberry Pi 3 - choose your source (Amazon, Frys, Adafruit…) Itty Bitty, Large Capacity USB Drive — for your games Pelican 1200 Case - https://amzn.com/B0051QYF5E PowerCore 20000 with Quick Charge 3.0, Anker's First Qualcomm Quick Charge 3.0 Portable Charger - https://amzn.com/B00VLNT9KW — I chose these because we already have them and love them! I also wanted a removable option that wasn’t dedicated to just this machine, so I can charge swap charger packs when one needed a charge. Kuman 7 Inch HD 1024*600 TFT LCD Screen Display Monitor for Raspberry Pi - https://amzn.com/B01FFAFMM0 — I chose this display because it has an HDMI input for easy cabling. It also has an internal speaker. Also, some of these come with a case or bezel. You don’t need it for this build. This also comes with an HDMI cable. Kuncan USB Am to Dc5.5*2.1mm Dc Dc Converter Cable Voltage Step up 5v to 9v/12v with Swift Switch - https://amzn.com/B01AY3XLEY — This has to be set to 12v to run the monitor. Onite Multi-function Dc Plugs for Ac Power Adapter Notebook Laptop USB 2.0 to Universal - https://amzn.com/B01C5KQD5I —This is for the monitor power cord. You really only need the yellow adapter, if you can find it. I didn’t have any luck at Fry’s. SNES Super Nintendo Controller , Retro USB Super Classic Controller for PC/Mac (Pack of 2) - https://amzn.com/B016K11LVY — What you choose depends on what you want to play. Command Damage Free Picture and Frame Hanging, Large Strips - https://amzn.com/B00404YKZI — I use these for EVERYTHING at home! (4) Tiny Screws - hardware store How I Designed This Thank you, NickRBrewer, for originally designing these!!! Monitor Plate -- I made the monitor hole smaller to accommodate the monitor that I purchased. I didn't realize that mine didn't come with the case/bezel that was in the original design. Lower Plate -- I reduced the width to accommodate TWO battery packs. Since there isn’t any additional soldering and minimal wiring, I have plenty of room under the Lower Plate. Also, these battery packs actually give it enough weight so it doesn’t fall over. It also fits snugly in my case, so I just added a post to the design to keep the back from sinking into the side. You could glue the post to the case if you wanted.
With this file you will be able to print No-Solder RetroPie Box with your 3D printer. Click on the button and save the file on your computer to work, edit or customize your design. You can also find more 3D designs for printers on No-Solder RetroPie Box.