Northern hemisphere of Tellus Lamp
prusaprinters
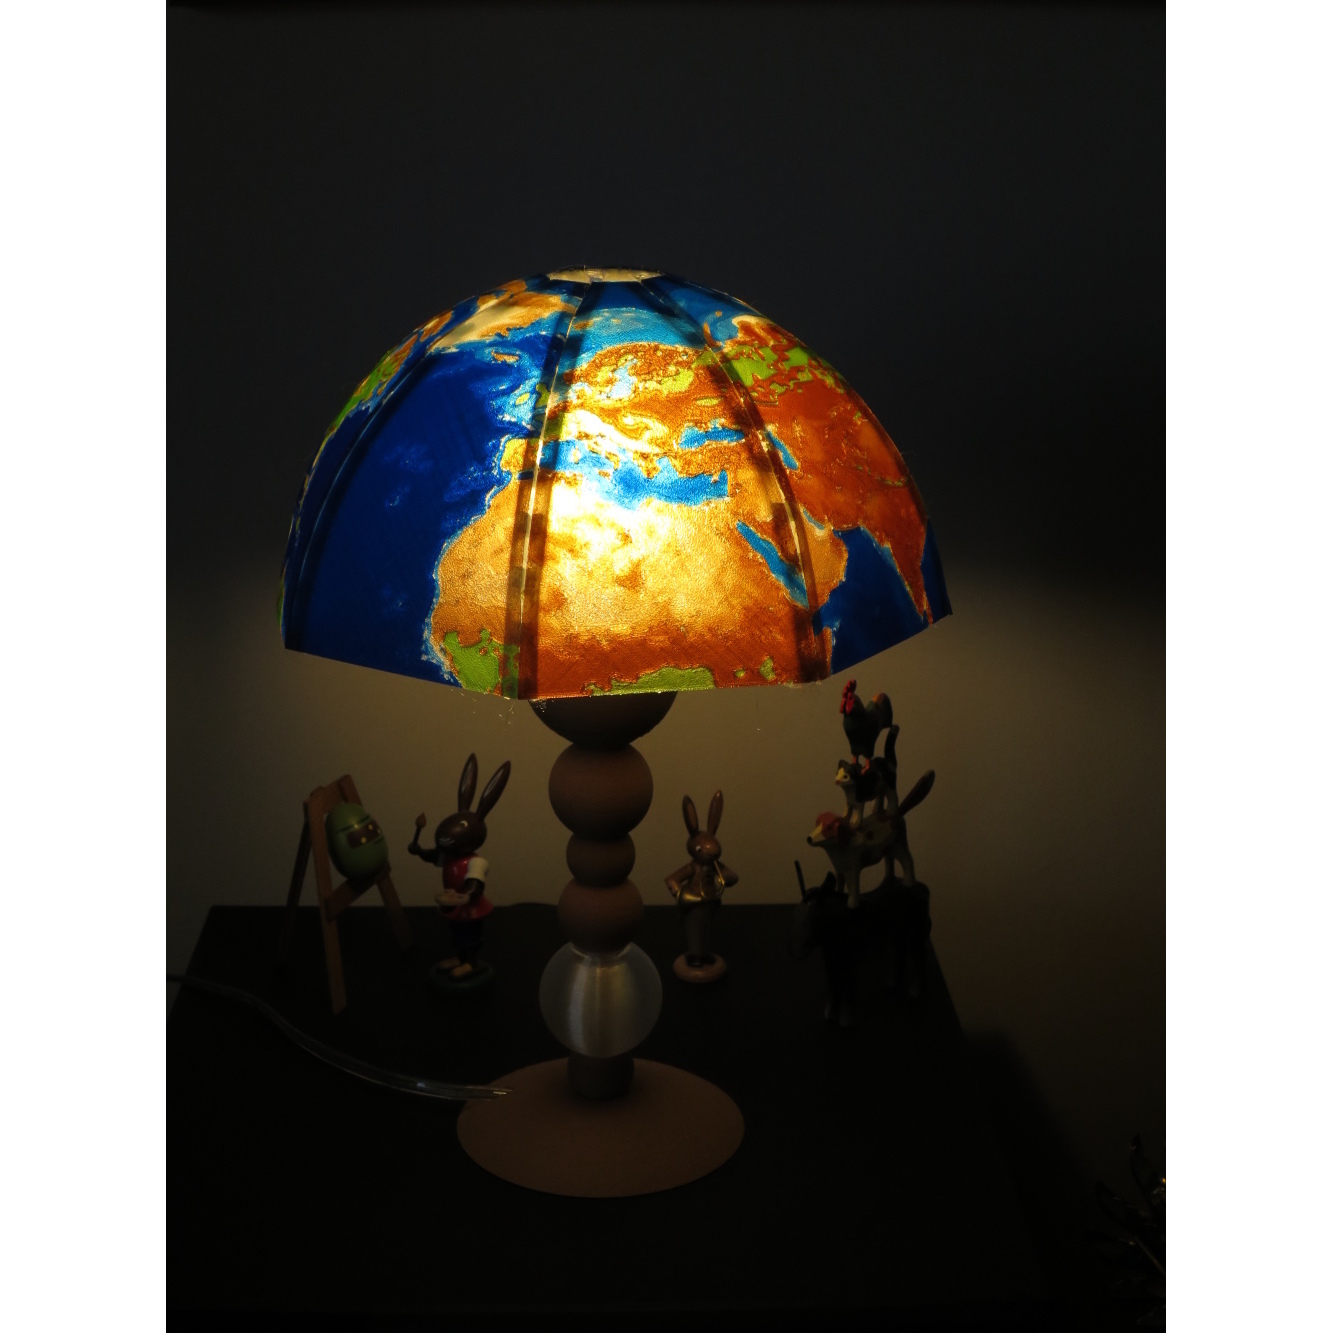
<p>Please meet the "Northern hemisphere of Tellus" lamp. It measures around 22 cm in diameter and 31cm of height and is a "push together" construction, desiged to give a modern touch and welcoming view. While it will take a while to print all parts, however, it is quite straight forward and assembly is easy as well. Furthermore, it is even possible to slice and print it as "single color tones" for those without a mmu.</p> <p>Please note that the print bed (for i3mk3 at least) is filled to a large extent during the shade prints. Clean the print bed properly all to the very edges before the print. Also, consider using the 7x7 mesh bed leveling (found within the settings menu).</p> <p>This lamp was designed using blender, freecad-daily, gimp and inkscape. If you would like to see my other designs, just search for "frimmel" at <a href="https://www.thingiverse.com">https://www.thingiverse.com</a>.<br/> Please be aware that my designs are generally CC non-profit. Please respect this decision.</p> <p><strong>Before you print this lamp, be sure to actually read the printing instructions.</strong></p> <h3>Print instructions</h3><h3> The various parts in brief </h3><p>The lamp base as a single object and can be printed as is, I have used wood fill for a nice single color look. Furthermore, there are two modifier objects in order to be able to print one of the spheres in a different material. The first modifier extends into the surrounding spheres with a shape that locks the parts togehter even in case of incompatible materials (e.g. PLA and PETG). The second modifier defines the interior of the single sphere, and can be used to set fill density = 0, that is, to print a hollow sphere (only really useful with transparent materials).</p> <p>I have printed the lamp holder using various materials. With e.g. woodfill the threads might become almost too tight. However, for me it worked out quite easy in the end: I just screw the part onto the E14 socket holder for a few degrees at a time (until it gets almost stuck), then unscrew a bit. By repeating this simple pattern, I could fully attach the threaded parts without using too much force even for woodfills. Then again, another solution to the tightness would be to scale one of the parts by 1-3% in X and Y direction (you can easily do this in the slicer).</p> <p>The eight lamp shades should be printed with a certain set of colours in order to give a correct visual appearance. The .3mf files are set up for the following colors (1st to 5th color in the mmu): FROGGY GOLD, BLUE, BROWN, GREEN, TRANSPARENT. I use Filament-PM PETG for all colors here except transparent where I used CPE-HG100. However, you could just as well use e.g. Fillamentums CPE-HG100 for all colors if you wish. If you would like to replace "FROGGY GOLD", use a dull although transparent color - that color is only used to make green PETG look a bit less green.</p> <p>The lamp shades are locked in place with something resembling a zip lock. As the printed surface is uneven all the way to the edges (the deep ocean is dark blue hence thick) parts of the zip locking will be a bit harder. However, the construction counts for these extremes and all should fit in the end.</p> <p>A final note: <strong>You can print the shades in a single color if you wish!</strong> That means, the planet would look as various shades of that color. For printing the shades in that way, just remove all modifiers within the .3mf, but <strong>keep all PART objects</strong> (it contains more than one part per shade).</p> <h3> Parts to print </h3><p>Note: If you are not too experienced, then do not use PETG as one of the two filaments for the lamp base, instead change the filament settings to e.g. two different woodfills (that will look great, I use it myself).</p> <p>For the lamp holder part, I recommend a third filament in order to increase the visual effect.</p> <h4>Lamp base (2 + 1 materials, print time 8 hours + 5 hours)</h4><p>telluspelare_tvåfärgad_xy0.4mm_z0.2mm_EasyWoodFILL_T-GLASE.3mf<br/> lamphållare_fästesdel_xy0.4mm_z0.15mm_WoodFILL.3mf</p> <p>(Advanced note for those who really want to mix PLA and PETG: The lamp base modifiers are actually designed with such a mix in mind. I print the modified sphere using transparent PETG, and manually decrease the print speed to 40% and increase the flow to 110% (only) during this part of the print in order to increase the transparent effect, thereby increasing the print time from 8 to around 10 hours.)</p> <h4>Lamp shade attachment parts (1 material, 7 hours)</h4><p>låsprofil_avfasad_X4med_X4utan_fästespinne_tellus_120mm_xy0.4mm_z0.2mm.3mf</p> <h4>Lamp shade (5 materials, 13 hours + 8 hours + 13 hours) </h4><p>The lamp shade is set up in order to be printed with transparent PETG arranged from 1st to 5th filament: FROGGY GOLD, BLUE, BROWN, GREEN, TRANSPARENT (you can change brands, exchange "FROGGY GOLD" with some other dark color et.c., however, try to keep the main color scheme)</p> <p>earth_R120_65mm_N1_N2_N8.3mf<br/> earth_R120_65mm_N3_N4.3mf<br/> earth_R120_65mm_N5_N6_N7.3mf</p> <h3> About electricity </h3><p>The lamp is set up for an E14 lamp socket found for example at the "Kjell & Co" shops in Sweden (<a href="https://www.kjell.com/se/produkter/hem-kontor-fritid/belysning/lamptillbehor/hallare/lamphallare-ojordad-e14-p39361">https://www.kjell.com/se/produkter/hem-kontor-fritid/belysning/lamptillbehor/hallare/lamphallare-ojordad-e14-p39361</a>) but available world wide, e.g. search ebay for "socket e14 lamp". Obviously, you will also need to buy an electric cable including a connector (I bought mine at "Clas Ohlson" in Sweden).</p> <p>You must ENSURE not to overheat the printed parts so take good care of which lamps to use. Personally, I use LED lamps of <strong>no more than 3W</strong> in my constructions.</p> <h3> Assembly </h3><p>Please also refer to the set of attached assembly photographs when reading these instructions.</p> <h4> Shades </h4><p>Please note: Since some parts of the shades are quite thick, especially the oceans, they don't bend so easily. However, they do bend so just be careful, follow the instructions and you will succeed with assembling the shade.</p> <p>First, arrange all 8 shade parts side by side in front of you in order so you do not by mistake join the wrong continents (I did, actually). Now take the two leftmost parts and start joining them using one of the four lock pieces <strong>with an additional bar</strong> (4 have bars, 4 don't). Align the top edges (the "north pole") of the two shades, and start attaching the lock piece by firmly (but gently as well) pressing its open end (the end without the bar) onto the top zip. Keep "zip locking" the parts all the way down. Be a bit creative, monitor what you are doing and adapt pressure, angle et.c. to suit your needs. It is quite easy once you get the hang on it, however, remember how long it took to prnt the shades, don't haste.</p> <p>Now take a lock piece <strong>without</strong> an extra bar. <strong>Examine this piece</strong> to understand that one end i slightly wider than the other. Start with the wide part at the top and start zip locking the next shade onto the two shades you have already joined.</p> <p>Continue this way with alternating type of lock parts. In the end, the four bars should meet close to "the centre of the Earth".</p> <h4> Base </h4><p>Push the cable first through the foot part. Now push the cable through the vertical part of the base, however, for time being don't make it tight yet. Pull the cable onwards through the printed socket holder. Attach the cable to the E14 socket part (be aware: only do this if you are experienced with electric components and you are allowed by local regulations to do so). Now screw the E14 socket part onto the printed socket holder and add the top of the socket holder as well. Mount the socket holder onto the base, simultaneously keep the cable short.</p> <p>Attach the lamp shade to the printed socket holder (the four bars inside the shade will later fit into corresponding holes in the socket holder, you will need to bend them slightly). Now add a lamp and plug it all in.</p> <h3> How the lamp shade modifiers are set up </h3><p>As an example, the shade part N5 is set up as follows:</p> <p>lampskärmsida.stl <strong><em> color 5 - main object - can be printed in a single color<br/> earth_N5_blå32.stl </em></strong> color 5 - PART (extend the surface)<br/> earth_N5_brun32.stl <strong><em> color 5 - PART (extend the surface)<br/> earth_N5_grön32.stl </em></strong> color 5 - PART (extend the surface)<br/> earth_N5_blå32.stl <strong><em> color 2 - MODIFIER (blue)<br/> earth_N5_brun32.stl </em></strong> color 3 - MODIFIER (brown)<br/> earth_N5_grön32.stl <strong><em> color 4 - MODIFIER (green)<br/> earth_N5_grön_lager1_32.stl </em></strong> color 1 - MODIFIER (green 1st layer - make green duller)<br/> earth_N5_vit32.stl <strong><em> color 5 - MODIFIER (white)<br/> lampskärmsida_MODIFIER_0top_0bottom_0perim_0fill.stl </em></strong> MODIFIER (boundary cutter, fill=0, bottom=top=perimeters=0)</p>
With this file you will be able to print Northern hemisphere of Tellus Lamp with your 3D printer. Click on the button and save the file on your computer to work, edit or customize your design. You can also find more 3D designs for printers on Northern hemisphere of Tellus Lamp.