Not So Itty Bitty Belted Extruder
thingiverse
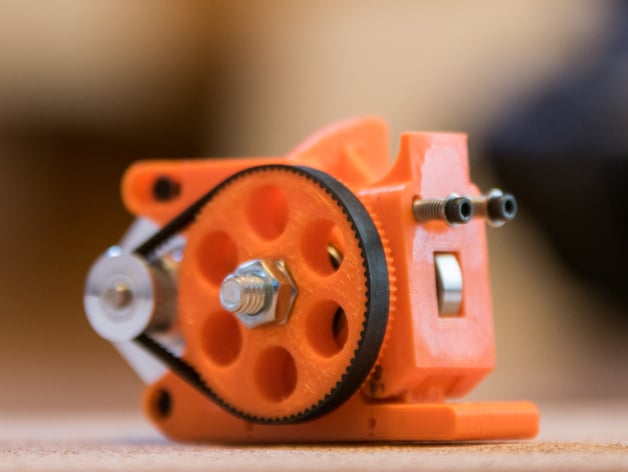
This is a remix of clough42's Itty Bitty Belted Extruder using a Nema17 rather then a Nema14 motor. All other parts are carried over. I used his build instructions as these are very similar The recess in the bottom is designed for a e3d v6 hot end. I do not have one yet but will this week. Until I test fit it I'm marking this as a work in progress. The images are from the first printing I did where I forgot to include this recess. Its designed to work with 1.75 filament. I added an additional model for .3 filament but as I do not run this I will not be able to test it. I designed a mount to work with a V-Slot mini Gantry : http://www.thingiverse.com/thing:1449705. I did not change the geometry from the Itty Bitty Belted Extruder so any mount that would work for that should work for this. I designed it so the same 188gt2 belt can be used. It's tight but fits. I extend the adjusters so any belt from 188 to 200 should work. You can read more about the Itty Bitty Belted Extruder here : http://www.thingiverse.com/thing:389105 Added two additional versions : Not_So_Itty_Bitty_Belted_Extruder_With_Top_Chain_Mount.stl - Provides mounting locations for a cable chain. Not_So_Itty_Bitty_Belted_Extruder_30.stl - 3mm filament I have an alternate guidler that I'm running now here : http://www.thingiverse.com/thing:1460827 https://youtu.be/RPqzVzOpp0M Print Settings Printer Brand: RepRap Printer: Folgertech i3 Rafts: No Supports: Yes Resolution: .2 Infill: 25% Notes: Support material is needed for this to print properly. Post-Printing To complete this, you will need: Three 608 bearings ( http://amzn.to/1TbNpqh ) An 8mm diameter 18-20mm pin for the guidler bearing two 45-60mm M3 screws ( http://amzn.to/1UQgs3I, http://amzn.to/1XVF8WH) Three 10mm M3 screws ( http://amzn.to/1UlAseL ) Eight M3 washers ( http://amzn.to/1UQgw3t ) Two M3 nuts ( http://amzn.to/1UQgysd ) Two extruder springs ( I used pen springs ) but these faucet spring work great as well ( http://amzn.to/1RTEqee ) A hobbed bolt with two jam nuts: http://clough42.com/go/product/hobbed-extruder-bolt/ A NEMA 17 motor: ( http://amzn.to/1XVFvR9 ) A drive kit: http://clough42.com/go/product/itty-bitty-belted-extruder-drive-kit/ -- A 20-tooth GT2 pulley for the motor -- A 188-2GT belt (GT2, 2mm pitch, 6mm width, 188mm/94 tooth closed loop) Instructions: After printing, snap off the support structures and clean out the bridging from the screw and hobbed bolt holes. Press in the hobbed bolt bearings and make sure they turn freely. Install the motor with three M3x10 screws (two washers on each bolt). Leave the screws loose for now. Install the hobbed bolt with the 1mm spacer under the head and the 2mm spacer behind the large pulley. Adjust the tension and lock with a jam nut. Assemble and install the guidler. Install the motor pulley and belt, adjust the belt tension and lock down the motor screws. You can reach the third motor screw through one of the pulley holes using a ball-end driver. I'm using the Clough42 custom milled bolt with 1/16 microstepping and a steps-per-unit value of 644.2 configured in Marlin. With this configuration, I'm having no trouble with 25mm/s retraction.
With this file you will be able to print Not So Itty Bitty Belted Extruder with your 3D printer. Click on the button and save the file on your computer to work, edit or customize your design. You can also find more 3D designs for printers on Not So Itty Bitty Belted Extruder.