NoTankS - 3D Printed RC Tank
thingiverse
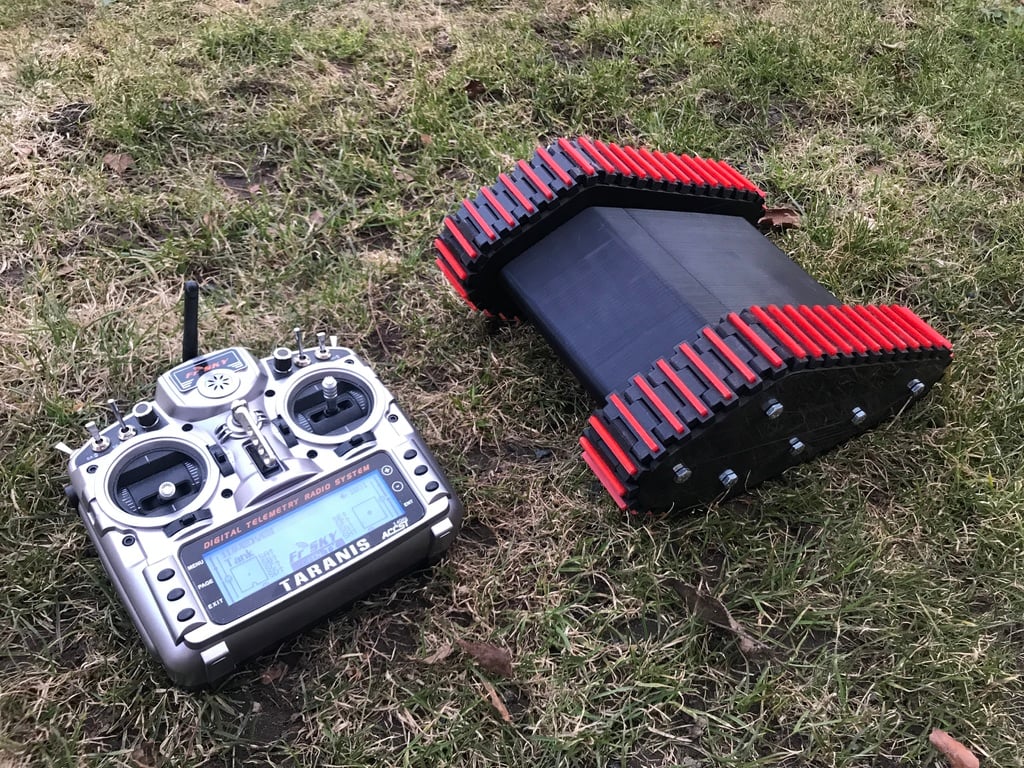
Introduction: --------------------- Introduction video: https://youtu.be/maQO2Yl2V8M It was my good friend Scott that got me interested in 3D printed RC tanks. He sent me a couple of youtube links with very cool tanks. I was inspired by the "RC Speed tank" by Bryant87 https://www.thingiverse.com/thing:2024364 and also "RC Tank" by Staind https://www.thingiverse.com/thing:2414983 I though they were really cool, like Terrascout nerf tanks on steroids. But i wanted a enclosed tank, more resistant to weather, for future robotics FPV projects. So i started drawing my on tank in Fusion 360. I started from scratch so my parts will not be compatible with the other tanks. About my design: --------------------- My goals was to have it enclosed, have as few non 3d printed parts as possible, have a simple design that is easily printed with as little support material as possible. Everything is designed around the wheel screws. The screws holds the wheels, act as hinges, mounts the battery tray, and locks the covers. I have even made a small tool to help when working with the screws. The design is also modular. The battery holder can easy be redesigned to hold different batteries. The covers can be redesigned to hold camera, have more ventilation etc. The bottom and the covers are designed to be printed on the side, that is why the nut holes are angled, so that no support is needed. The track segments doesn't need screws and nuts, they are put together by pressfitting cut to length pieces of 3mm nylon filament. The track segments also have a slot in them, that is for being able to fit different grip insert, like a TPU insert for more traction on slippery surfaces, or sharp teeth for more outdoor traction. ##### I have included a step file :-) Things you will need: --------------------- 2x motor and esc combo, 80T https://www.banggood.com/540-Motor-60A-ESC-Carbon-Brushed-110-RC-Crawler-Shaft-3_175mm-RC-Car-Parts-p-1187553.html 2x Zippy Compact 3700mAh 3s batteries (or your own battery of choice) https://hobbyking.com/en_us/zippy-compact-3700mah-3s-25c-lipo-pack.html 24x 8x22x7mm Ball Bearings (standard skateboard bearings) https://www.banggood.com/10pcs-ABEC-7-608ZZ-8x22x7mm-Ball-Bearings-Deep-Groove-Ball-Bearing-p-1185033.html >2x 11T M1 5mm Pinion Gear >https://hobbyking.com/en_us/11t-5mm-m1-hardened-steel-pinion-gear-1pc.html >and >2x 5mm to 3.2mm pinion adapter >https://www.banggood.com/HOBBYWING-Motor-Axle-3_17mm-To-5mm-Change-over-Shaft-Adapter-p-927457.html (might even be possible to print) or >2x 12T 3.2mm Pinion Gear >https://www.conrad.se/St%e5lkugghjul-Reely-523-3,2-STAHL-Modul-typ-1.0-Borrdiameter-3.2-mm-Antal-t%e4nder-12.htm?websale8=conrad-swe&pi=240362 12x M6 70mm Hex bolt 12x M6 Nut 8x M3 10mm screw (for the motors) 2x velcro strap for holding batteries 3mm nylon filament (or other types of 3mm filament) http://taulman3d.com/618-features.html Your own RC radio and receiver, preferably on that supports tank mixing. https://hobbyking.com/en_us/frsky-2-4ghz-accst-taranis-x9d-plus-digital-telemetry-radio-system-mode-2.html A couple of zipties Battery connectors How to print: --------------------- I have printed everything in regular PLA. Track segments are printed with 100% infill everything else with 20%. The covers and bottom are designed to be printed on its side, a little brim is a good idea. notanks_v1_bottom_wheel.stl need support material. notanks_v1_front_cover.stl needs touching buildplate support Things you need to print multiple of: 2x notanks_v1_drive_wheel_55t.stl if you use 12t pinion for motor. 2x notanks_v1_drive_wheel_56t.stl if you use 11t pinion for motor. 82x notanks_v1_track.stl 8x notanks_v1_bottom_wheel.stl 2x notanks_v1_front_wheel.stl 24x notanks_v1_wheel_insert.stl 2x notanks_v1_outside.stl 2x notanks_v1_inside.stl (mirror one when printing) (now there also are alternative full covered notanks_v2_outside_snow.stl and notanks_v2_inside_snow.stl , if you have a larger printbed) How to assemble: --------------------- 0. Tool Print the included tool, it makes the job building easier then using a wrench. It is also great to have when out in the field driving. 1. Wheels: Two ball bearings are press fitted into each wheels, a vise is a good tool for that. A wheel insert is then fitted into each ball bearing in the wheels, that is two per wheel. Be in mind that if you have chosen to use the 11 teeth motor pinion gear you will need the 56 teeth drive wheel, if you have chosen the 12 teeth motor gear then you will need the 55 teeth drive gear. 2. Bottom, Cover and sides: The nuts are press fitted into the holes using a screw from the other side to drag them in. 3. Motors: Attache pinion gears (and adapters) to motors. Screw the motors to the inside parts. 5. Sides: Put the long bolts into the outside parts, put the wheels on the bolts. Front wheel in the front and drive wheel on top. Put the inside part with the motor on the bolts and screw in the drive wheel bolt. 6. Bottom Screw the now assembled sides onto the bottom part. Before thightening the screws, insert the rc holder part, between the slots in the insides. 7. Covers Screw on the front and back cover. 8. The tracks: The track segments is put together by pressing in pieces of 3mm nylon filament. 41 segments per track,. When mounting the tracks it is easiest to remove the back wheel push it forward and then tighten the track when the back wheel is pushed back and mounted. It is going to be very thigh first, but loosens a little bit over time when driving. But you might even want to start with 42 segments per track. For easy disassemble you can leave one filament piece a bit longer sticking out some millimeter so that it can be grabbed by pliers. 9. Battery holder: Unscrew the two bottom middle bolts a little bit, mount the battery holder and fasten it by screwing in the bolts again. Attach a velcro strap to the slots in the battery holder for holding batteries. 10. Electronics: Solder the wires to the motors. Battery connectors to the ESC:s. Mount the ESC:s and receivers onto the rc holder using zipties. Connect wires and fasten the wires to the holder with zipties. 11. RC: Program your radio with a good tank mix, go out and have fun. Warnings / Future upgrades --------------------- Caution when driving in the winter: (Now fixed, alternative full cover sides available, see updates below) >Snow can build up and get the tracks stuck. That is what happened to me once, i was >using a 35T motor and when the track got stuck the motor draw to much current and >burned up. In future upgrades I will make the inside and outside part bigger to cover the >wheels completely to limit snow from getting in to the tracks. Heat: >When i have tested the tank it is in the middle of the Swedish winter, with temperatures >blow zero degree Celsius. If driving in warmer locations, perhaps ventilation for the motors >and escs are required. I have thought about making changes to front and back cover to >allow mounting a 40mm fan on each side, for better cooling, and if so the inlet will be >angled backwards to prevent dirt from getting in, but that is for later considerations. Drive wheel: >I have experimented with having the driving on the front wheel, an even on the front and >top wheel at the same time, but it seams having just the top wheel is less sensitive to dirt >and stuff locking up the tracks. I have seen a design on thingiverse that have a planetary >gear built into the drive wheel, that might be wort a try in the future. Updates: --------------------- 2018-09-22 First FPV test over 4G LTE, using a raspberry pi zero w and a 4G LTE Wifi router https://www.youtube.com/watch?v=8x5hJwNIOas Added files: notanks_fpv1_pizero.stl and notanks_fpv1_backpack.stl and notanks_fpv1_drive.py that is the control program 2018-04-08 Made a youtube video about the upgrades: https://www.youtube.com/watch?v=ycGbiYwoBRY 2018-04-04 Added Inserts for the tracks, i printed mine in red PLA, looks great and gives more traction, especially in snow. See the picture for how awesome it no looks :-) File added: notanks_v2_track_insert.stl 2018-04-02 I have added alternative full cover sides, to prevent snow and dirt getting into the tracks, se the latest picture added. They are a bit bigger then standard printer bed size can handle. I did mine on my CR-10S (300x300mm bed). The files added are: notanks_v2_inside_snow.stl notanks_v2_outside_snow.stl 2018-02-15 The battery i used was discontinued: https://hobbyking.com/en_us/zippy-compact-4000mah-3s-25c-lipo-pack.html I changed it to this, should also work: https://hobbyking.com/en_us/zippy-compact-3700mah-3s-25c-lipo-pack.html Keep in mind that any not to small and weak 3s battery shold work, i just used old batteries i had laying around.. :-)
With this file you will be able to print NoTankS - 3D Printed RC Tank with your 3D printer. Click on the button and save the file on your computer to work, edit or customize your design. You can also find more 3D designs for printers on NoTankS - 3D Printed RC Tank.