nRF24L01 Cover
thingiverse
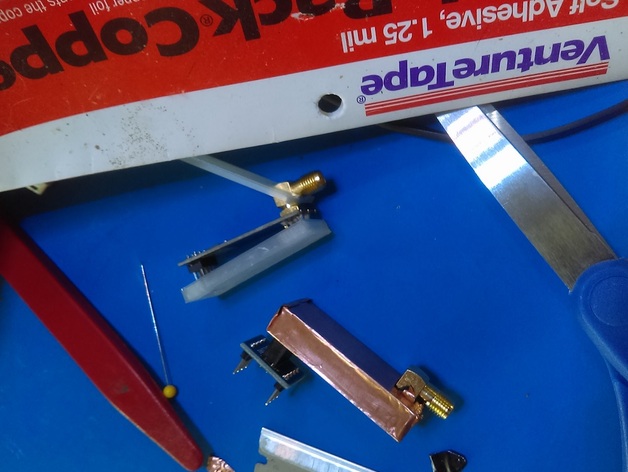
The nRF24L01 radio module I buy comes in two versions, each with a different antenna connector. I don't typically use the version with a built in antenna trace, as I need long distance capability. However, its been found that the modules need shielding to reach longer distances, and some people have found that shielding helps with nearby micro controller operation. I suppose it can even help with FCC certification, assuming that is a thing for you... So, I know the first thing a DIY'er will do is grab some aluminum foil... but I really like a cleaner look, so I built a "cover" for my radio module. Once you put the module in the cover, you wrap it in foil. I have copper self-adhesive foil all around my house, because of some Stained Glass work I enjoy.. there is no reason to glue the module cover either if you are wrapping it with self-adhesive tape! It is a tight fit on purpose. I can get mine to fit around the board snugly with some pressure (getting the antenna connector through is the main issue). For a SMA connector, attach it after putting the cover on. And remember, the shield needs to be grounded and sufficient thickness to work the best, from what I can tell. ~1 mil foil is fine probably, and remember you can do multiple layers! In my case I just do a quick solder from the antenna ground to the foil since they are touching. Print Settings Printer: CTC Rafts: No Supports: No Resolution: .3 Infill: 40 Notes: Build time: 0 hours 15 minutes Filament length: 1255.6 mm Plastic weight: 3.78 g (0.01 lb) Material cost: 0.08 I use a .3 layer height and 40% infill, but its so small many printers are going to use 100% infill on a lot of the model anyhow. Post-Printing Wrap with foil and ground the foil... Remember for outdoor use, adhesive can fail with prolonged water contact... of course, none of these modules are waterproof either.. so this will help with waterproofing but its not the only action you should take to waterproof. How I Designed This I included the model I use.. I generally build a simple block model of the part, then build the covering plastic form, and then subtract the model out and adjust. Its easier for me to measure and build a model first, then adjust tolerances on the cover once I have cut away the space the model takes.. Also I use 123dDesign for most of this, as its pretty easy to learn all in all.. and its FREE.
With this file you will be able to print nRF24L01 Cover with your 3D printer. Click on the button and save the file on your computer to work, edit or customize your design. You can also find more 3D designs for printers on nRF24L01 Cover.