Nut Bracket for German RepRap X400‘s Built-Table adjustment
thingiverse
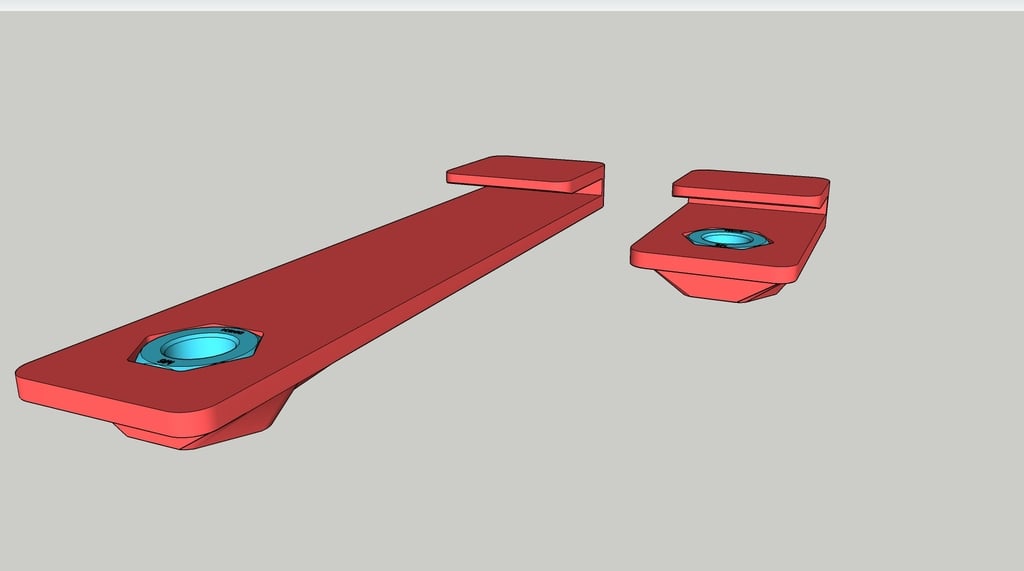
As the X400’s built table adjustment is not really a joy, these two simple things make operator’s live much easier. The original printer setup requires two tools at the same time for the table’s Z-adjustment. Above the table a Allan wrench key must be used. The self-locking nut on the bottom side of the metal plate must be hold by an ring wrench while adjusting the Allan screw. Each time the adjustment is changed the nozzle/table distance must be checked afterwards. One can imagine that this takes a lot of time for all four adjustment points. These brackets replace the ring-wrench and can be simply installed by shifting it on the metal plate. No printer modification is necessary. After installation the only tool to be used is the Allan key which also allows the distance check during adjustment. This will save a lot of time! Installation hint: 1. Unscrew the self-locking nut (take care not to pull out the Allan screw completely!) 2. Remove the washer between nut and metal plate 3. Insert nut into the bracket 4. Shift bracket in its correct position until you can screw in the Allan screw. 5. Re-Adjust the table by only using the Allan key Print out each part two times The long brackets are for the rear left- and right side. The short brackets fit from the front side. Material recommendation: Due to a durable material stability I recommend to use ABS or CPR or equivalent material. **************** DE ******************** Die Tischeinstellung des X400 ist in seinem Originalzustand keine Freude und sehr Zeitaufwendig. Zwei verschiedene Werkzeuge, ein Innensechskant- und ein Mau-Ringschluessel müssen für die Einstellungen verwendet werden. Waehrend man den Innensechskant verstellt, muss von der Unterseite die selbstsichernde Mutter gegengehalten werden. Nach jeder Verstellung muss der Abstand Duese/Tisch kontrolliert werden. Danach muss ggf. wieder nachjustiert werden. Man kann sich vorstellen, dass das bei vier Einstellungspunkten sehr zeitraubend ist. Diese Halter ersetzt vollstaendig den Einsatz des Ringschluessels. Die Mutter wir von nun an durch den Halter fixiert und es muss nur noch der Innensechskant benutzt werden. Ein weiterer Vorteil ist, dass der Duesen-/Tischabstand sofort waehrend des Einstellvorgangs kontrolliert werden kann! Installation: 1. Abschrauben der selbstsichernden Mutter 2. Entfernen der Unterlegscheibe zwischen Mutter und Metallplatte 3. Einsetzen der Mutter in den Halter 4. Positionierung des Halters bis sich die Innensechskantschraube eindrehen laesst 5. Abschließende Tischeinstellung nur Mithilfe des Innensechskants Fuer ein vollstaendiges Set muss jedes Teil zweimal gedruckt werden. Die langen Halter sind auf der hinteren Seite von Links und Rechts aufzuschieben. Die kurzen Halter sind von vorne auf die Metallplatte aufzuschieben. Materialempfehlung: Fuer eine gute Langzeitstabilitaet im warmen Druckraum sollte ABS oder CPE (oder Aehnliches) verwendet werden!
With this file you will be able to print Nut Bracket for German RepRap X400‘s Built-Table adjustment with your 3D printer. Click on the button and save the file on your computer to work, edit or customize your design. You can also find more 3D designs for printers on Nut Bracket for German RepRap X400‘s Built-Table adjustment.