Octoprint power control inrush eliminator and relay contact protector in v-slot box
thingiverse
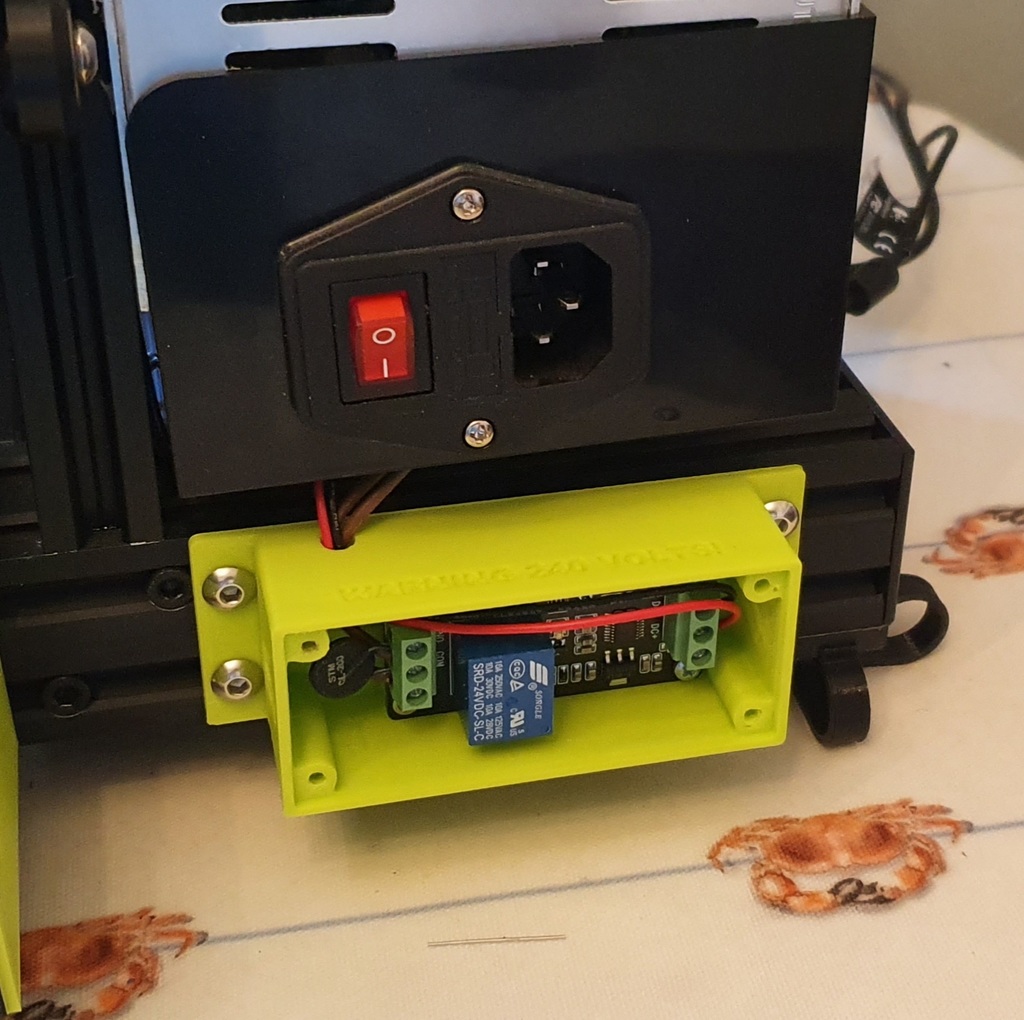
OCTOPRINT POWER RELAY STUCK ON? IMPORTANT NOTE ON SWITCHING MAINS TO A 3D PRINTER PSU... *** This thing involves wiring and working with mains voltages. Only do this if you are experienced and competent working with high voltages *** Some low-cost power supplies like the one in the Ender 3 have a huge initial current spike when first switched on. This is called "inrush" current. Inrush current can weld Octoprint relay contacts closed (on) and damage the relay. It's essential to switch the mains side because the currents when at steady state are well below the maximum rating of the relay (10 amps at 240v), but the inrush current is too high for the relay contacts. Note that you must not switch the 24-volt line with these relays because the current is much too high for the relays all the time. The mains side is the right way to do it, but the inrush spike has to be managed... Some people recommend using a NTC (Negative Temperature Coefficient) thermistor in series with the mains supply to manage inrush. These are cheap and easy to fit but unfortunately only really work when installed with equipment that has a constant operating current. A 3D printer jumps from 200 mA to 1.2A depending on activity, so NTC thermistors are not suitable in this use case. Instead, an active inrush solution works best involving using a relay to bypass the NTC Thermistor (or a high-wattage 25 ohm resistor) shortly after powering up. This thing is my go at building an active inrush eliminator to protect an Octoprint relay or any other relay you might be using to switch your 3D printer on and off. The case is a remix from another designer (linked to in this thing), but I have customized the box to fit the delay relay board I have used. The relay board I used is a delay relay board I found on Amazon that switches the relay on a set time after the power is applied. I have set it up to switch on around 2 seconds after power-on. The 25 ohm NTC thermistor is wired in series with the mains power to stop the inrush current, and the relay on the delay relay board bypasses the NTC when it's activated. This means it's only in circuit for a few seconds after switching on. This avoids powering up the heated bed and hot end through the NTC thermistor, which then gets very hot. Circuit diagram in thing photos. The delay relay board is powered by the 24-volt output of the printer PSU. See this article for reference on inrush currents: https://sound-au.com/articles/inrush.htm The delay relay board is pictured in this thing and is available on Amazon here: Timer Relay 24V Adjustable Timer Delay Relay Module Self-Locking Trigger Delay Controller Delay On Off Switching Module (DC24V) https://www.amazon.co.uk/dp/B07W4JWTQW/ref=cm_sw_em_r_mt_dp_U_lT70Eb91989ZJ The NTC thermistor is available from Farnell Components in the UK. FOR 240-volt mains in the UK, the 25 ohm CL-200 is suitable. For 120v mains, you will need to use a different thermistor with a cold resistance of around 12 ohms. Amphenol CL-200 - Thermistor, ICL NTC, 25 ohm, Radial Leaded, CL Series #jelzbot
With this file you will be able to print Octoprint power control inrush eliminator and relay contact protector in v-slot box with your 3D printer. Click on the button and save the file on your computer to work, edit or customize your design. You can also find more 3D designs for printers on Octoprint power control inrush eliminator and relay contact protector in v-slot box.