Oculus/Meta Quest 2 Flip-Up Halo Strap
thingiverse
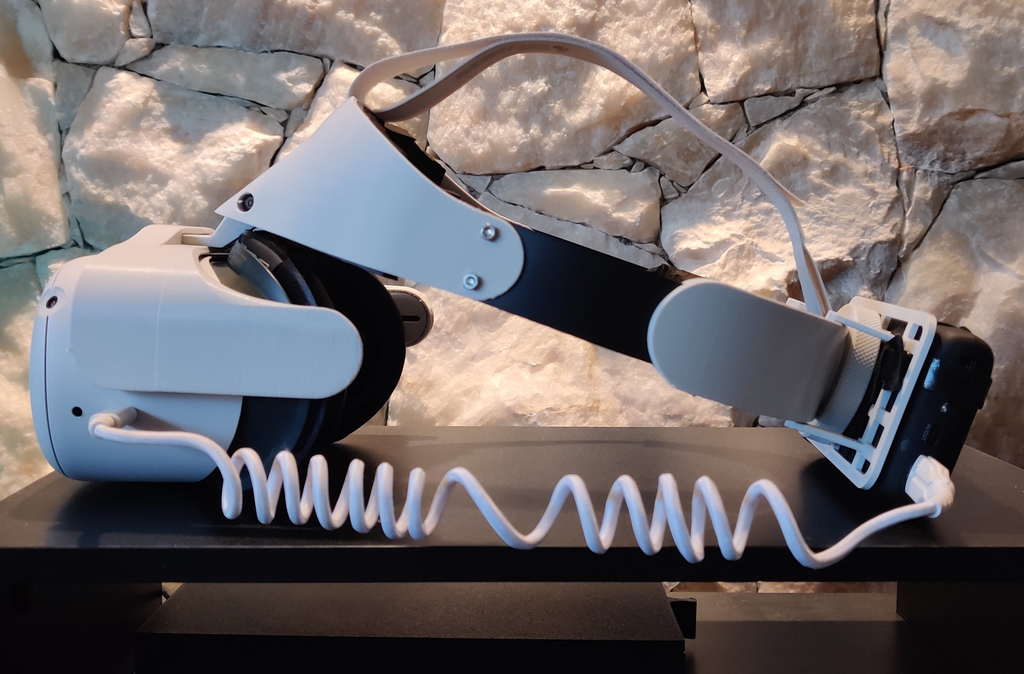
Update 1: Added fillets to the teeth of AdjGear and BackInsert, to hopefully improve longevity of these parts. This is a Halo-style head strap for the Quest 2 VR headset, which incorporates a hinge at the top of the headset to allow easy entry/exit from VR. I made this to make VR development on the Quest 2 less of a hassle, as it allows me to keep the headset on my head while I jump in and out of debugging things. Included is also a bracket for mounting an external battery, which clips on at the back. It is lightly based on the PSVR/Oculus Rift S head straps, with no hinge between the back and front of the head strap, and the HMD is mounted to the strap at a single point at the center of your forehead. Comfort-wise, I do not recommend using a dense foam like neoprene as cushioning, as it digs into your forehead. I have not had the chance to test any other cushioning. Fit-wise, it should fit most heads. Users with long hair may still experience some slip at the back if playing a high intensity game like Thrill of the Fight (would recommend tying your hair back if possible, helps a bit). It uses some M2 and M3 hardware (listed below), as well as any cushioning of your choice, up to 10mm thick, and any spring that fits around an M2 screw (a pen spring or silicone hose works). BOM: - 4x M3x8mm Screws - 2x M3x12mm (up to 25mm) Screws - 4x M3 Nuts - 2x M3 Low Profile Nyloc Nuts (Prusa builders might have spares) - 1x M2x8mm Screw - 1x M2x12mm Screw - 1x M2x12mm Standoff - 1x Pen Spring OR 3mm of Silicone Hose with ID of 3mm - (Optional) Velcro Strap from the original Quest 2 strap - Any cushioning up to 10mm thick Assembly Instructions: 1. Mount the Back Insert to the Back. To do this, squeeze the ends of the back frame lightly and push the insert in. 2. Insert the two straps into the back frame, such that the L/R are faced inwards and are upright (the top-side of the back will have a cutout in the top-middle). (Optional but recommended) sand the insertion end (the end furthest away from the L/R) of the two straps so that they're beveled. This prevents them from getting caught/locking up. 3. Screw in the M2 standoff to the back frame, using the shorter M2 screw. Make sure that the two straps go past the mounting point at the back. Once in, the straps should get caught on the standoff. 4. Place the adjuster gear into the adjuster wheel, so that the gear is fully seated. 5. Align the two straps. 6. Mount the adjuster assembly to the back. The wheel should be almost flush with the back. Test that both straps are caught by the gear by pushing down on the gear and twisting the adjuster. 7. Insert the longer M2 screw into the adjuster cover. 8. On the other side of the cover, slide the spring/hose onto the exposed threads of the M2 screw. 9. Mount the cover, by aligning the hole in the gear with the M2 screw. Tighten the M2 screw such that there is a noticeable tactile click whenever the adjuster is spun clockwise, but it can still rotate anti-clockwise without much difficulty. 10. Apply your cushioning of choice to the forehead and back parts. 11. Slot the other ends of the strap into the forehead part, and mount using 2 M3x8 screws and nuts on each side. 12. Fit the 2 M3 Nyloc Nuts on both legs of the hinge part. 13. Mount the hinge to the front, screwing 2 M3x12 screws into the Nylocs in the hinge legs.. 14. Fit the Adapter Mount to the Quest 2. The mount snaps on the the two wings on either side of the headset. This may require some force. 15. Slide the headset onto the hinge. This part is friction fit. Optional: 1. Taking the original Quest 2 strap, separate the part of the strap that goes over the top of your head from the rest of the strap. This can be done with a little finesse. 2. On the top side of the back frame, there is a cutout with two poles that you can attach the strap to. Start by sliding the non-velcro end of the strap onto one of the poles, and push it inwards until the strap can grab onto the other pole easily. 3. Loop the velcro-end of the strap into the forehead part, and secure. Adjustments: - Use the adjuster wheel at the back to adjust tightness. - Put the headset on, ensuring that the forehead part sits comfortably right around where your forehead ends. - Adjust the headset's distance from your face by sliding the headset along the hinge. - The hinge may require periodic re-tightening. Re-tighten as you see fit. Battery Mount: 1. Mount the battery onto the battery mount using velcro/zip-ties. 2. Push the battery mount onto the back of the frame. Make sure each leg of the battery clips on nicely. Note: While still usable, this does obstruct the adjustment wheel at the back, making it harder to reach. Known Issues: - The hinge could be tighter - The way the headset mounts on the hinge can loosen over time - There is some interference between the hinge and the face cushion
With this file you will be able to print Oculus/Meta Quest 2 Flip-Up Halo Strap with your 3D printer. Click on the button and save the file on your computer to work, edit or customize your design. You can also find more 3D designs for printers on Oculus/Meta Quest 2 Flip-Up Halo Strap.