Oculus Quest 2 Elite Strap Fix
thingiverse
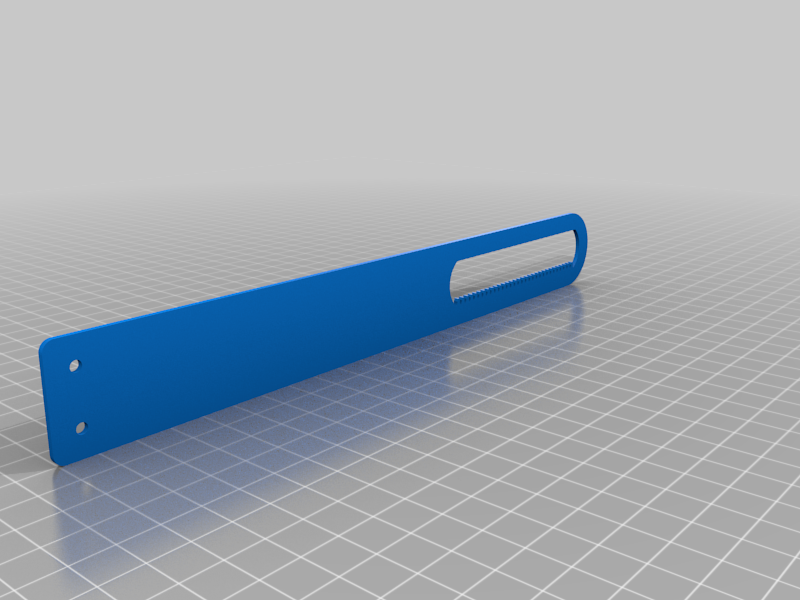
Disassembly and re-assembly: Knowing what the product looks like inside might help you in disassembly. Here are some photos of the disassembled Elite Strap with Battery: https://www.reddit.com/r/OculusQuest/comments/ksan42/oculus_quest_2_elite_battery_strap_disassemble/ The trickiest part of this project is definitely getting the rubbery back brace off the main Elite Strap body, since there are no visible screws to unscrew to get it off. I just wedged a plastic credit card between the housing and started yanking it off. It's actually held on by a very strong piece of tape and some tiny plastic clips. Don't pull on the rubbery bit though. Once you manage to pull off the first piece, the rest of the disassembly is cakewalk. Grab your screwdriver kit and undo the screws, making sure you keep track of them since they are of varying lengths (3 sizes, short, medium and long) Depending how badly your original strap arms are damaged, you can try to salvage the parts that snap onto the Quest 2 itself. DO NOT CUT THEM, as they are extremely brittle. Use a metal saw or a file instead to cut off the cracked/damaged parts. And instead of drilling, heat up a piece of metal while holding it with pliers to make the screw holes for the new replacement strap arms by melting. The original Elite Strap plastic is so brittle that drilling or cutting it will cause new cracks and can ruin the salvageable bits. Apply some epoxy in between the new parts and the salvaged parts and use screws of your own choosing to make the attachment stronger. Pop rivets are a good alternative to screws here. Printing new parts: Since the ratchet gear mechanism is quite a tiny component with tiny teeth that need to align well, make sure that you compensate for elephants foot in your slicer settings. I personally used 0.1 or 0.2mm in PrusaSlicer wihile printing on my heavily modded Ender 3 with direct feed. The ratcheting part of the strap arms are curved behiend the back of your head inside the mechanism. To achieve the curve like the original one has, dunk the freshly printed piece into hot boiled water and let the plastic soften up until it's moldable. Find something that is round and aproximately has a diameter of 10cm / 4" and use that to shape the piece. It should look like the letter J. Bare in mind that both of the strap pieces need to be bent in opposite directions, due to how the ratcheting mechanism works. When you insert the new printed pieces back into the headstrap mechanism, make sure they are inserted at their "maximum" position to ensure the aligment of the strap arms. To test the fit, screw the second plastic cover back on and rotate the ratchet dial on the back. Everything should work. https://youtu.be/2U5IBuDewiY
With this file you will be able to print Oculus Quest 2 Elite Strap Fix with your 3D printer. Click on the button and save the file on your computer to work, edit or customize your design. You can also find more 3D designs for printers on Oculus Quest 2 Elite Strap Fix.