Oculus Rift CV1 Earbud Fix
thingiverse
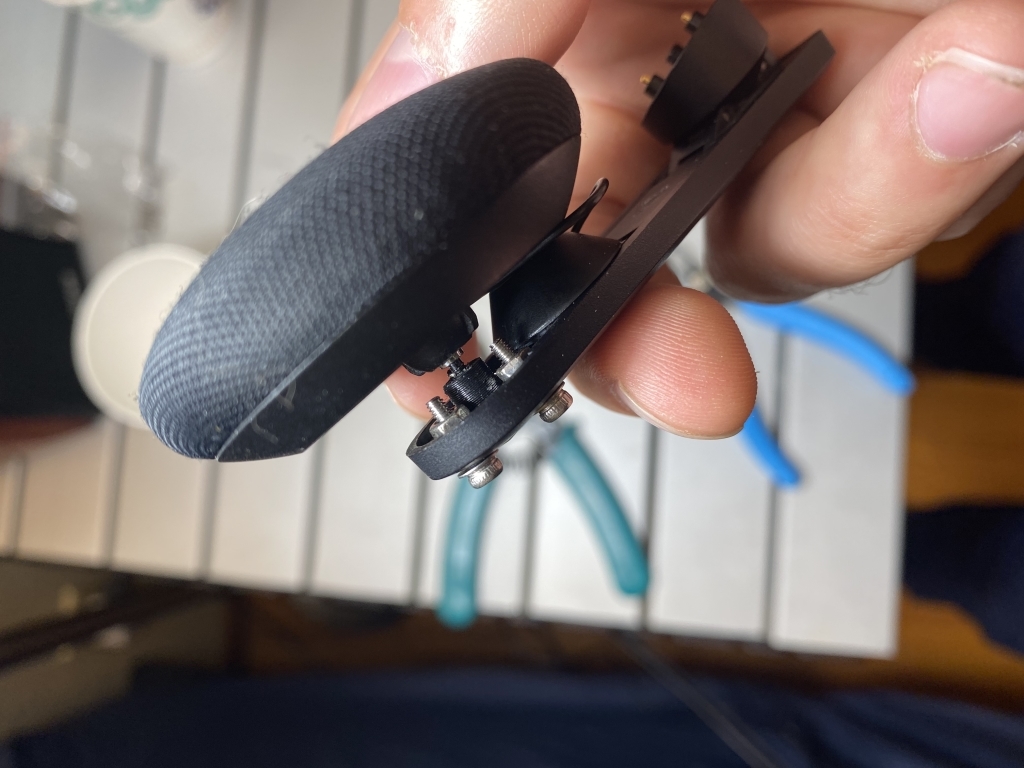
This is a fix to help mount the Earbud Speaker to the Earbud Housing on the Original Oculus Rift CV1. NOTICE: This is a fix for a specific issue. The issue this fixes is when the Earbud Speaker becomes disattached from the Earbud Housing, but they are still connected by the tiny speaker wire. If this is your issue, this will work for you! Also, there is a nub under where I slid the OEM speaker holder down. This is what broke on my Original Rift CV1. If this sticks up too much for you, you may have to remove it somehow for this fix to work. Steps: 1) Print the part. 2) Remove the Rift Earbud speaker and housing with a flathead screw on inside of rift headband. 3)slide the original part that the earbud sat in up towards where the earbud connected to the rift 4)Place the printed part in where the broken plastic bit that used to hold the earbud speaker broke 5) Drill into one of the premade holes using a 1/16" or 2 mm drill bit 6)take a M2 screw, nut, and two washers, and tighten the printed part with the still broken earbud, leaving the earbud speaker still disattached from the replacement part. 7)Now that the two peices are fixed together, drill the remaining two holes with confidence they will all be symmetric and fit together again. 8)Remove the screw from the earbud housing, and separate the printed part from the Oculus Earbud 9)Using needle nose pliers, screw the tiny screw that comes out of the earbud speakers into the printed part. Realize that you can actually pull the screw on the earbud speaker out slightly to get a better purchase with your pliers. Twist the printed part onto the screw by hand or find another plier. At this point, the printed part should be attached to the speaker earbud via the screw that comes out the back of the earbud. The little wire coming out of the earbud better still be attached to the main unit or this fix will not fix that. The two parts should be held together through friction. Also, there should be three holes coming out of the back of the earbud housing which are perfectly symmetrical since you should have used the printed part as a guide. 10) Place the printed part, with the earbud attached, back into the housing near the bottom with the holes, and screw the two parts together through the predrilled holes, with two washers per hole, one on the nut side and one on the head side of the M2 screw. Repeat this process for all three holes, and make sure to tighten them well, but not so much as to destroy the plastic of the earbud housing. I considered using a dab of superglue to lock the screw to the nut, but decided against it. 11) At this point you should be able to screw the entire earbud and housing back onto the Rift CV1(Not Rift S) with a flathead screwdriver to get the finished product in the pictures. Final Note: I included the scad file here in case anyone wants to remix it. I used M2 screws, and used 2mm as the predrilled hole depth, but if you have a different size screw or drill bit, be my guest and change this however you like, just please give credit to this original design if it was helpful to you. Also, do whatever you want with this print. It's a gift to the world!
With this file you will be able to print Oculus Rift CV1 Earbud Fix with your 3D printer. Click on the button and save the file on your computer to work, edit or customize your design. You can also find more 3D designs for printers on Oculus Rift CV1 Earbud Fix .