OKAY Synth
thingiverse
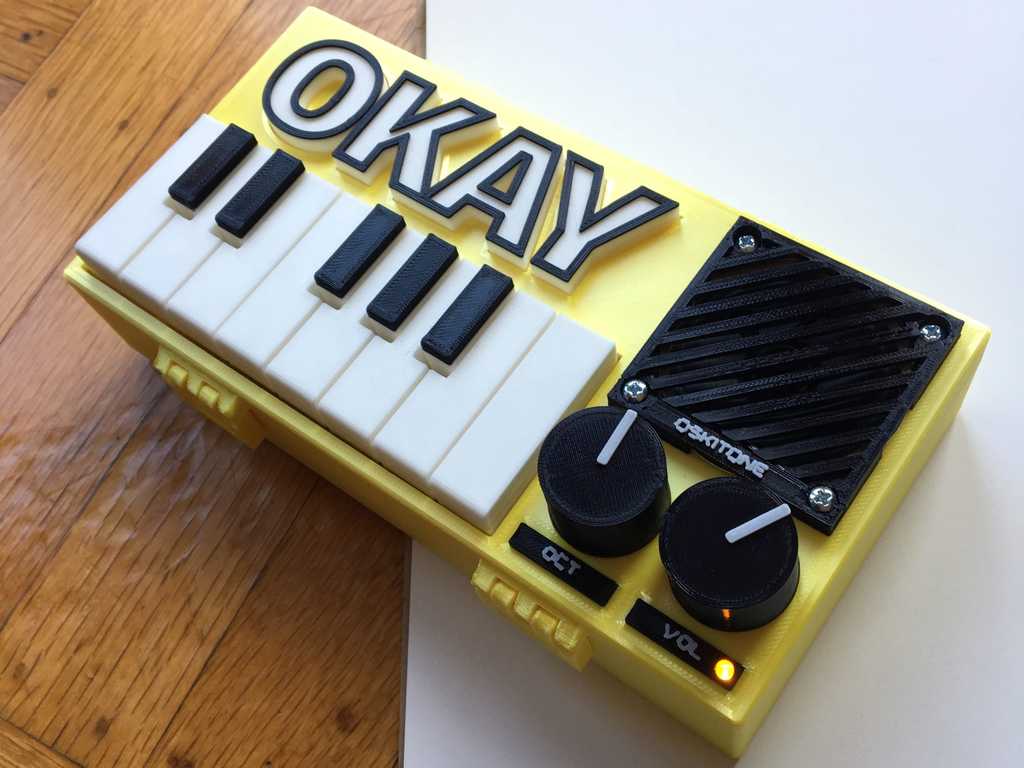
<iframe src="https://player.vimeo.com/video/235418217" width="640" height="360" frameborder="0" webkitallowfullscreen mozallowfullscreen allowfullscreen></iframe> https://vimeo.com/235418217 <br /> Oh, nothing fancy, just an analog square wave synthesizer... That's OKAY! - <strong>Monophonic:</strong> Only one note at a time can be played. This is opposed to “polyphonic,” where multiple simultaneous notes can be played. - <strong>Analog:</strong> There are no computers, microcontrollers, sound samplers, or anything digital involved. The sound you hear is the sound of a speaker being abused by discrete electronic components like capacitors and resistors and logic chips. - <strong>Square-wave:</strong> When its output is viewed on an oscilloscope, its wave resembles a square. It’s a “hard” sounding wave type, great for bass lines, and commonly associated with chiptune music and old video games. These are the 3D models for the [OKAY DIY Kit](http://www.oskitone.com/product/okay-synth-diy-kit). Read more about the project, its design, and where it's headed [here](http://blog.tommy.sh/posts/okay-synth). Differences from [OKAY 2](https://www.thingiverse.com/thing:2760653): fewer keys, keys mounted to enclosure top, key plungers, no audio out jack #### Printing instructions ##### Slicing I print everything at .2mm layer height by default. To get multiple colors, insert color change GCODE at the recommended color change depth. (Assumes .2mm and [allows extra room to minimize errant stringing problems](http://blog.tommy.sh/posts/quick-tip-changing-colors-on-3d-prints), but you should verify in your slicing software before sending to printer.) <table style="width: 100%; table-layout: fixed"> <tr> <td><strong>Part</strong></td> <td><strong>Supports</strong></td> <td><strong>Infill</strong></td> <td><strong>Color change depth</strong></td> </tr> <tr> <td>Bottom</td> <td>Build plate only </td> <td>Normal (20%)</td> <td>n/a</td> </tr> <tr> <td>Top</td> <td>No</td> <td>Normal (20%) </td> <td>n/a</td> </tr> <tr> <td>Hinge parts</td> <td>No</td> <td>Normal (20%)</td> <td>n/a</td> </tr> <tr> <td>OKAY text hold-in</td> <td>No</td> <td>Normal (20%)</td> <td>n/a</td> </tr> <tr> <td>Keys</td> <td>No</td> <td>Light (5%)</td> <td>12.8</td> </tr> <tr> <td>Key plungers</td> <td>No</td> <td>Normal (20%)</td> <td>n/a</td> </tr> <tr> <td>Speaker</td> <td>No</td> <td>Normal (20%)</td> <td>5.4</td> </tr> <tr> <td>Labels</td> <td>No</td> <td>Normal (20%)</td> <td>6.4</td> </tr> <tr> <td>OKAY text </td> <td>No</td> <td>Light (5%)</td> <td>9.8</td> </tr> <tr> <td>Knobs</td> <td>No</td> <td>Normal (20%)</td> <td>18.4</td> </tr> </table> <br /> ##### Assembly - Clean up strings - Cut or melt away any stringing. Be careful not to scratch dark filament underneath text embossing - Enclosure bottom - Break built-in bridge supports from each PCB post with a small screwdriver or other stabby object - Knobs - Cut built-in bridge support from bottom to expose shaft cavity - One knob has a hole in its side. This is a cavity for the brass threaded insert, which you’ll lock into place by inserting with a hot soldering iron Final assembly information is available at http://blog.tommy.sh/posts/okay-synth and http://www.oskitone.com/guides
With this file you will be able to print OKAY Synth with your 3D printer. Click on the button and save the file on your computer to work, edit or customize your design. You can also find more 3D designs for printers on OKAY Synth.