Olympus OM-D BLN-1 Dummy Battery
thingiverse
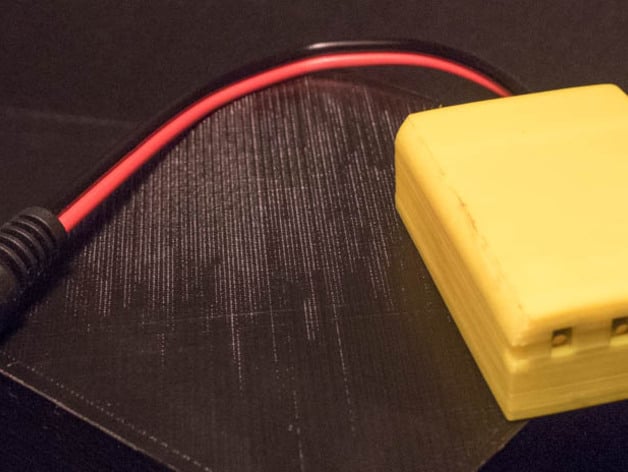
This is a dummy battery for Olympus cameras using the BLN-1. This includes the OM-D E-M5, E-M5ii, and E-M1, as well as the PEN E-P5. I don't know yet whether the new PEN F uses this battery, but I suspect it will. This will allow you to power your cameras with a simple DC adapter, or battery pack. This is typically needed for long running time lapse, or in a studio environment where ac power is simply more convenient when shooting all day. I wanted to avoid the expense of needing a custom made PCB for the contacts. I came up with a way to use simple, common 1/4" crimpable quick connectors, to provide the contacts. This has been tested in all 3 of my camera bodies, and works well. Edit: I added an .stl with both parts together, for cheaper printing through shapeways. Print Settings Printer: Folger Tech Kossel Rafts: No Supports: No Resolution: .2 mm Infill: 10% Notes: I use a 4mm brim to avoid peeling/warping. I designed the files to the battery, and cameras, not to my printer. They should print well on any decently calibrated printer. I used PLA during my prototyping process, and for this example. I will likely use ABS for the ones I use. Post-Printing Building the Adapter For me the first thing to do was peel the brim from my parts. Then assemble the necessary bits to finish the thing: -2x 1/4" crimp on spade connector -short length of 2 conductor wire to provide a lead(i used a barrel connector w/lead I had on hand) -glue compatible with the plastic in which you print the part -wire strippers/crimpers Other stuff you may want: -a connector of some kind for the end of the cable(i used a barrel connector since my battery system and ac adapter both can utilize it) -battery pack or AC adapter that provides 7.6-8.4VDC So there you have your bits together. Now pull the end of the cable through the entry hole in the dummy battery. Now take your connectors, and put a 90" bend in them, so that the flap fold back towards the fitting, not away from it(only enough clearance to bend them the one way). Now strip the ends of the wire, and crimp on your connectors. Now we insert the spade into the slots. Be sure you place the positive in the positive slot, etc. The part is clearly labeled. You may need to grasp the connector with a pair of pliers to insert it. It's intentionally tight. Now you can situate your wires inside the housing. You could add a few dabs of silicone here and there to be extra sure it all stays put. If you wish to add a strain relief, wrap a zip tie around the cable just inside the housing, and clamp it down super tight. Snip off the tail, and voila, strain relief. This is a good time to test the dummy in your camera, before you seal it up. Triple check that you got the polarity correct from your power source to the dummy. Install it in the camera, connect it to your power source, and turn on your camera. If it works, you are ready to proceed. Now grab the lid and make sure it fits well and seats flush with the housing. Tune it up with a razor blade, or some sand paper, if necessary. Mine fit very well right off the printer. Once you are sure it fits, you can apply a small bead of glue to the lip on the housing, and squeeze the lid into place. Let the glue cure completely before doing any testing. You don't want the glue to dry while it's in your camera, securing it there for all time! So now you have a dummy battery. Plug it into your camera, and take a time lapse that lasts a week, if you want. How I Designed This I used Sketchup.
With this file you will be able to print Olympus OM-D BLN-1 Dummy Battery with your 3D printer. Click on the button and save the file on your computer to work, edit or customize your design. You can also find more 3D designs for printers on Olympus OM-D BLN-1 Dummy Battery.