One Plate Mechanical Clock
thingiverse
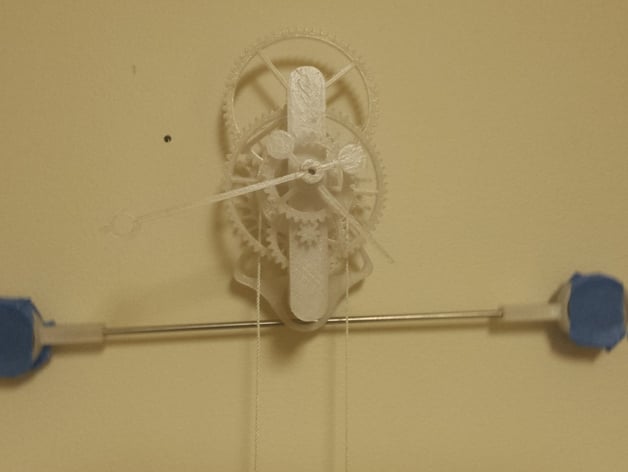
I designed this clock so that all parts comfortably fit within a 180mm x 180mm square. Just hit print and in about 6 hours, you will have everything you need for a functional weight-driven mechanical clock. It was a fun exercise in minimalism and a test of my printer's fine detail capabilities. In addition to the plastic, the clock requires the following: 1 x 200mm 3mm diameter shaft 1 x ~75mm 3mm diameter shaft 1 x ~45mm 2mm diameter shaft 3 x RC Helicopter bearings 6x3x3 (or 6x2.5x3) 1 x 450g weight 8 x coins - I'm overseas with foreign coinage, but quarters should work ~3m string - I'm using 550 cord guts since that is all that I currently have available 2 x nails to mount it to the wall. It can run 1.3 years on a single wind provided you mount it above the Mariana Trench, but on my wall it goes over 12 hours. Doubling the weight with a pulley provides more than a day. I'd recommend using the larger frame should you decide to go that route. Tugging the coins outward slows the clock down and shifting the whole pendulum assembly sideward balances it increasing reliability, mechanical efficiency, and aesthetic appeal. I will post assembly instructions and possibly an exploded view in due course. UPDATE: 20160831 Here's a video of it in action: https://www.youtube.com/watch?v=I5wlcmDbiXc Note: I have yet to adjust the pendulum for accurate time keeping. Also, utilizing my limited Tetris skills I managed to fit the bigger frame and pulley onto the same size plate (labelled v2), so I guess they no longer count as accessories. I added a small clock face that you can glue on the front if desired. UPDATE: 20161010 To accommodate smaller build plates, I split the frame piece in to separate top and bottom parts (bigframea and bigframeb) so now people with build plates as small as 110 x 110 can print this design. I also uploaded an updated wheel 4 so that it uses a metal shaft rather than a plastic one. Below are my non-printable parts:https://www.amazon.com/Miniature-Bearings-MR63ZZ-L-630-673ZZ/dp/B00ZHSQX42/ref=sr_1_2?ie=UTF8&qid=1476061067&sr=8-2&keywords=6x3x3+ball+bearinghttps://www.amazon.com/Airplane-Model-Stainless-Steel-Round/dp/B00OK6G93M/ref=sr_1_1?ie=UTF8&qid=1476061363&sr=8-1&keywords=3mm+shaft+200mmhttps://www.amazon.com/20Pcs-Stainless-Steel-Round-150mmx2mm/dp/B00KHUR5AQ/ref=sr_1_2?ie=UTF8&qid=1476061389&sr=8-2&keywords=2mm+shaft UPDATE: 20170219 I posted an exploded render of the clock (finally). For assembly, I jammed "druma" onto the 3mm shaft ensuring a tight fit with no freewheeling. After that, I threaded everything else on in order. For the weight drum, I tied the string through the small hole in the middle flange and wrapped it opposite directions around the top and the bottom. The pendulum assembly (anchor, penweights, and 3mm shaft) slid on over the lower post. Once all was in place, I covered it with bigframa-v2. The front gear train is pretty self explanatory. Print Settings Printer: Reach Rafts: No Supports: Yes Resolution: .25 Infill: 30 Notes: Printed with Inland natural PETG on my Reach 3D printer http://www.reach3dprinters.com (probably one of the best bang/buck printers out there) at 30 mm/s with 250/70 C. Total print time was around 6.5 hours. Supports are required everywhere due to the drum piece. Post-Printing Clean up all parts with a knife to ensure no artifacts that could interfere with the gear train. Any "elephant footing" can easily stop the escapement, so ensure your printer is well calibrated. Wheel four in particular requires a bit of post-print attention since its integrated shaft is so tall and thin. Ream out shaft holes as required. Wheel two should spin freely around its 2mm shaft, as should wheel one, the outer drum, and the hour hand/wheel five. The inner drum/ratchet and the minute hand must be snug enough to turn with the shaft (hence the ball bearing (yes I know that it's cheating)).
With this file you will be able to print One Plate Mechanical Clock with your 3D printer. Click on the button and save the file on your computer to work, edit or customize your design. You can also find more 3D designs for printers on One Plate Mechanical Clock.