One-Push Pill Dispenser
prusaprinters
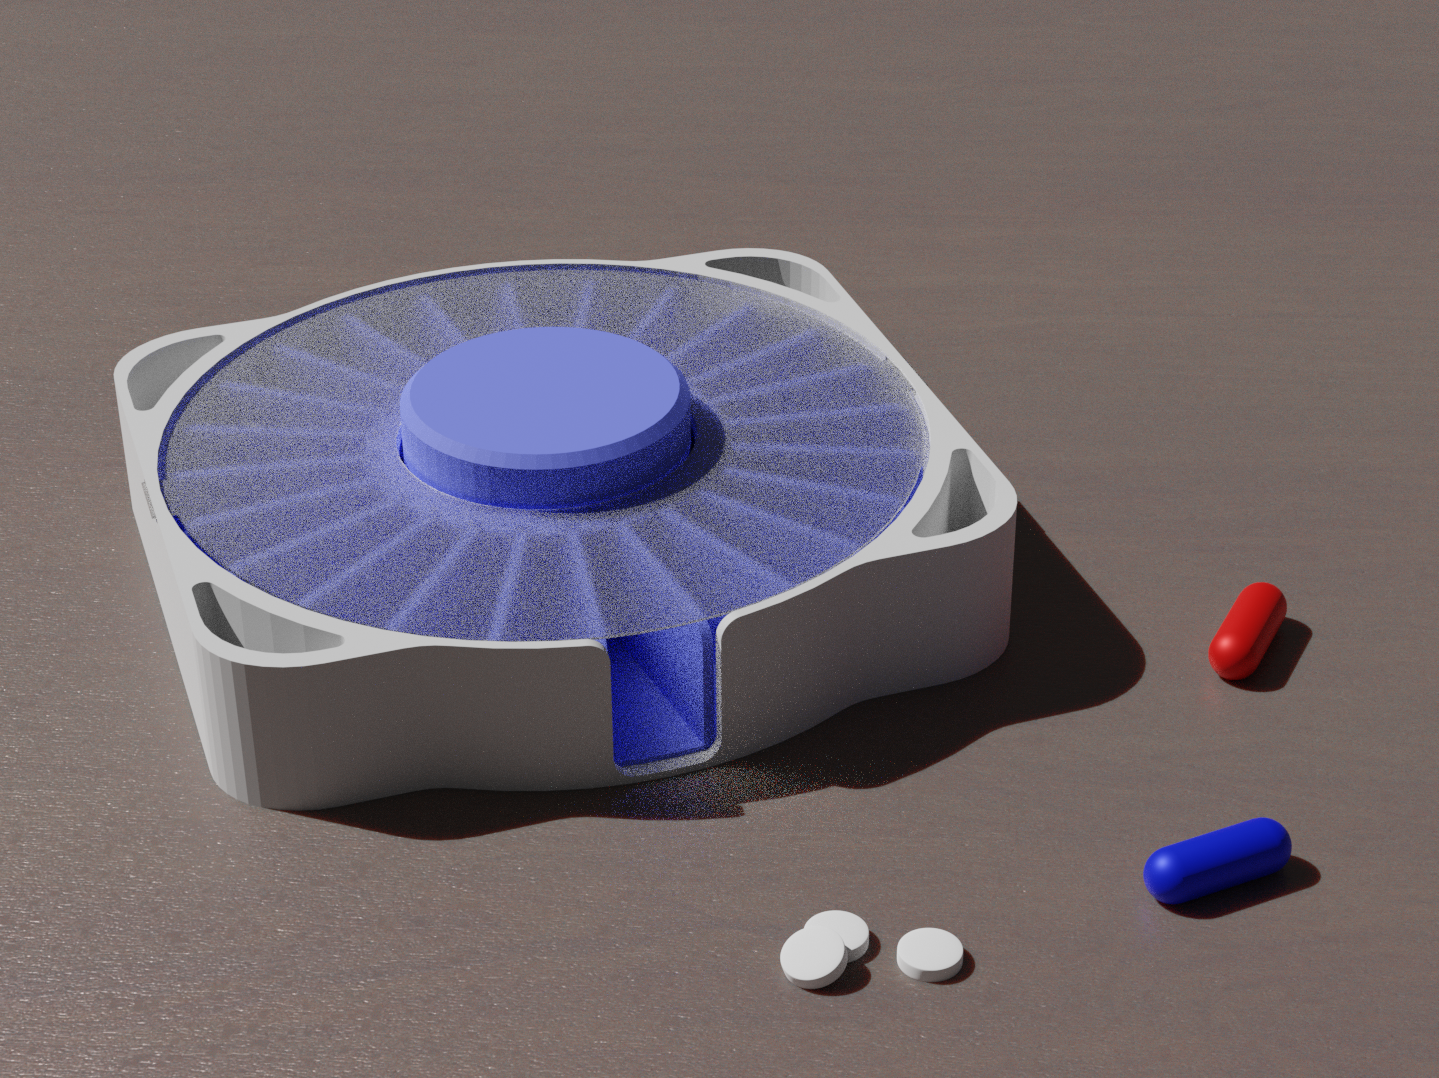
<p><strong>IMPORTANT!</strong><br><i>I do not recommend printing this! It was designed with my old printer in mind (which had horrible tolerances). The design is also imperfect, with the “spring” wearing down over time and it overall running roughly. I apologize for the inconvenience. This will not be deleted as I still want to showcase my work, even if flawed.</i></p><p> </p><p>This is a pill dispenser that only requires one push to dispense pills! Rather than buying an expensive electronic pill dispenser or having difficulties opening/rotating a manual pill dispenser, this model dispenses pills with one push of the center button.</p><p>Demo Video:<br> </p><figure class="media"><oembed url="https://www.youtube.com/watch?v=kHOOKVMFIUY&feature=youtu.be"></oembed></figure><p> </p><p>The dispenser allows people who may struggle with opening manual pillboxes/containers to easily dispense pills. It also allows for easy organization, as the machine dispenses one slot each push. You can organize your pills in advance into the dispenser and push the button once, no need to read labels or figure out if you have the correct pills.</p><p>Each push rotates the internal storage by a certain angle via an internal cam mechanism,* which turns the linear pushing motion into "segmented" angular motion. When the button is pushed down, small extrusions on the button push on an internal wedge, which rotates the pill storage by half a slot. When the button is pushed back up by the spring, the same extrusions push on other internal wedges on the top, rotating the pill storage by another half slot, thus completing the rotation.</p><p>The model is made of only 6 pieces and requires minimal assembly. All parts are replaceable if they break (assuming you press-fit all the parts and did not use glue). All parts can also be printed on a small print bed (120mm x 120mm) as well!</p><p>If you print with PLA or other non-ABS materials please let me know if my part sizes are okay with your material. I can't print with anything but ABS so I can't test common materials like PLA. This in particular and other feedback is appreciated!</p><p>Although I did not use any of their files, credit to Tanya Akinora with their 3D Printed Pill Dispenser for the original idea. Check out the model!<br><a href="https://www.prusaprinters.org/prints/27215#_ga=2.9131645.9179937.1586072101-1138105214.1584655542">https://www.prusaprinters.org/prints/27215#_ga=2.9131645.9179937.1586072101-1138105214.1584655542</a></p><p>*I'm unsure if the mechanism I used is technically a cam mechanism, but this is the best word I can use to describe it. Feel free to correct me.</p><h3>Print instructions</h3><p>PDF Version of Instruction Images:<br><a href="https://drive.google.com/file/d/1KIMLv60OZI_F0MCq6E9E9J0f129y76Zd/view?usp=sharing">https://drive.google.com/file/d/1KIMLv60OZI_F0MCq6E9E9J0f129y76Zd/view?usp=sharing</a></p><p><strong>Parts List</strong><br><i>1 - Outer Case</i>: The case that holds the mechanism together.<br><i>2 - Pill Storage and Cam Bottom</i>: The slots for pill storage and the bottom row of "cam wedges."<br><i>3 - Cam Top</i>: Top of the cam mechanism.<br><i>3 - Cam Top (Tight Fit)</i> Top of the cam mechanism. This version has slightly smaller cuts so it'll be tighter when placed on Part 2.<br><i>4 - Button</i>: Just a button.<br><i>5 - Compression Spring</i>: 3D Printed spring<br><i>6 - Top Lid</i>: Thin, flexible top lid to cover the mechanism and prevent it from coming apart.</p><p><strong>Mechanism Jam Information</strong><br>Due to the possible roughness of the wedge surfaces, it is possible for the button to jam when it is moving upward via the spring's force. To unjam, lightly push down on the edges of the button until it unjams. You can also try straightening out the button.</p><p><strong>Printing Instructions</strong><br>Infill: No preference<br>Layer Height: 0.2 mm<br>Nozzle: 0.4 mm Nozzle<br>Supports: None (Exception: <i>Part 4 Button</i> requires supports for the small extrusions on the side)</p><p><strong>Print Bed Orientation</strong><br>All prints are designed to not need supports. Follow the orientation laid out in the images on the original post.</p><p><strong>Assembly</strong><br>Instruction images included on original post. Written version:<br>1) Place <i>Part 3 - Cam Top</i> around <i>Part 4 - Button</i> such that the side extrusions on the Button fit into the wedges on the Cam Top.<br>2) Place <i>Part 5 - Compression Spring</i> into the center of <i>Part 2 - Pill Storage and Cam Bottom</i>. The compression spring has a small extrusion that should fit into the center hole of the Pill Storage while having a "ledge" that cannot pass through the center hole.<br>3) Place the assembly made in <i>Step 1</i>, into the assembly made in <i>Step 2</i>, making sure the button faces up and the Compression Spring on the Pill Storage fits into the rectangular area on the underside of the button. You may need to put force on the Cam Top to press fit it into the Pill Storage.<br>4) Place the assembly made in <i>Step 3</i> into <i>Part 1 - Outer Case</i>. Make sure the Compression Spring also slides into the rectangular area on the Outer Case.<br>5) Insert <i>Part 6 - Top Lid</i> onto the Outer Case. This will require bending the Top Lid so the tabs can fit into the holes on the Outer Case.<br>6) Press the Button a few times and make sure the Pill Storage rotates correctly.</p>
With this file you will be able to print One-Push Pill Dispenser with your 3D printer. Click on the button and save the file on your computer to work, edit or customize your design. You can also find more 3D designs for printers on One-Push Pill Dispenser.