Oogoo Mixer
thingiverse
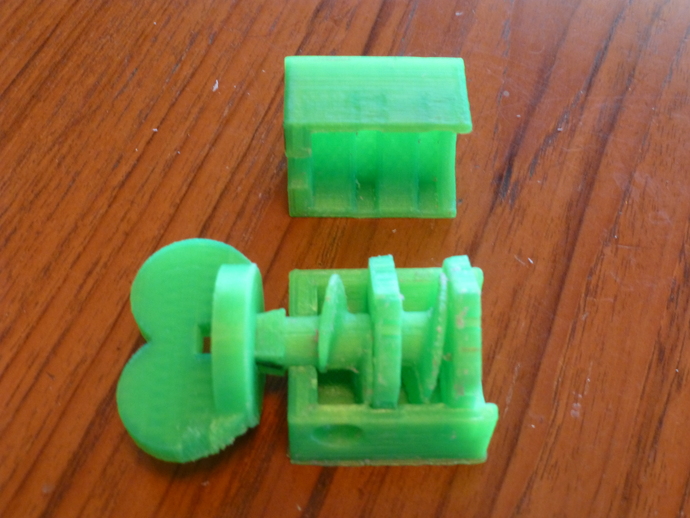
Oogoo ( http://www.instructables.com/id/How-To-Make-Your-Own-Sugru-Substitute/ and http://www.instructables.com/id/7-Things-To-Fix-Or-Do-With-Oogoo/ ) is great stuff! Inexpensive, easy to mold, easy to clean up, quick setting, and makes parts with a nice soft yet firm feel to them. The only thing I don't like is mixing it up. Combining silicone and corn starch, possibly along with some coloring agent, is not easy. Messy, hard to get uniform, and the time taken eats into the working time for the Oogoo. There must be a better way. Here's my answer. Use an auger to press the stuff thru some plates with holes in them. Minimal mixing is needed to just get the corn starch sort of wetted with silicone. Then inject it into the auger, turn the auger, and out comes uniformly mixed Oogoo, ready to mold. Watch the video here http://www.youtube.com/watch?v=IE8L7yjxwAE&feature=youtu.be This is very much a work in process. The OpenSCAD for the Auger needs to be parameterized and there should be a base plate of some sort to hold things together. Instructions Construction: DO NOT USE my stls for the plunger!!! Measure the OD and ID of the tubing you will use (see Materials) and put the values into the OpenSCAD file for the Feeder. Create the stls after you make modifications. A note about the design: The Auger itself is designed in Blender 2.6 using the Screw Tool. This is exported as an stl, then imported into OpenSCAD and sliced and diced as necessary to make the final part. Using Blender and OpenSCAD together in this way is very effective. Materials: Print one each of the top and bottom case, and the Auger Crank (optional). Print the AugerSplit (two parts). Glue the Auger together with multi-purpose pipe cement. (I used DoitBest mp-6. Described as “medium set, clear for ABS, PCV, and CPVC pipe and fittingsâ€.) Apply with a Q-tip or cotton bud, depending on which side of the Pond you reside. ;>)}} Print four each of the Auger Rings. Print one each of the Feeder (two parts). 1 inch (25mm) of 1/4†ID x 3/8†OD HDPE tube (or similar). Note: If you live in Metric Land, then adjust this diameter accordingly. Sorry this is not a parameter in the Auger file yet. 4†to 6†length of PVC pipe for the plunger handle. Size needs to fit inside your outer tube with enough room for vent holes. 2 1/2†to 3†length of Acrylic tube about 1 1/4†ID for the Feeder body. (Having this piece be transparent or translucent is important.I cut the bottom off an old pill bottle.) Auger Assembly: Carefully glue the Auger together with multi-purpose pipe cement. (I used DoitBest mp-6. Described as “medium set, clear for ABS, PCV, and CPVC pipe and fittingsâ€.) Apply with a Q-tip or cotton bud, depending on which side of the Pond you reside on. ;>)}} Line the two halves up carefully. This is not difficult if you work slowly. Let dry thoroughly. Clean up the parts carefully so they fit together, yet turn reasonably freely. You may or may not want to put the Auger Crank on. Hold the Auger Ring pieces in place around the Auger and snap them into the grooves in the bottom case. It works best if the dividing lines of the rings are 90 degrees to the case dividing line. Put the case top on. Mine snaps into place and holds everything together securely. Feeder Assembly: Clean up the two parts. Drill out the 1mm holes in the plunger since they'll almost certainly be plugged with plastic. Glue the the plunger handle into the plunger using multi-purpose pipe cement (described above) Allow it to dry thoroughly. Fit the Acrylic tube into the feeder. It should fit snugly; DO NOT glue it in place. You will want to remove it for cleaning. Final Assembly: Be sure the ends of the 1/4†ID tubing are square and fit it between the Feeder and the Case top. You will most likely plug and unplug this as you fill and use your Oogoo Mixer, but be sure it fits at this stage. Look at the auger and see when the opening from the case is most open. Put a reference mark on the case. Mine is shown; yours should be very similar.
With this file you will be able to print Oogoo Mixer with your 3D printer. Click on the button and save the file on your computer to work, edit or customize your design. You can also find more 3D designs for printers on Oogoo Mixer.