Openbuilds v-slot Y axis for Lulzbot TAZ 3, 4, 5 or 6 printers
prusaprinters
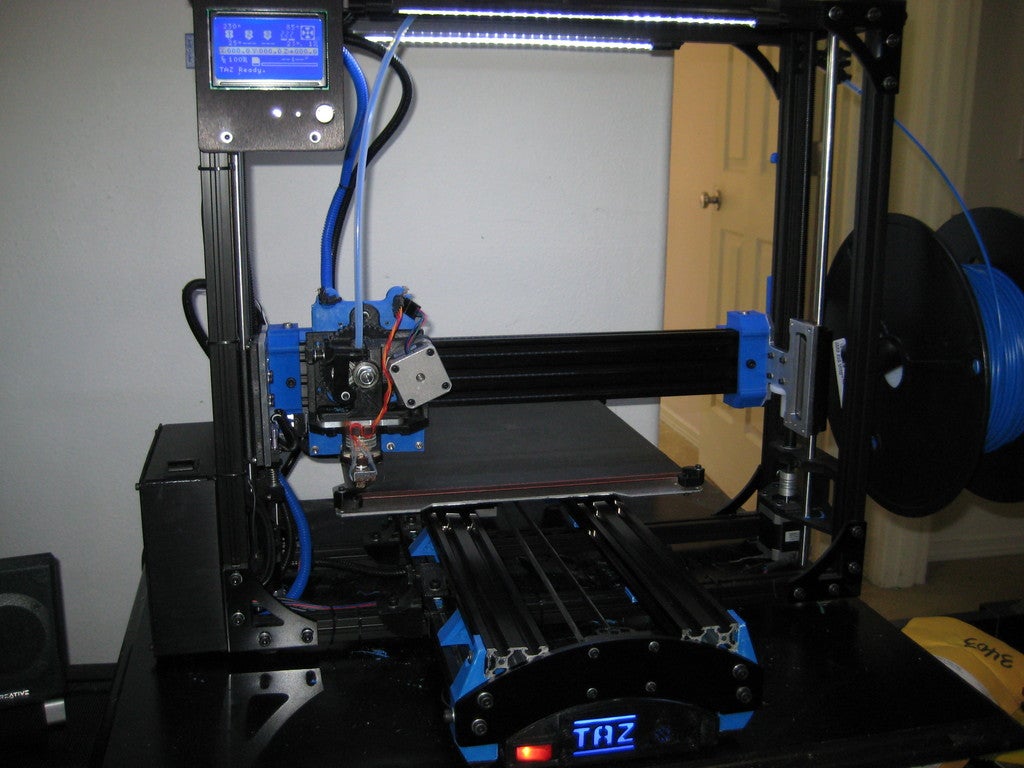
<p>This project adds a bolt on, no firmware modification required fully supported Y axis to the Lulzbot Taz 3, 4 and 5 printers in place of the existing bearing rods. This project is compatible with the layout of the Taz 3. You will need to drill 4 highly precise holes in a new or existing Taz 3-5 heated bed mount plate to accommodate the Openrail hardware.<br/> Build thread is here: <a href="https://forum.lulzbot.com/viewtopic.php?f=16&t=2426">https://forum.lulzbot.com/viewtopic.php?f=16&t=2426</a></p> <p>Video of the completed modification in action: <a href="https://youtu.be/79-YFZdIeOM">https://youtu.be/79-YFZdIeOM</a></p> <p>If you downloaded the 1.0a version of the corners, they were 4mm too tall at the very tip. You can easily cut that off without affecting the part, or download the corrected 1.1a variant and reprint it.</p> <p>The new Version 2.0 parts move the rail outboard 1mm per side to better engage the wheels.</p> <p>Update 2:</p> <p>The two Idler and Motor endplate reinforcement plates are designed to allow for easier rail allignment in parallel. The first release was off a bit, Version 2.0 is corrected, pictures to come shortly, You will need to tap the end of the Openrails with an M5 Tap to be able to use these plates (the two outside holes on the front and all 4 holes on the back), and they should be considered optional.</p> <p>The other addition is an optional Combined Drill Guide. It has the spacing set between the small fixed and large exxentric holes fixed. It's a thicker plate, which will hopefully make it more effective. it also has smaller holes for the bolts, so it shouldn't be able to move around as much anyways. This one does use significantly more plastic than the other ones, but it should thoretically be easier to use. You'll want to print two of them and make sure they both line up when you drill your holes. The X allignment (side to side) is absolutly critical for the drill guide. The Y allignment doesn't really matter.</p> <p>Update 3. New version of the Combined Drill plate now uploaded. The old one was apperently too close together.</p> <p>Update 4: It turns out the motor mount metal plate from the Taz 3 is 4mm different than the one in the Taz 4/5 in important areas. This means the back reinforcing plate will not fit a 4/5 yet. A 4/5 specific variant will be uploaded tonight. In my defense I don't have a Taz 4 or 5 Chassis to test the plate on hehe.</p> <p>Update 5: Version E of the 4/5 motor endplate, the holes are right now I think.</p> <p>Note: This will fit a Taz 6.</p> <p>Update 6: The new idler front plate has a small recess to accomodate the new Y axis belt tensioner tension bolt <a href="https://www.thingiverse.com/thing:1656341">http://www.thingiverse.com/thing:1656341</a> It is otherwise unchanged from the 1.0_a revision.</p> <p>Update 7: The Taz 6 bed plate has 4mm wider spacing on the stock bearing mount holes. There is now an uploaded drilling guide that takes that into account.</p> <p>Update 8: The long awaited instructions document is now uploaded!</p> <p>Update 9, uploaded an updated Taz 6 specific endplate.</p> <p>There are several other related projects that are referenced in the PDF document, you may find the following optional projects of use as well :<br/> External Y axis Belt tensioner: <a href="https://www.thingiverse.com/thing:1656341">https://www.thingiverse.com/thing:1656341</a><br/> Y axis motor bearing reinforcement "hat" <a href="https://www.thingiverse.com/thing:2588359">https://www.thingiverse.com/thing:2588359</a><br/> Retrofit nozzle wiper mount for a Mini / Taz 6 style nozzle wiper <a href="https://www.thingiverse.com/thing:1261303">https://www.thingiverse.com/thing:1261303</a></p> <h3>Print instructions</h3><h3>Category: 3D Printer Parts Summary</h3> <p>This project adds a bolt on, no firmware modification required fully supported Y axis to the Lulzbot Taz 3, 4 and 5 printers in place of the existing bearing rods. This project is compatible with the layout of the Taz 3. You will need to drill 4 highly precise holes in a new or existing Taz 3-5 heated bed mount plate to accommodate the Openrail hardware.<br/> Build thread is here: <a href="https://forum.lulzbot.com/viewtopic.php?f=16&t=2426">https://forum.lulzbot.com/viewtopic.php?f=16&t=2426</a></p> <p>Video of the completed modification in action: <a href="https://youtu.be/79-YFZdIeOM">https://youtu.be/79-YFZdIeOM</a></p> <p>If you downloaded the 1.0a version of the corners, they were 4mm too tall at the very tip. You can easily cut that off without affecting the part, or download the corrected 1.1a variant and reprint it.</p> <p>The new Version 2.0 parts move the rail outboard 1mm per side to better engage the wheels.</p> <p>Update 2:</p> <p>The two Idler and Motor endplate reinforcement plates are designed to allow for easier rail allignment in parallel. The first release was off a bit, Version 2.0 is corrected, pictures to come shortly, You will need to tap the end of the Openrails with an M5 Tap to be able to use these plates (the two outside holes on the front and all 4 holes on the back), and they should be considered optional.</p> <p>The other addition is an optional Combined Drill Guide. It has the spacing set between the small fixed and large exxentric holes fixed. It's a thicker plate, which will hopefully make it more effective. it also has smaller holes for the bolts, so it shouldn't be able to move around as much anyways. This one does use significantly more plastic than the other ones, but it should thoretically be easier to use. You'll want to print two of them and make sure they both line up when you drill your holes. The X allignment (side to side) is absolutly critical for the drill guide. The Y allignment doesn't really matter.</p> <p>Update 3. New version of the Combined Drill plate now uploaded. The old one was apperently too close together.</p> <p>Update 4: It turns out the motor mount metal plate from the Taz 3 is 4mm different than the one in the Taz 4/5 in important areas. This means the back reinforcing plate will not fit a 4/5 yet. A 4/5 specific variant will be uploaded tonight. In my defense I don't have a Taz 4 or 5 Chassis to test the plate on hehe.</p> <p>Update 5: Version E of the 4/5 motor endplate, the holes are right now I think.</p> <p>Note: This will fit a Taz 6.</p> <p>Update 6: The new idler front plate has a small recess to accomodate the new Y axis belt tensioner tension bolt <a href="https://www.thingiverse.com/thing:1656341">http://www.thingiverse.com/thing:1656341</a> It is otherwise unchanged from the 1.0_a revision.</p> <p>Update 7: The Taz 6 bed plate has 4mm wider spacing on the stock bearing mount holes. There is now an uploaded drilling guide that takes that into account.</p> <p>Update 8: The long awaited instructions document is now uploaded!</p> <p>Update 9, uploaded an updated Taz 6 specific endplate.</p> <p>There are several other related projects that are referenced in the PDF document, you may find the following optional projects of use as well :<br/> External Y axis Belt tensioner: <a href="https://www.thingiverse.com/thing:1656341">https://www.thingiverse.com/thing:1656341</a><br/> Y axis motor bearing reinforcement "hat" <a href="https://www.thingiverse.com/thing:2588359">https://www.thingiverse.com/thing:2588359</a><br/> Retrofit nozzle wiper mount for a Mini / Taz 6 style nozzle wiper <a href="https://www.thingiverse.com/thing:1261303">https://www.thingiverse.com/thing:1261303</a></p> <h3> Instructions</h3> <p>You will need to source 2x 500mm 20mm x 40mm Openrail extrusions, 4 Openrail</p> <p>2x 40mm x 20mm Openbuilds linear extrusion, 500mm long. <a href="http://openbuildspartstore.com/black-v-slot-linear-rail/">http://openbuildspartstore.com/black-v-slot-linear-rail/</a><br/> 4 sets of bearing wheels (<a href="http://openbuildspartstore.com/xtreme-solid-v-wheel-kit/">http://openbuildspartstore.com/xtreme-solid-v-wheel-kit/</a> or other sets) ,<br/> 2 spacers (6mm) <a href="http://openbuildspartstore.com/aluminum-spacers/">http://openbuildspartstore.com/aluminum-spacers/</a><br/> 2 eccentric spacers <a href="http://openbuildspartstore.com/eccentric-spacer/">http://openbuildspartstore.com/eccentric-spacer/</a><br/> Bolts and nuts (M5, Lengths to be determined.)<br/> M5 Heat set nuts (Mcmaster Carr has them)<br/> 1 Taz 5 heated bed mounting plate (the Aluminum thingy) that you can drill into with a drill press, can be purchased from Lulzbot if you don't want to risk your existing one for $35<br/> The printed parts (4 end pieces, 6 middle supports, and theoretically the Drill Guide(s)</p> <p>You may also want these two drill bits:<br/> <a href="http://www.mcmaster.com/#catalog/121/2427/=zy8ysr">http://www.mcmaster.com/#catalog/121/2427/=zy8ysr</a></p> <p>Metric Black&Gold Oxide High-Speed Steel Jobbers Drill Bit<br/> 7.2mm, 108mm Overall Length, 71.4mm Drill Depth, 135 Degree Point<br/> 30565A296</p> <p>Metric Black&Gold Oxide High-Speed Steel Jobbers Drill Bit<br/> 5.0mm, 92mm Overall Length, 61.1mm Drill Depth, 135 Degree Point<br/> 30565A272</p> <p>7.2mm is the exact size of the eccentric wheel adjuster</p> <p>Using the existing Y bed structure as a base, remove the Rod mount end pieces and any attached hardware. You will also need to remove at least one of the Y bed mounts from each existing 500mm long 20mm rail. Now install 3 bed support pieces per side, one in the middle, then the bed mount you removed, then one on either end. They should be spaced evenly. Now install the new endcaps and the new Openrails.</p> <p>Next, take your bed plate and Drill template(s) and drill the holes in the indicated locations. Precision is key here. You only have about 1-2mm adjustability so if you are off, you start over with a new plate. A drill press, precision clamping, a realllly good carbide drill bit set, and patience are highly recommended.</p> <p>Once that is finished, install the Openrail wheels in the bed plate and slide it onto the new bed rails. Adjust tensions as needed until the bed moves smoothly with no play at all.</p> <p>You do not need to edit firmware or anything along those lines to get this to work. Aside from the hole drilling, it's a bolt on modification.</p> <p>Full parts list (Thank you mikronano for writing this up):<br/> Spacers ( 6x - each):<br/> (2) M5 x 10mm<br/> (2) M5 washers<br/> (2) T-nuts<br/> so if you use six spacers you'll need (12) for each of the above</p> <p>Front Rail Ends (Idler):<br/> (6) M5 x 10mm (use on the T-nuts)<br/> (6) M5 x 20mm (use upfront on the End Plate)<br/> (12) M5 washers<br/> (2) M5 heat inserts (i.e. product#94180A361 M5x6.7mm from McMaster-Carr will do just fine)<br/> (2) M3 x 16mm (for the upper holes upfront on the End Plate and all the way back to the Idler)</p> <p>Rear Rail Ends (Motor):<br/> (6) M5 x 10mm (use on the T-nuts)<br/> (8) M5 x 20mm (use upfront on the End Plate)<br/> (14) M5 washers<br/> (2) M5 heat inserts (same M5x6.7mm)<br/> (2) M3 x 16mm (for the upper holes upfront on the End Plate and all the way back to the Motor)</p> <p>Wheels:<br/> (4) M5 x 30mm (I personally prefer the "Low Profile" from OpenBuilds because they're the only ones that I can find with Full Threads)<br/> (12) M5 washers</p>
With this file you will be able to print Openbuilds v-slot Y axis for Lulzbot TAZ 3, 4, 5 or 6 printers with your 3D printer. Click on the button and save the file on your computer to work, edit or customize your design. You can also find more 3D designs for printers on Openbuilds v-slot Y axis for Lulzbot TAZ 3, 4, 5 or 6 printers.