Openbuilds v-slot z axis for Lulzbot Taz 4/5 Printers
prusaprinters
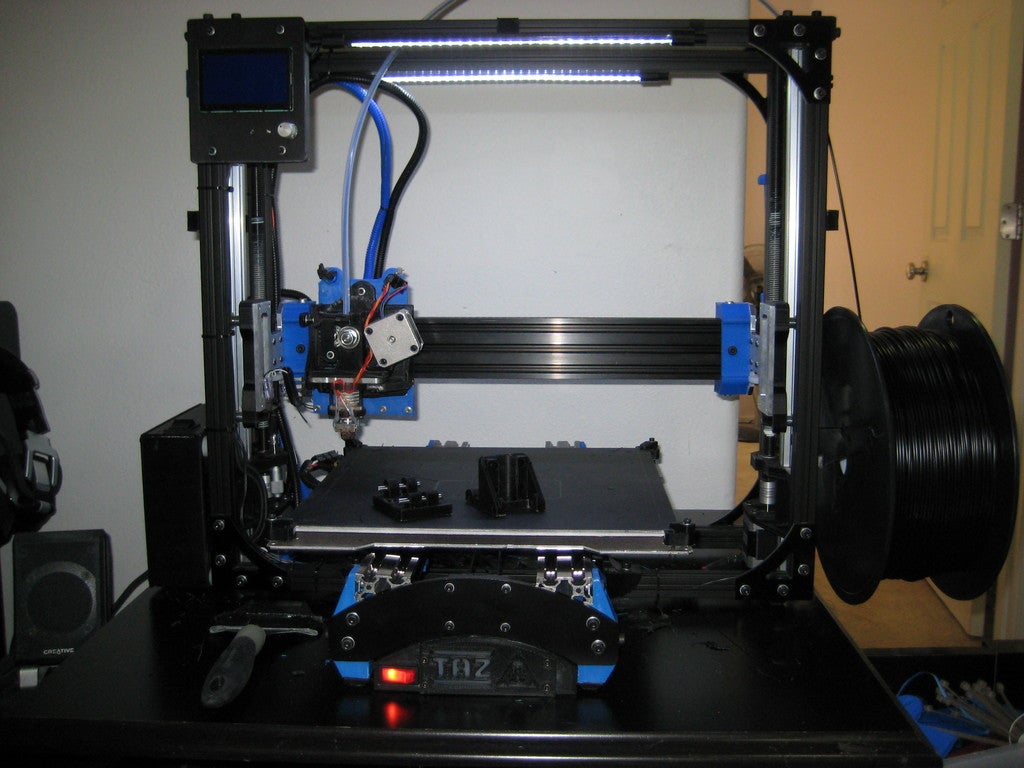
<p>This modification adds Openrail extrusions in place of the existing Lulzbot Taz 4 or 5 smooth Z rod. I will post a parts list soon. It basically just needs 8 of the mini wheels, with 4 mini wheel eccentrics and 4 6mm spacers. Extrusions are 20mm x 20mm openrail 500mm extrusions, stock. You will also need some T slot nuts (m5, I recommend the Dropin ones for this) 4 spacers and longer M5 bolts to move the control box out fromt he frame to clear the wheels, and several longer M3 bolts. THis project also has an option to replace the existing stock heat set insert based Z endstop with a full on Micrometer body, which I highly recommend.</p> <p>Edit: Uploaded a new version of the bearing carriage. This version has sufficient clearance to work with my new Anti wobble nut project. If you dio not intend to fit that project, the older version is fine. The anti wobble Z nut mount project may be found here: <a href="https://www.thingiverse.com/thing:1089626">http://www.thingiverse.com/thing:1089626</a></p> <p>Edit 2: wobble clearance block with passthrough slot for the Z endstop cable now uploaded.</p> <p>Edit 3: Cabel routing top cover option now uploaded. The sum difference of that part and prior versions is the cable chase segment on the side for routing front to back. This is mainly useful for adding lightbars or sensors on top of the gantry.</p> <h3>Print instructions</h3><h3>Category: 3D Printer Parts Summary</h3> <p>This modification adds Openrail extrusions in place of the existing Lulzbot Taz 4 or 5 smooth Z rod. I will post a parts list soon. It basically just needs 8 of the mini wheels, with 4 mini wheel eccentrics and 4 6mm spacers. Extrusions are 20mm x 20mm openrail 500mm extrusions, stock. You will also need some T slot nuts (m5, I recommend the Dropin ones for this) 4 spacers and longer M5 bolts to move the control box out fromt he frame to clear the wheels, and several longer M3 bolts. THis project also has an option to replace the existing stock heat set insert based Z endstop with a full on Micrometer body, which I highly recommend.</p> <p>Edit: Uploaded a new version of the bearing carriage. This version has sufficient clearance to work with my new Anti wobble nut project. If you dio not intend to fit that project, the older version is fine. The anti wobble Z nut mount project may be found here: <a href="https://www.thingiverse.com/thing:1089626">http://www.thingiverse.com/thing:1089626</a></p> <p>Edit 2: wobble clearance block with passthrough slot for the Z endstop cable now uploaded.</p> <p>Edit 3: Cabel routing top cover option now uploaded. The sum difference of that part and prior versions is the cable chase segment on the side for routing front to back. This is mainly useful for adding lightbars or sensors on top of the gantry.</p> <h3> Print Settings</h3> <p><strong>Rafts:</strong> No</p> <p><strong>Supports:</strong> No</p> <p><strong>Resolution:</strong> printed with 0.50mm nozzle</p> <p><strong>Infill:</strong> 85%</p> <p><strong>Notes:</strong></p> <p>You want a pretty dense infil for these as they will be structural. I would not recommend PLA for this application. The Z motor brackets and top plates are quite large and cannot be printed on a mini.</p> <h3> Post-Printing</h3> <p>Tell us more...</p> <h3> Custom Section</h3> <p><strong>Insrtructions</strong></p> <p>It appears Thingiverse ate my origional instructions section. Will need to rebuild it later. For now here's the Bill of materials</p> <p>Z axis Bill of Materials</p> <p>6 M5 heat set inserts <a href="http://www.mcmaster.com/#94180a361/=zhts4o">http://www.mcmaster.com/#94180a361/=zhts4o</a><br/> 4 3/16" 1 and 3/4" long steel shafts (locally sourced from Ace Hardware)<br/> 8 Igus 2MTRI MYI-03-03 Flanged Bearing, 3/16" IDx 3/16" L (ebay)<br/> 8 1/4" threaded nylon spacers, at least 1/2" length<br/> 8 bolts that will fit the threaded nylon spacers</p> <p>Openbuilds Z axis:<br/> 8 Xtreme Mini V Wheel™ Kit <a href="http://openbuildspartstore.com/xtreme-mini-v-wheel-kit/">http://openbuildspartstore.com/xtreme-mini-v-wheel-kit/</a><br/> 8 30mm Low profile head M5 bolts <a href="http://openbuildspartstore.com/low-profile-screws-m5/">http://openbuildspartstore.com/low-profile-screws-m5/</a><br/> 2 20mm x 20mm x 500mm Openbuilds V slot extrusions <a href="http://openbuildspartstore.com/v-slot-linear-rail/">http://openbuildspartstore.com/v-slot-linear-rail/</a><br/> 4 6mm eccentric spacer <a href="http://openbuildspartstore.com/eccentric-spacer/">http://openbuildspartstore.com/eccentric-spacer/</a><br/> 4 6mm solid spacer <a href="http://openbuildspartstore.com/aluminum-spacers/">http://openbuildspartstore.com/aluminum-spacers/</a><br/> 8 12mm long thread m3 cap head bolts<br/> 18 M5 10mm Cap head bolts (the support braces require 3 each, for double bracing, add 6 bolts and T-nuts)<br/> 22 additional M5 T-nuts (I reccommend the drop in ones for these, they make it considerably easier<br/> 12mm long Cap low profile cap head bolts (M5) for securing control box spaced out to clear boltheads<br/> 1 M5 heat set insert if you will not be doing the micrometer upgrade<br/> 12 M5 washers</p> <p>Stock parts that will be reused:<br/> The Z height set bolt spring assembly<br/> The existing M5 bolts, washers, and T-nuts that secure the stock Taz 5 Motor mounts, and upper leadscrew mounts to the chassis frame</p>
With this file you will be able to print Openbuilds v-slot z axis for Lulzbot Taz 4/5 Printers with your 3D printer. Click on the button and save the file on your computer to work, edit or customize your design. You can also find more 3D designs for printers on Openbuilds v-slot z axis for Lulzbot Taz 4/5 Printers.