OpenCat Nybble DIY
prusaprinters
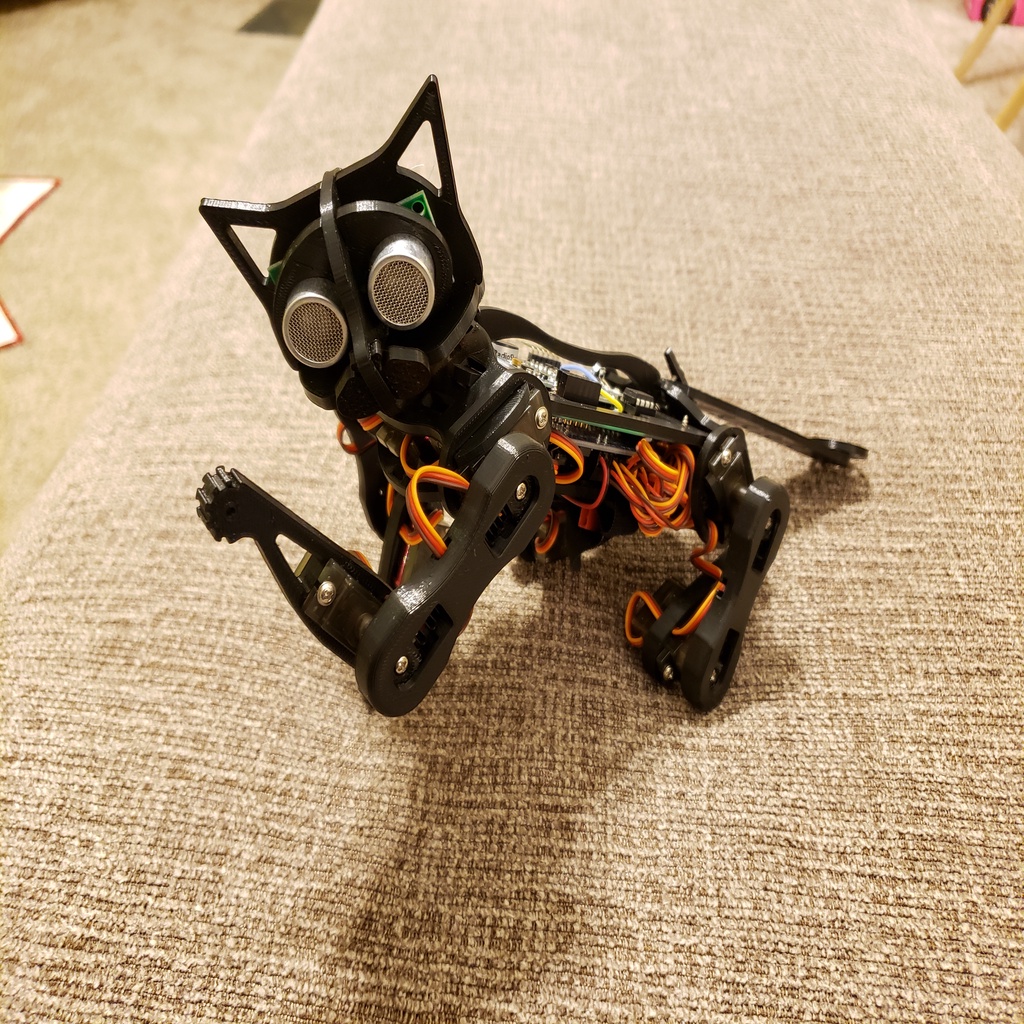
<p>Update 1/4/2020:<br/> Added a new STL option for the eyes that should fit a SR04 sensor.</p> <p>Update 12/5/2019:<br/> After last night's down time for maintenance, the upload function seems to be working again. I have re-uploaded all 25 files and they appear to be downloading properly again. Please use the regular download function and let me know if any issues crop up.</p> <p>Update 12/4/2019:<br/> Thingiverse is acting up and will not let me upload the files properly because their site is broken and buggy and probably completely overwhelmed. Please check comments from today's date for a temporary link to the files stored in OneDrive.</p> <p>This is my Do It Yourself version of the OpenCat Nybble robotic kitten by Petoi (as seen on the cover of Make Magazine, Volume 70 Oct/Nov 2019). You can support the project on the Indiegogo site (<a href="https://www.indiegogo.com/projects/nybble-world-s-cutest-open-source-robotic-kitten">https://www.indiegogo.com/projects/nybble-world-s-cutest-open-source-robotic-kitten</a>#/) where you can buy a full kit or even just the electronics board.</p> <p>Source code and schematic is located at <a href="https://github.com/PetoiCamp/OpenCat">https://github.com/PetoiCamp/OpenCat</a></p> <p>Using only the Magazine article as reference, I have designed my own, duplicate, 3D Printable frame so that you can print your own or even use my design as spare parts to repair your official lasercut kit.</p> <p>Electronics required are as follows:</p> <p>Arduino Pro Mini 5V 16Mhz</p> <p>EEPROM 24LC256</p> <p>MPU-6050 Gyro</p> <p>Piezo buzzer</p> <p>1500UF 16V High Temperature Aluminum Electrolytic Capacitor<br/> <a href="https://www.microcenter.com/product/429755/nte-electronics-vht1500m16-1500uf-16v-high-temperature-aluminum-electrolytic-capacitor">https://www.microcenter.com/product/429755/nte-electronics-vht1500m16-1500uf-16v-high-temperature-aluminum-electrolytic-capacitor</a></p> <p>Adafruit 16-Channel 12-bit PWM/Servo Driver - I2C interface - PCA9685 <a href="https://www.adafruit.com/product/815">https://www.adafruit.com/product/815</a></p> <p>QTY (11) MG90S Metal Gear Servos<br/> https://www.amazon.com/gp/product/B07R7PYK9T/ref=ppx\_yo\_dt\_b\_asin\_title\_o07\_s00?ie=UTF8&psc=1</p> <p>38 KHz IR Receiver<br/> <a href="https://www.microcenter.com/product/476345/velleman-1838-ir-infrared-379khz-receiver---2-pack">https://www.microcenter.com/product/476345/velleman-1838-ir-infrared-379khz-receiver---2-pack</a></p> <p>Compatible IR Remote (I chose this 44 button remote from <a href="https://www.amazon.com?linkCode=ll2&tag=thingiverse09-20&linkId=e4759bff1fa9a55a0f897d801ce2d765&language=en_US&ref_=as_li_ss_tl"> </a><a href="https://www.amazon.com?linkCode=ll2&tag=thingiverse09-20&linkId=e4759bff1fa9a55a0f897d801ce2d765&language=en_US&ref_=as_li_ss_tl"> Amazon</a> and modified the Arduino Code to match)<br/> https://www.amazon.com/gp/product/B00AF5YOK2/ref=ppx\_yo\_dt\_b\_asin\_title\_o03\_s00?ie=UTF8&psc=1</p> <p>Ultrasonic Range Finder for Eyes (SRF05)<br/> https://www.amazon.com/s?k=srf05&hvadid=77927986214133&hvbmt=be&hvdev=c&hvqmt=e&tag=mh0b-20&ref=pd\_sl\_89epxwbpkb\_e</p> <h3> Print Settings</h3> <p><strong>Printer Brand:</strong></p> <p>Prusa</p> <p><strong>Printer:</strong></p> <p>i3 MK2S</p> <p><strong>Resolution:</strong></p> <p>.2</p> <p><strong>Infill:</strong></p> <p>20%</p> <p><strong>Filament:</strong> Hatchbox PLA Black<br/> <strong>Notes:</strong></p> <p>Most parts are simply flat patterns which are really quick and easy to print. The original leg sections (I called them "Thighs") were a 2-piece sandwich design that bolted together and needed store bought metal springs. My design is a 1-piece "print-in-place" design that includes 3D printed springs.</p> <p>Note: I had to use considerable force to break loose the embedded sliding pieces so don't assume yours are fused together just because it takes some force to break loose! Use the included 3D printed springs to save having to buy metal ones at a store. Also note it took some fiddling in Slic3r PE to get the springs to print at a 0.4mm wide, single extrusion width. I found them to be too stiff if printed any thicker than one extrusion width.</p> <p>Very little hardware is required to assemble and all hardware needed is included with your servos!</p> <h3> Post-Printing</h3> <p><strong>DIY Electronics soldered to a std 50mmx70mm project board</strong></p> <p><strong>Back side showing 16 CH PWM board, right angle headers and JST connector for 2s RC battery</strong></p> <p><strong>Custom IR Remote button mapping</strong></p> <p>As discussed on Petoi user forum<br/> <a href="https://www.petoi.com/forum/software/altering-code-for-alternate-ir-remote">https://www.petoi.com/forum/software/altering-code-for-alternate-ir-remote</a></p> <p>Note:<br/> Link appears to not resolve but that is because you must register or signup on the Petoi forum. Took me a few days myself to realize this. No fees, not personal data, just an e-mail address to sign up so don't worry.</p> <p><strong>This is the schematic I used from a previous version of the OpenCat project.</strong></p> <h3> How I Designed This</h3> <p><strong>Fusion 360</strong></p> Category: Robotics
With this file you will be able to print OpenCat Nybble DIY with your 3D printer. Click on the button and save the file on your computer to work, edit or customize your design. You can also find more 3D designs for printers on OpenCat Nybble DIY.