OpenForge 2.0 Mausoleum

OpenForge 2.0 Mausoleum

thingiverse

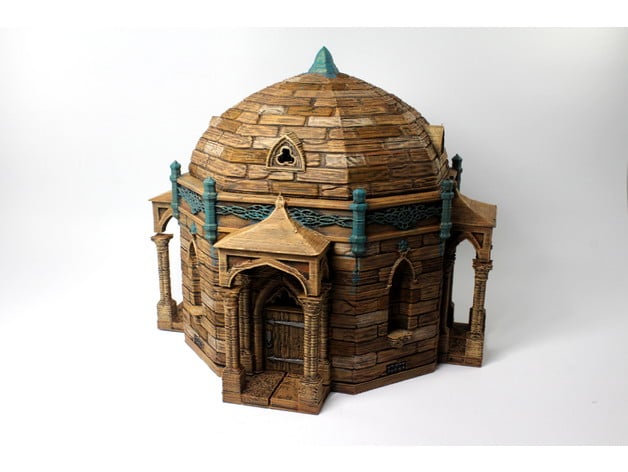
I designed this mausoleum for Frostgrave (specifically for the scenario "The Mausoleum" which requires a small square or rectangular building at least 6 inches on a side with a door on each of the 4 sides. I ran into another person's treatment of the specific building I modeled this after, the Moorhead Mausoleum. The building was perfect, but the designs were not publicly available. This building can be used for any fantasy gaming purpose, not just Frostgrave. My design comes with the ability to insert either doors or windows (like the real building) in any of the 4 cardinal sides. Includes a OpenForge 2.0 bases for magnetic and OpenLOCK systems. For instructions on how to get started with OpenForge, we have a set of tutorials. Want to sell OpenForge prints? Want to use OpenForge designs in your product, check out the license FAQ. OpenForge is now a patron supported project. I use the resources that my patrons give me in order to get the resources to let me create more sophisticated tiles with a greater level of detail. Please, support me, and I’ll deliver an ongoing stream of awesome gaming terrain. You can find more about OpenForge and Masterwork Tools at our: Online catalog and backer site Website Forums (Mostly we use facebook now) Twitter Facebook How I Designed This I got the idea for this piece from a very similar piece based off the same real world mausoleum. It was published in the lead adventurers forum by TabletopToReign. I found the inspiration, the Morehead Mausoleum in Allegheny Cemetary, Pittsburgh. I gave the mausoleum my own spin on it. Moorhead Mausoleum History The Moorhead Mausoleum, which has underground crypts, was surely the grandest tomb in the Cemetery before the construction of the Ford mausoleum (Section 1) three decades later. It stood in splendid isolation, surrounded by a heavy stone fence as Gothic as itself. The style has an unusual fantasy about it, almost as if some imperial tent had been reproduced in sandstone. The Moorhead for whom this mausoleum was built appears to have been James Kennedy Moorhead, d. 1884, a Corporator of the Cemetery who was a Pennsylvania Canal operator, builder of engineering works, and president of the Monongahela Navigation Company, which canalized the river of that name. (from Allegheny Cemetery) Painting and Construction Supplies 3d printed parts Dome Entrance 1 (4x) (print with the top face down for best results Entrance 2 (4x) Entrance 3 (8x) Mausoleum Wall (4x) 4 doors or windows, any mix you prefer Paint Brown primer (I use Krylon Fusion Ultra Flat Camouflage) Burnt Sienna (Americana) Raw Sienna (Americana) Honey Brown (Americana) Fawn (Americana) Desert Sand (Americana) Sepia Wash (Vallejo Game Color) Umber Wash (Vallejo Game Color) Black Wash (Vallejo Game Color) Adamantine Black (Reaper Master Series) Old Pewter (Reaper Master Series) Old Bronze (Reaper Master Series) Spruce Green (Reaper Master Series HD) Sapphire Blue (Reaper Master Series) Liquitex Matte Medium Water Other Supplies 1.75 mm filament, 8 short lengths about 3/4" Cyanoacrylate glue (super glue) Prime the pieces with dark brown primer. I love the Krylon Fusion paints, they are super flat and bind to plastic really well. Hit the stone areas with medium coverage of Burnt Sienna. You want to make sure the deep areas still show through with the dark brown. Now do a lighter coverage of Raw Sienna. Not quite a drybrush, but make sure the paintbrush is not particularly full of paint. Now drybrush with Honey brown. This is intended to be a highlight, so you want to focus on it ending up on the upturned edges of the piece. I do this by only moving the brush down against the part. (Optional) Now use fawn to pick out about 5 blocks per piece. Drybrush the fawn on and onto the same brick on the reverse side. Pick different bricks for each of the 4 parts. (Optional) Now use a sepia wash and pick out 5 more bricks. Cover the whole brick with the wash on front and back. This is called glazing. We are using the wash to tint the entire brick. (Optional) Finally glaze 5 more random bricks with a brown wash. Brown and sepia are similar, but the hue is still different, and the bricks will give some variation. Use a black wash inside the grate at the bottom (Optional) Highlight the stone embelishments (the arches, pillars and base of the niche) with a mix of Desert Sand and Honey Brown Use a very dark metallic on the grate itself. I used Adamantium Black. Highlight the grate with a lighter metallic. I chose to also go for a more dull color in Aged Pewter to show the age. Paint the tracery on the top, the rods and the small symbol above the niche with a bronze paint. Here I use Old Bronze. Mix a green and a blue to create a turquoise. Then add a wash medium and some water. I use equal parts Liquitex Matte Medium and water to make the wash. If you don't have that, you can use water and a little rubbing alcohol to make the wash. The alcohol will make it so the wash also sticks to surfaces instead of just going for the crevices. I took my green which was already close to a turquoise and dry brushed the raised surfaces to get more verdegris on the metal.. Glue some short lengths of filament into two of the walls. Glue two sides together, making sure that the filament sides are oriented so you can glue the two halves together. The filament acts as a strengthener to keep the bond between sides strong. Glue the two halves together and clamp. If using the floors, glue them into two halves and wait to dry. Then glue the two sides together. Flip over and glue the pillars in the corners. The pillars are painted the same way as the rest. Glue the painted roof and arches to the building, but *not* the pillars. There's an outline on the building of where these two pieces should be glued. I found it works out better if you glue the arches first and then the roof. Paint the door and door arch (glue 2 back to back) with the krylon flat dark brown Hit the wood on the door with Burnt Umber Do a lighter layer with Milk Chocolate. I'm keeping the browns a different hue from the stone to make it clear that this is wood. Dry brush with Honey Brown I used the Aged Pewter on all the metal parts and on the two sides. Then lined around the metal parts with a black wash. Paint the arch and the top of the door like the rest of the stonework. Slide the decorative arch in, then the door. Don't glue, this is made to be able to hold windows (like 3 sides of the real mausoleum) or a wall. Both of which I plan on releasing later. Changelog Dec 13, 2017 - Terrain4print fixed up some bad geometry in Entrance_1.stl, thanks!

Download Model from thingiverse

With this file you will be able to print OpenForge 2.0 Mausoleum with your 3D printer. Click on the button and save the file on your computer to work, edit or customize your design. You can also find more 3D designs for printers on OpenForge 2.0 Mausoleum.