OpenForge Modular Plank / Rope Bridges - 28mm
thingiverse
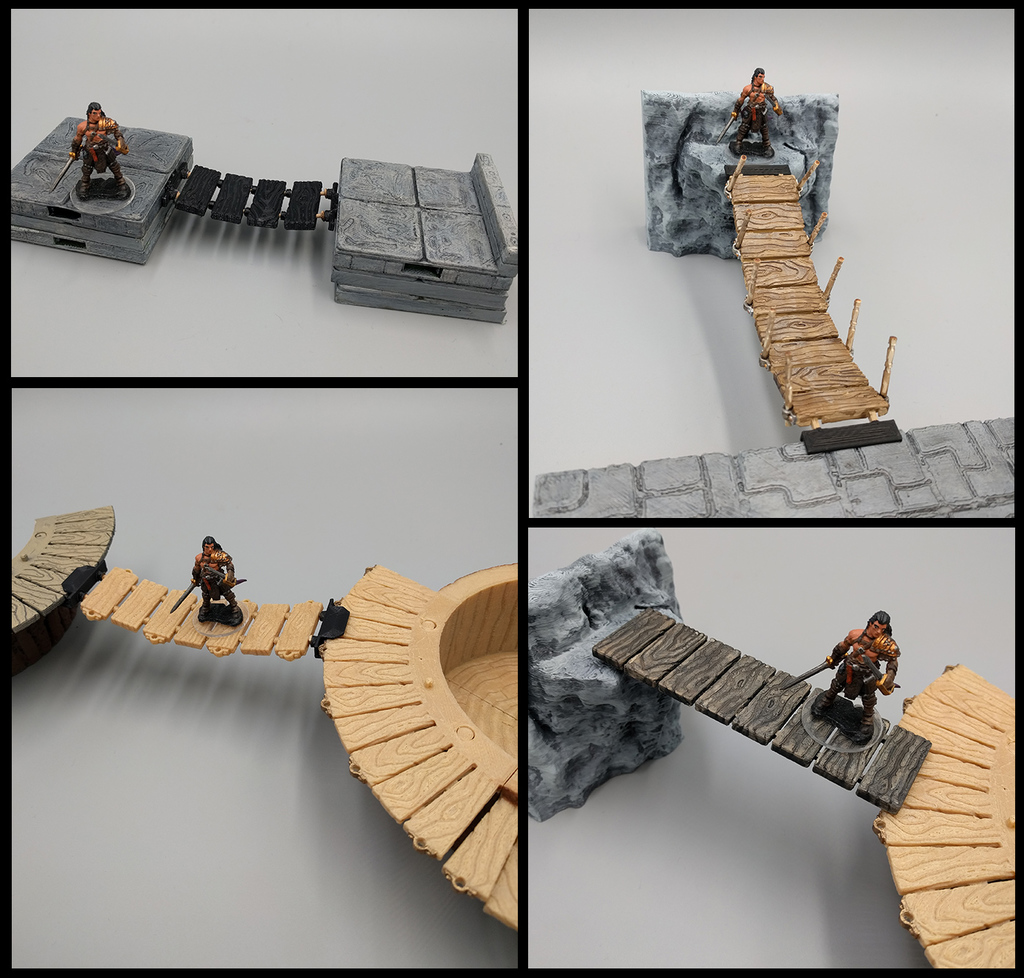
[](https://go.ec3d.design/the-ignis-quadrant-ks) -------------------- Created with support from backers for my Kickstarter from EC3D, [Forest of Oakenspire](https://www.kickstarter.com/projects/ecaroth/forest-of-oakenspire-3d-printable-tabletop-models). These bridges are intended to be highly modular and satisfy all your bridge-building needs. There are three types of bridges included are detailed below. All bridges can be made with the following end types: 1. OpenLOCK, to clip directly into your tile sets 2. Flat bracket, to set on or affix to any edge surface 3. Oakenspire platform clips, to connect the walkways between the trees. ----------------- **Print-in-place Hinged Bridges** These bridges have built-in hinges that print as part of the design. They come in 4 lengths, and with the optional railing system (detailed below). They are designed to be printed at _exactly_ .2mm layer height, and once printed you lightly flex/snap each planking section to release the hinge and make them flexible. You print two of whichever end type you need and glue them into the end slots to finish. **Filament Rope Bridge** These bridges are designed to be printed and assembled like jewelry in any length. They use two pieces of filament as "rope" within the planking to provide flexibility. A more flexible filament type works best (I used Hatchbox Wood, which looks like rope and worked great). To build, you print as many plank sections as you like (with or without railing brackets) and optionally some spacers if you want visible space between your planks. You then print two of whichever end type you need, then cut two lengths of filament "rope" and either glue or melt them into the end bracket. If glueing, make sure it sets up completely before the next step. To melt you can hit the end of the filament with a lighter and stuff it in the bracket, holding in place till it solidifies again. When doing this, position the filament so the natural curve goes downwards, so the bridge hangs correctly. Then you thread on your planks/spacers, cut the filament to length, and attach the opposite side end. These bridges can be made to virtually any length needed. **Flat/fixed Bridge** These bridges print in sections of 4 planks, and do not include a railing option. There is a connector bracket that you can also print to glue/connect multiple sections together to make longer lengths, and these bridge use the same ends as the print-in-place flexible bridges. These work great for ramps and other kind of fixed bridges. ----------------- **Railing System** As mentioned above the bridges include options to make a railing system. This is the same railing system used in the Forest of Oakenspire Kickstarter, and includes brackets w/ holes in the prints. To build the railing system you cut toothpicks to length and super glue them in the holes, then use twine or waxed string to create the actual railing.
With this file you will be able to print OpenForge Modular Plank / Rope Bridges - 28mm with your 3D printer. Click on the button and save the file on your computer to work, edit or customize your design. You can also find more 3D designs for printers on OpenForge Modular Plank / Rope Bridges - 28mm.