OpenOPTI (A cheap open-source 3D Microscope)
thingiverse
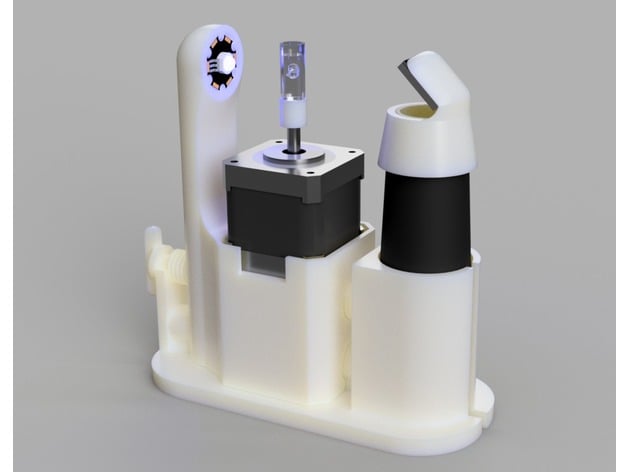
Optical Projection Tomography (OPT) harnesses reconstruction techniques similar to those used by CT x-ray imaging, but incorporates visible light to microscopically examine samples. By capturing hundreds of images from every angle of rotation, a 3D representation of the sample can be achieved with the clarity and focus of traditional microscopes without necessitating destructive physical sectioning. There are multiple approaches to accomplish this, however in the interest of simplicity and frugality I opted for the most basic method here as a starting point. The rig consists of: a USB microscope ($20), mirror ($1), stepper motor ($15), EasyDriver stepper motor driver($7), 10W LED ($8), variable buck-converter ($2), Arduino Nano ($4), and small AC/DC power supply ($5). (So ~$60 total.) Steps to operate the system: Install the arduino firmware Install the Matlab CT Reconstruction Package Add-on (https://www.mathworks.com/matlabcentral/fileexchange/35548-3d-cone-beam-ct--cbct--projection-backprojection-fdk--iterative-reconstruction-matlab-examples) Change the COM port in the Matlab script to your Arduino's current port. Enable or disable CUDA in the Matlab script if you don't have an Nvidia graphics card Center and focus your sample of choice exactly in the center of the camera's frame. Click Run. Wait awhile Turn on Volume 1 Turn on a Rendering setting Threshold the resulting 3D rendering until you get only the bits of the reconstruction that you want I've posted this here in hopes that someone somewhere can gain enjoyment or better yet productive use from having an affordable 3D microscope. If that's you and you have comments or questions please feel free to contact me here in the comments section and I'll do my best to assist. March 21, 2017 Update Initial Setup Today I wrote a quick script in Matlab to capture images from the rig with some success. The image acquisition process for OPT is actually rather simple so the script wasn't hard to write. All you have to do is step the motor, save an image, step the motor, save and image...x200 times per scan. Then it's just a matter of pointing those pictures at a reconstruction program, and finally a rendering program. The reconstruction program I'm using is called NRecon. It's fast, free, and fairly tolerant of most imaging setups with only little pre-processing needed. The output of NRecon will be another several hundred image files: reconstructed layers of a 3D image stack that will be used in the final stage to produce a 3D volumetric body. One of those reconstructed layers can be found attached. This slice is taken from the middle of the nut, which is why two distinct round patterns can be seen in the image. What you're seeing is a badly artifacted 2D slice of the nut as if you were looking down on it from above. The test is crude, but effective. It also represents the worst case scenario for an OPT imager in the form of an opaque reflective subject, so I didn't expect much. But, going forward I have my image acquisition and reconstruction pipeline that I know works. The data from the nut is too scattered to be properly thresholded and rendered into a 3D volumetric body. However, had I gone on to do so I would have used ImageJ, a very versatile and open source image processing suite. (I also use ImageJ for the image pre-processing before NRecon.) Once I get my hands on a good translucent sample and a proper trans-illumination source I'll report back with another test. It begins March 23, 2017 Update Got around to another test, this one using a blob of an amber-like substance. It's much better than the last subject since it's more transparent, however it still has reflections and refractions so it's not the perfect subject. March 1, 2017 Update Turns out trans-illumination works waaaay better for capturing opaque objects. Had a very successful scan today of a small 2.5mm diameter screw. Actual microscope images: https://gfycat.com/BlackNimbleEuropeanpolecat 3D Reconstruction 360: https://gfycat.com/ZigzagShamelessAsianporcupine Another reconstruction of a 2.5mm diameter screw this time done in Matlab rather than NRecon March 18, 2017 Update Finally got around to building an automated acquisition AND reconstruction pipeline that's all in Matlab. So now all it takes is a run of the script and everything is handled for you! There are loads of reconstruction parameters that I still have to play around with, but that'll come in time.
With this file you will be able to print OpenOPTI (A cheap open-source 3D Microscope) with your 3D printer. Click on the button and save the file on your computer to work, edit or customize your design. You can also find more 3D designs for printers on OpenOPTI (A cheap open-source 3D Microscope).