OpenRC Truggy HSP Remix
thingiverse
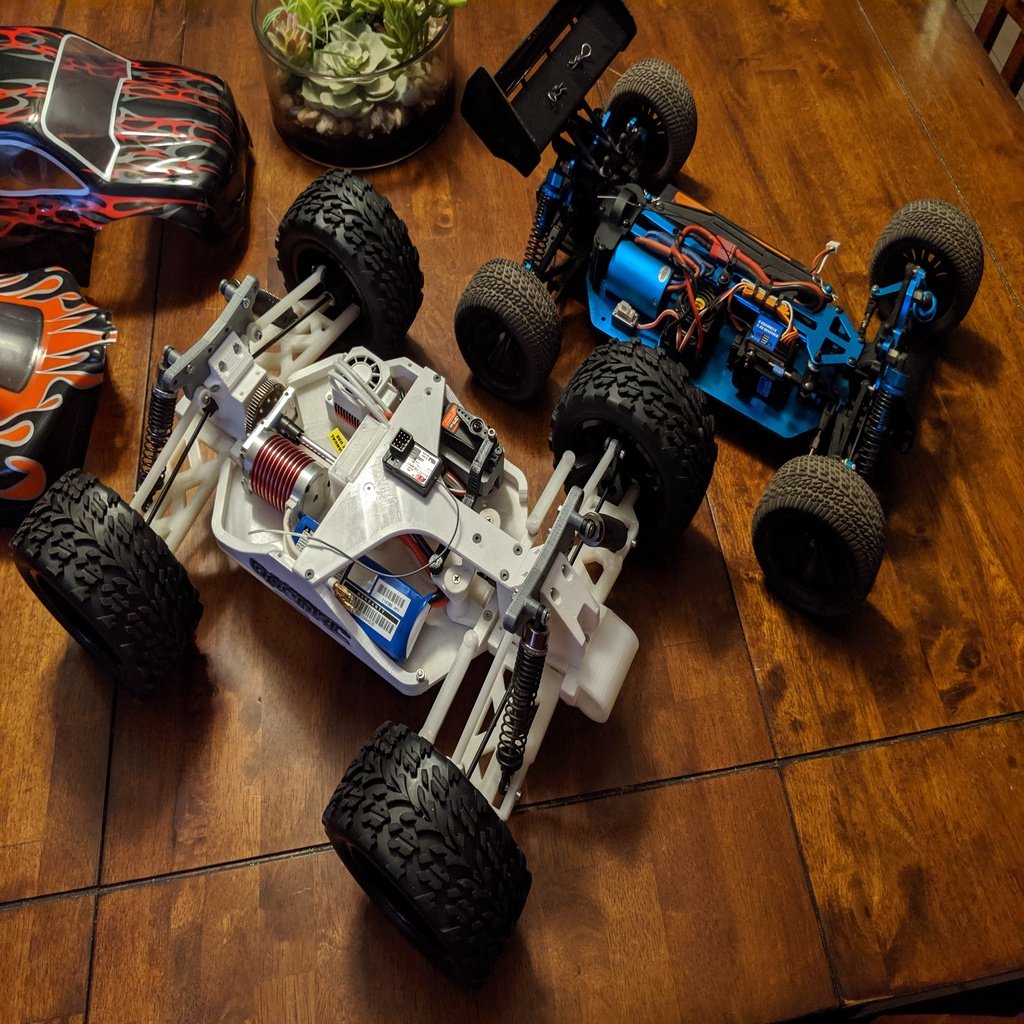
This is a remix of the OpenRC Truggy by Daniel Noree. It uses driveline parts (differentials, motor plate, center gear, dogbones, etc) from HSP RC cars. These parts are inexpensive and available on Amazon and AliExpress. Some of the printed parts are the same as the original Truggy, but most are tweaked to accommodate the HSP components. Everything you will need to print and buy is listed here. Print the following quantity of each part: QTY Part_File (Notes) 1 Chassis_Plate_Front.stl 1 Chassis_Plate_Rear.stl 1 Left_Shield.stl 1 Right_Shield.stl 1 Upper_Decker_Front.stl 1 Upper_Decker_Rear.stl 1 Center_Support.stl 1 Motor_Plate_Spacer.stl 1 Deck_Connector.stl 1 Gear_Guard_left.stl 1 Gear_Guard_Right.stl 2 Body_Holder.stl 1 Bumper.stl 2 Shock_Tower.stl 2 Diff_Housing_Upper.stl 2 Diff_Housing_Lower.stl 4 Wishbone_Big_Part.stl 4 Wishbone_Small_Part.stl 4 6mm_Linkage_75mm.stl (These are used as the upper suspension arms) 1 C-Hub_Left_Front.stl 1 C-Hub_Right_Front.stl 2 Steering_Block_v2.stl 1 C-Hub_Left_Rear_With_Toe-in.stl 1 C-Hub_Right_Rear_With_Toe-in.stl 1 Pivot_Shaft.stl 4 Shock_Spacer.stl 1 Stabilizer.stl 1 Steering_Plate.stl 1 Steering_Part_1.stl 1 Steering_Part_2.stl 1 Servo_Arm.stl 2 6mm_Linkage_55mm.stl (These are used as the steering linkages) 1 Servo_Holder.stl 4 Wheel_Hex_Hub.stl 4 OpenRC_Truggy_Rim.stl 4 OpenRC_Truggy_Tire.stl You will need to purchase these HSP parts: HSP#, QTY, Description, (Notes) 02024, 2, Differential 02030, 1, Front pinion and shaft, (Comes with C clip to hold pinion gear on) 03015, 1, Rear pinion and shaft 03007, 1, Motor plate 04003, 1, Center drive shaft 11184, 1, Main Gear, (64T) 11181, 1, Motor Gear, (11119 is 17T, 11181 is 21T) 02016, 2, Drive Cup 02033, 4, Axle Stub 12007, 4, 100mm dog bone, (Goes by brand HSP or RedCat) You will also need to purchase these parts. I am listing the HSP part numbers, but you may choose to buy other equivalent parts: HSP#, QTY, Description, (Notes) 02055, 4, Nylon Lock Nut M4, (For the wheels. Get the crappy looking black ones, they hold better than the pretty anodized ones) 02038, 13, Ball Head Screw 6mm 02138, 8, Bearing 15x10x4mm, (Sold in packs of 6, one on each wheel, two in each diff) 02139, 9, Bearing 10x5x4mm, (Sold in packs of 2 or 8, one on each wheel, two in each diff, one on the motor plate) 08027, 5, Pin 2x10mm, (one in each wheel and one for the main gear) 06002, 4, Spring and Shock Absorber, (also goes by number 106004) 02053, 4, Body clips 08010N, 4, Wheel and Tire, (Sold in packs of 2, Only buy this if you don't want to print the wheels) No HSP#, 4, Bearing 12x6x4mm (for the Steering. Search for "bearing 12x6x4") No HSP#, 4, Inner Wishbone Pin 3x56mm, (cut from a 300mm rod, search for "3mm x 300mm rod" ) No HSP#, 4, Outer Wishbone Pin 3x31mm, (also cut from a 300mm rod) You will also need to purchase these fasteners: Note: This is all M3x0.5 hardware. That means 3mm shaft with 2 threads per millimeter. CS means countersunk. BH means Button Head. You can also use socket head screws (SCHS) in place of any of the BH screws. The lengths of CS screws are measured from the tops of the heads to the tips of the screws. The lengths of the BH screws are measured from the bottom of the heads to the tips of the screws. Don't ask me why, I don't know. Further down is a list of where each fastener is used. QTY, Description 12 CS_M3X8mm 35 CS_M3X10mm 4 CS_M3x14mm 2 CS_M3x16mm 8 CS_M3x25mm 15 BH_M3X10mm 12 BH_M3X16mm 2 BH_M3X20mm 32 NUT_M3 Even more stuff U need to purchase: Radio and receiver (I like the Flysky FS-GT2) (I also like the Hobby Porter 91803G-VT) Steering Servo (Search for "standard servo") 540 size Motor and ESC (Search for "brushless 540 motor and esc") 2S Lipo battery (Search for "Turnigy 2200mAh 2S 20C Lipo Pack") Charger (Search for "2S LiPo Charger") RC Sticky tape (Search for "Double Sided Clear Servo Tape") Body (I rock an HSP body (of course lol). Search for "hsp 94111 body") Fastener Usage: CS_M3X8: --10 connect the chassis plates to the left and right shields (underneath). --1 connects each upper and lower diff housing together above the wishbone pin holder. CS_M3X10: --8 connect the center support to the upper and lower chassis plates. --6 connect the steering pieces together. --4 connect the rear diff to the chassis plate. --4 connect the servo to the servo holder. --3 connect the servo holder to the chassis plate. --3 connect the 03007 motor plate to the chassis plate. --4 connect the upper deck plates to the left and right shields. --2 conect the front deck plate to the front diff. --1 connects the stabilizer to the front deck plate. CS_M3x14: --2 connect each wishbone pin holder to the diff. CS_M3x16: --2 connect the deck connector to the rear diff. CS_M3x25: --2 connect each wishbone small part to the big part. BH_M3X10: --4 connect the front diff to the chassis plate. --2 connect each body mount to the shock tower. --1 connects the servo arm to the servo horn. --2 connect the bumper to the chassis plate. --2 connect each upper and lower diff housing together. BH_M3X16: --2 connect each shock tower to the diff housing. --1 connects each shock to the shock tower, through the shock spacer. --1 connects each shock to the wishbone. BH_M3X20: --2 connect the deck connector to the 03007 motor plate, through the motor plate spacer. NUT_M3: --15 are used in the front assembly. --15 are used in the rear assembly. --2 are used to attach the servo arm to the servo horn (double nutted together on the BH_M3X10 screw). Good luck, let's fire up them printers! Links to some videos of my Truggy! https://youtu.be/A5M8prYqbYM https://youtu.be/mmi5klbRuJ0 Edits: 2020.05.23: What? I finally added a fastener list? Yaay! Also reorginazed the description for (hopefully) better clarity. 2020.04.30 Version 2.0! Updated the suspension components based on my drive-break-redesign cycles. Here is what I changed: Wishone: New two piece design does not use the pressed-in 2mm outer pin. instead it is a captive 3mm pin,like the inner wishbone pin. this should be stronger and also much easier to service in the field. The new wishbone is also thicker and you only have to replace half if it breaks. Also it centers the C-hubs on the wishbone, which increases the wheelbase and makes the dogbone move more smoothly through the suspension travel. C-hubs: new style mates to the new wishbone and to has a 6mm balljoint at the top instead of the M3 screw. The rears also feature a 3 degree toe-in which looks a little goofy but really increases high speed stability. No more constant fishtailing! Steering linkage: Slightly increased the length to 55mm due to the steering block moving slightly forward. Version 2.0 upgrade notes: You should totally upgrade to version 2.0 if you already printed the original version. Handles way better! This new version can be retrofitted to an existing V1.0 by printing/installing these new parts: Wishbone Big Part (4x) Wishbone Small Part (4x) 6mm Linkage 55mm (2x replaces the steering linkages) 6mm Linkage 75mm (4x replaces the turnbuckles) C-Hub, Left Front (1x) C-Hub, Right Front (1x) C-Hub, Left Rear, With Toe-in (1x) C-Hub, Right Rear, With Toe-in (1x) ...also you will need 8x more of the 02038 6mm ball head screws and you will need to make 4x Outer Wishbone Pin 3x31mm. 2019.11.27: Wishbone_v3 Changed the wishbone print helpers again to use less plastic and detach easier 2019.11.17: Wishbone_v2 Steering_Block_v2 C-Hub_Rear_v2 Changed the bearing pocket sizes in the steering block and rear C-hub based on feedback from jritt187 (thanks!). They were oversized at 10.6mm and 15.6mm. Now they are 10.2mm and 15.2mm. Also added print helper to the wishbone and reoriented it to print like the original Truggy wishbone.
With this file you will be able to print OpenRC Truggy HSP Remix with your 3D printer. Click on the button and save the file on your computer to work, edit or customize your design. You can also find more 3D designs for printers on OpenRC Truggy HSP Remix.