Optical Center Punch & Hole Ruler (using 8D Nails)
prusaprinters
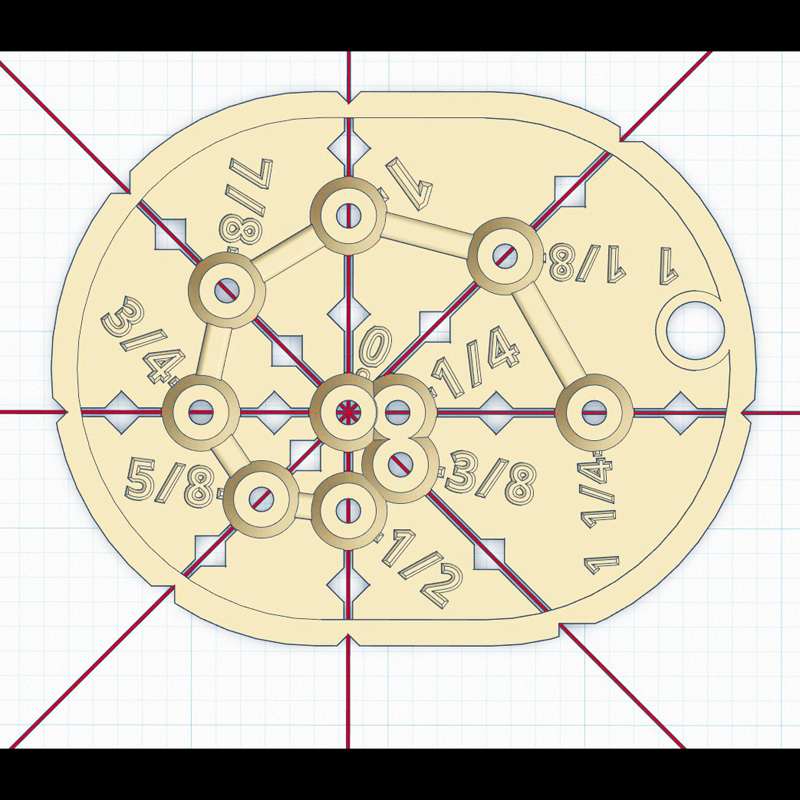
<p>This is an inexpensive visual center punch that lines up with measurement lines and makes it fairly easy to strike accurate, centered punches. It also has additional ruled posts that permit you to strike additional spaced punch marks with 1/4, 3/8, 1/2, 5/8, 3/4, 7/8, 1, 1 1/8, 1 1/4, 1 1/2, 1 3/4 or 2" spacings. The post shafts are designed to fit a standard 8D nail, which is used as the actual punch (or two nails if you want multiple holes that are spaced accurately).</p> <p>To use the tool, just mark your material with cross hair measurement lines, align the tool with the cross hairs (making sure the base is flat to the surface), insert the 8D nail and tap it with a hammer to strike the marking. If you need an additional hole with one of the above spacings, keep the first nail in the first center punch indentation and punch a second nail at the desired spacing (this is harder to describe than it is to actually do). For the three wider spacings, you will need to re-center the nail in the first indentation, but in a wider post (Ex. 3/4" post to 1/14" post = 2" spacing).</p> <p>Note: the actual printed version in the photos has the raised fraction text painted yellow to aid with visibility (I need reading glasses); also, I added reinforcements between the posts to the included 3D object file to help make the base more rigid, without using a lot of additional filament.</p> <p>FYI, I was looking at a video showing how cool optical center punches are (for those of us who are occasionally a little OCD), but they are expensive. This got me thinking about designing some type of center punch that makes aligning the holes easier, but which is not expensive. This is what I came up with. I started with just the one center punch with cross hairs, but then it occurred to me that by adding additional measurement posts, I could make a combination center punch and hole ruler. I have no idea if anything similar exists. It is kind of an experimental tool.</p> <h3>Print Settings</h3> <p><strong>Printer Brand:</strong></p> <p>Creality</p> <p class="detail-setting printer"><strong>Printer: </strong> <div><p>Ender 5</p></div> <p><strong>Rafts:</strong></p> <p>Yes</p> <p class="detail-setting supports"><strong>Supports: </strong> <div><p>Doesn't Matter</p></div> <p><strong>Resolution:</strong></p> <p>0.16</p> <p class="detail-setting infill"><strong>Infill: </strong> <div><p>100%</p></div> <p><strong>Filament:</strong> Hatchbox PETG Black</p> <p><br/> <p class="detail-setting notes"><strong>Notes: </strong></p> </p><div><p>The raft helps the base to be more flat. I printed the example at .2 resolution, but I think it would look nicer at 1.6.</p></div> Post-Printing ============= <p>The holes for the nails are designed to be fairly tight in comparison to the nail shaft diameter. Most 8D nails have stamped, chiseled tips that are a little wider than the shaft. Carefully file or sand the nail tip to make it sharp, and most importantly, centered -- if the tip of the nail is not centered, it will not punch accurately. Also, make sure the nail shaft is straight; a crooked nail will bind in the tool.</p> <p>Some or all of of the post holes may be tight. just carefully work with them until the nail fits through without too much effort, but not so easy that the nail can jiggle or shift when in the shaft.</p> </p></p></p> Category: Hand Tools
With this file you will be able to print Optical Center Punch & Hole Ruler (using 8D Nails) with your 3D printer. Click on the button and save the file on your computer to work, edit or customize your design. You can also find more 3D designs for printers on Optical Center Punch & Hole Ruler (using 8D Nails).