Orbiter + HeroMe Gen 5 +V6 for Tronxy X5SA-400
thingiverse
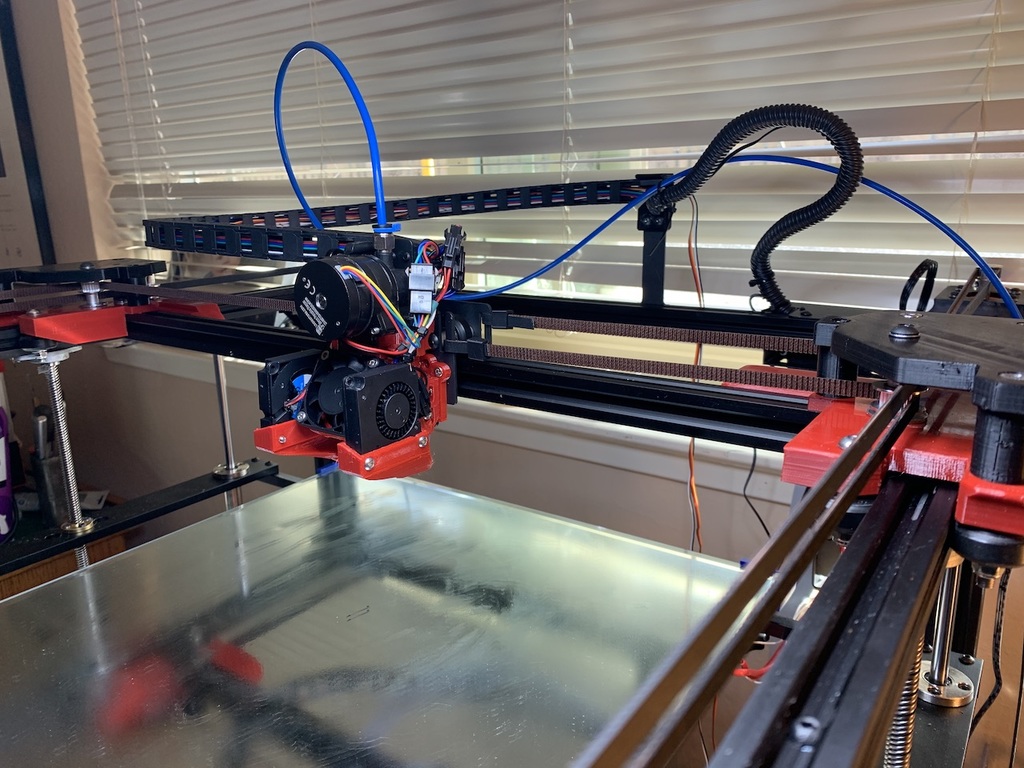
This is a V1 "Thing" or adding a Orbiter Extruder to a Tronxy X5SA-400 (late 2020 model) with a E3D V6 hot end. I use tinkercad to create this design. You can download a copy to tweak from: https://www.tinkercad.com/things/bySqdVnD5nn-hero-me-x5sa-and-orbiter-v4 For HERO ME GEN 5 piece: 1. I revised a prior X5SA/Hero Me Gen5 mounting bracket from: https://www.thingiverse.com/thing:4742927 When I tried the V6 bracket on my late model X5SA-400 (non-pro), the holes did not match up. This bracket matches the holes in my gantry plate. But it was close enough so it could have been just my printer was not fully tuned up. You should try both brackets and use the one that matches your gantry plate. 2. I also remixed the Base 3 (V6/V6 Clone direct drive. But it was only a very minor change: I added a pre-drilled hole in the top of the Base 3 to attache the Orbiter mounting plate. You can obviously use your own and drill your own hole. 3. I needed to trim down and extend the travel for one of the bltouch mounting brackets. 4. From the original from HeroMe Gen 5 collection (https://www.thingiverse.com/thing:4460970) you will need to print: a. V6 retaining collar b. V6 air dam c. 4010-Lightweight Duct *FORWARD* d. Fan guard if you want... The mounting plate is used to attached the Orbiter to the Base 3 and the Gantry. There are two holes in the front that take 40mmx3m cap screws. These go through unthreaded holes in the gantry and are secured with nuts. Order of assembly: 1. Prep Base 3 as usual (secure nuts for Ducts and mounting bracket). You might want to thread the "extra" whole on top of Base 3 for a 3M screw. 2. Install V6 and attach with collar. 3. Attach to mounting bracket. 4. Attach to gantry plate. 5. Attach the bltouch offset mount to the Orbiter mounting plate. 6. Pre-install two cap screws in the Orbiter mounting plate facing *UP* (believe these are 15mmx3M) 7. Sit Orbiter mounting plate on Base 3. Put the two 40mm cap screws in, but don't secure. 8. Thread the top cap screw thru the mounting plate and start the thread into Base 3. 9. Secure the 3 screws of the Orbiter mounting plate. 10. Run all your wires. Of particular concern is the V6 heater cartridge and thermistor wire. 11. Now mount the two fan ducts. At this point, before you install the fans themselves, you should adjust the level of the ducts as per the Hero me instrutions. 12. Mount the fans and run their wires too. 13. Mount the bltouch to the mounting bracket. 14. Attach the bltouch mounting bracket to the offset mount that you previously secured to the Orbiter mounting plate. 15. Adjust the bltouch level per their instructions. My measurements for the bltouch offsets were -40, -7, but this was through direct measurement so could be off +/- 1mm.
With this file you will be able to print Orbiter + HeroMe Gen 5 +V6 for Tronxy X5SA-400 with your 3D printer. Click on the button and save the file on your computer to work, edit or customize your design. You can also find more 3D designs for printers on Orbiter + HeroMe Gen 5 +V6 for Tronxy X5SA-400.